Shop Progress Pics

Status
Not open for further replies.

Douglas Robinson

Doug Robinson
Corporate Member
More Progress

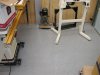
While waiting to wire the outlets, I took advantage of the unseasonably warm weather and painted the floor using the Rustoleum Epoxy paint. It worked as advertised. If I had it to do over again I would skip the colored flecks.

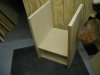
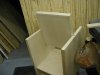
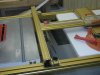
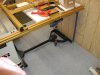
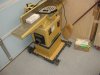
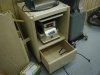
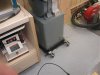
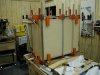
I have also edge-banded the flip-top cart, added castors and built the top. I still have to attach it to the carcass, but I didn't want to take the PC router out of table right now.

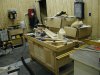
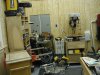
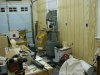
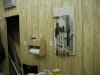
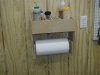
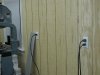
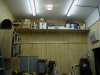
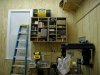
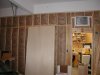
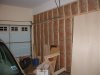
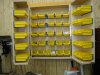
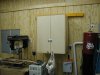
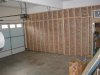
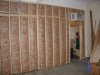
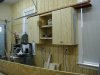
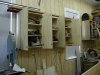
I built a quick detachable pegboard unit in about 30 minutes, pics to follow. Attached are shots show the shop with a lot of stuff moved in. Things will change as I build permanent cabinets. I think I am going to need storage shelves up high for infrequrntly used items.

Have a happy and safe holiday and new year.

Doug
 

Attachments

  • P1010031.jpg
    P1010031.jpg
    92.2 KB · Views: 190
  • P1010032.jpg
    P1010032.jpg
    102 KB · Views: 204
  • P1010033.jpg
    P1010033.jpg
    144.5 KB · Views: 183
  • P1010034.jpg
    P1010034.jpg
    124.9 KB · Views: 190
  • P1010035.jpg
    P1010035.jpg
    155.3 KB · Views: 187
  • P1010036.jpg
    P1010036.jpg
    137.2 KB · Views: 190
  • P1010037.jpg
    P1010037.jpg
    141.2 KB · Views: 219

sawman

New User
Albert
Doug your shop is looking great. Plenty of overhead lights (seems like you can never have to many) and windows for natural light (very helpful when applying finish). Covering the backwall with paneling versus sheetrock repair was very good idea. I used OSB for the walls inside my shop and painted everything white (the more light the better it is). I opted for no automatic door openers, it is wired for them, but door rails get in the way as it is (you can use the rails for hanging small objects for finishing).
When I constructed my garage we planed an apartment above it to be used in the future, but I completed the entire project and wish I had not (I try to be polite to my on property neighbor, you know how noisy the dust collector and table saw or planer can be). Although the rent is paying for the building, I would never do that again.
Once again, finishing the back wall with paneling versus sheetrock is a great move on your part. When I finish sheetrock I use the 1/3 method, 1/3 on the wall, 1/3 on the floor and 1/3 on me. Makes for a great job not including the sanding.

Merry Christmas,
Albert, Al or whatever
 

Douglas Robinson

Doug Robinson
Corporate Member
More progress!

Mike the electrician called today and came over 2.5 hours later ...I've got the power!!!!:-D All outlets up and running, and the AC/Heater works great! After three years of limited outlets and LOTS of extension cords I am in hog heaven!

Travis Porter came by last night for a visit. I was glad to bounce ideas off him. I am planning on taking one of his suggestions and moving my compressor into the garage and running a line through the wall. That way it wont be in the way and the noise will be limited.

I also expect he'll be right about the placement of my accessories around the shop. There's gonna be alot of rearrangement.

I have almost finished the flip-top cabinet. All that is left is to attach the tools. BTW Travis I fixed the sticking drawer. The bottom of the drawer was not flush with the sides and was pushing the runners outward causing the binding. one run of a flush trim bit and voila perfect fitting drawer!

With Travis's help I got the table saw onto its new base. Today I corrected the set of the saw so that it will fit and it turns out I need another extension wing to the saw.

Pics to come.

Doug

P.S. T I hope the cherry ply worked out.
 

Douglas Robinson

Doug Robinson
Corporate Member
Pics as promised

Pic 1 is of a glue/paper towel rack I made from palns in Wood magazine. I added spacer at the bottom so that the rack would not sag towards tohe wall at the bottom.

Pic 2 is the glue rack and a detachable pegboard I through up to help me organize myself. Don't know if it is staying.

Pic 3 is two of the live outlets on the outside wall. Hopefully the next time you see this wall there will be cabinets between the windows.

Pics 4 and five show the gap in the table saw where the 2nd wing belongs. Pic 5 also shows the mobile base. Got from Amazon for 127.99 with free shipping.

Pic 6 is the joiner on the mobile base that used to be under the saw.

Pics 8 and 9 show the flip-top cart and (band saw with a mobile base). The tools still have not been mounted on the cart. I need to make a cardboard mock up of the OSS to see if it will fit as there is only an inch or so of clearance.

Well lot to still to do and I don't know where to start. I have figured that in a one car garage mobility is key.

Let me know what you think and any suggestions you might have.

Happy new year :drunken_s ,

Doug
 

Attachments

  • Shop 12-30-06 002.jpg
    Shop 12-30-06 002.jpg
    131.5 KB · Views: 189
  • Shop 12-30-06 001.jpg
    Shop 12-30-06 001.jpg
    117.3 KB · Views: 202
  • Shop 12-30-06 003.jpg
    Shop 12-30-06 003.jpg
    108 KB · Views: 199
  • Shop 12-30-06 004.jpg
    Shop 12-30-06 004.jpg
    104.8 KB · Views: 196
  • Shop 12-30-06 005.jpg
    Shop 12-30-06 005.jpg
    143.4 KB · Views: 192
  • Shop 12-30-06 006.jpg
    Shop 12-30-06 006.jpg
    124.2 KB · Views: 188
  • Shop 12-30-06 008.jpg
    Shop 12-30-06 008.jpg
    114.5 KB · Views: 182
  • Shop 12-30-06 007.jpg
    Shop 12-30-06 007.jpg
    127.9 KB · Views: 188

Douglas Robinson

Doug Robinson
Corporate Member
Things Keep Movin'

What I have done since my last post:

1. I moved my sotrage shelve up onto the wall to clear up some scarce floor space.

2. Built and installed storage shelves along the top of the back wall about 2' from the ceiling. This should not (hopefully) interfere with the lighting.

3. Started build a parts cabinet along the lines of the cabinet shown on page 28 of Shopnotes Issue 85.

4. Insulated most of the partition wall. Wouldn't you know it, I was about 8 feet shy of enough to finish.:-(

Finally, I wanted to buy materials for the parts cabinet, a pair of wall cabinets and a wall bench. I got the van emptied out and drove to the BORG. Wouldn't you know it. It closed early for 1/1/07! :BangHead: I went across the street to the rival BORG and it to had closed early :BangHead: :BangHead: . I went home loaded up the van again and went to sleep. Maybe tonight....

Pics to follow tonight.
Happy, health New Year:wav:

Doug
 

Travis Porter

Travis
Corporate Member
Re: Things Keep Movin'

That sucks. Get ready to go and stores are closed.

It is coming along well I will give you that. Good light and lots of receptacles are definitely a plus.
 

Douglas Robinson

Doug Robinson
Corporate Member
Pics I mentioned earlier today Pics

Here are four shots.


1 is the upper back wall stoarge shelf. I put my D4, Sawsall HVLP sprayer, liquids and other less-frequently used stuff there.

2. is a pic of the two open shelved storage cabinets I have had for a long time. I mounted them on french cleats and ran the power line for the air cleaner between them.

3 and 4 are the insulated parition wall (minus some spots around the doorway.) Next shot of this will hopefully be a sheetrocked and mudded wall.

Doug
 

Attachments

  • Shop 1-2-06 001.jpg
    Shop 1-2-06 001.jpg
    116.6 KB · Views: 182
  • Shop 1-2-06 002.jpg
    Shop 1-2-06 002.jpg
    133.2 KB · Views: 180
  • Shop 1-2-06 003.jpg
    Shop 1-2-06 003.jpg
    110.2 KB · Views: 200
  • Shop 1-2-06 004.jpg
    Shop 1-2-06 004.jpg
    106.6 KB · Views: 186

MikeH

New User
Mike
Re: Pics I mentioned earlier today Pics

It's looking real good Doug. Keep up the good work.
 

Travis Porter

Travis
Corporate Member
Re: Pics I mentioned earlier today Pics

I bet it felt good to get all that stuff put away. I see you mounted the storage cabs. I think that was a good idea.

What's next?
 

Douglas Robinson

Doug Robinson
Corporate Member
I started the parts cabinet. It will have 56 bins inside. I cut most of the pieces tonight. Despite my detailed plans and measuring many times, two of the pieces are 1/2 inch short (the sides)..:BangHead: So I called it a night and will cut the front and back down a 1/2 inch so they are all even. (reproducing the rabbit I will be cutting off in that half inch, and then dry fit and glue it.

Then I cut it in half widthwise, and cut one of those halves in half length wise. Attching hpiano hinges follows. I will then mount the sotrage bin supports inside, Add knobs and mount omn the wall w/ french cleats.

Doug
 
Last edited by a moderator:

Douglas Robinson

Doug Robinson
Corporate Member
Tonight,...so far...

I glued up the panels for the parts cabinet. The first pic is proof you can never have too many clamps.

The second pick needs a little explaining. Travis P. suggested moving my compressor into the garage and running a pass-through through the wall. This would clear up the limited floor space and reduce the noise. I figure it would be easier to run it now before the sheetrock goes up. So I drilled a 1 1/4" diameter hole and was looking for a way to secur some pipe. The compressor hose fits fine BTW.

I was at the BORG and saw a replacement sink drain tube. If fit perfectly and comes threaed with its own threaded locking ring. Well, I thought it was creative.:lol: .

Doug
 

Attachments

  • P1010035.jpg
    P1010035.jpg
    135.8 KB · Views: 203
  • P1010036.jpg
    P1010036.jpg
    138.8 KB · Views: 190

Travis Porter

Travis
Corporate Member
Actually, that is pretty cool. That way you can get other "goodies" through when you need to.

Nice to see you getting some shop time in with power and all hooked up.
 

Douglas Robinson

Doug Robinson
Corporate Member
Update

I am waiting on the guys who are coming to do the drywall this AM. I am posting some befor pics.

In addition I have completed my parts sorage cabinet and my wall cabinets. Pics included. I am working on the bench for under the wall cabinets and hope to have them done by the end of the week.

Doug
 

Attachments

  • P1010043.jpg
    P1010043.jpg
    128.8 KB · Views: 176
  • P1010042.jpg
    P1010042.jpg
    113.5 KB · Views: 187
  • P1010037.jpg
    P1010037.jpg
    123.8 KB · Views: 184
  • P1010038.jpg
    P1010038.jpg
    144.1 KB · Views: 181
  • P1010039.jpg
    P1010039.jpg
    113.3 KB · Views: 174
  • P1010040.jpg
    P1010040.jpg
    125.1 KB · Views: 185
  • P1010041.jpg
    P1010041.jpg
    113.4 KB · Views: 181

NZAPP1

New User
Nick
WOW that is coming along nicely:icon_thum I like the parts storage cabinet where did you get the bins and mounting track?
 

Douglas Robinson

Doug Robinson
Corporate Member
I modified a Shopnotes plan and the bins and track came from the BORG beginning with a "L".

BTW the cabinet is my first and last project made from Sandeply!

Doug
 

dancam

Dan
Corporate Member
Doug,

You've really made a super nic e shop for yourself.:eusa_clap :eusa_clap :eusa_clap
 
Status
Not open for further replies.

Premier Sponsor

Our Sponsors

Top