Anyone used a pantograph style carving duplicator?

Status
Not open for further replies.

CarvedTones

Board of Directors, Vice President
Andy
I am not thinking of mass producing carvings; I am thinking about carving designs on scrap and transferring the roughed out carving to an instrument and then doing the detail by hand. Anyway, I came across this carver's pages on his pantograph:

http://www.dust-n-shavings.com/pantograph/howItWorks.htm

and then I purchased a plan on eBay for this one:

carver1.jpg


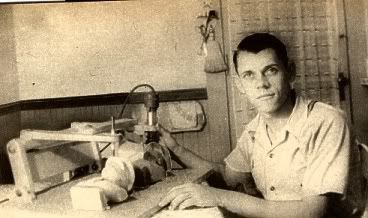
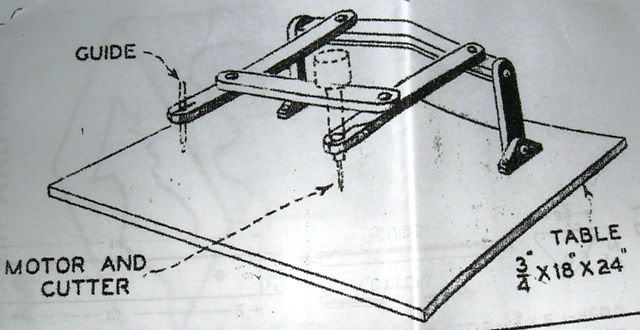
That's the listing picture. I think it purposefully obscures a lot of detail because there isn't much to it, but I figured it was worth $8 to have some instructions and dimensions to work with. I am pretty sure it is just a reprint of an old article, but I can't find it anywhere and the seller claims to hold the copyright. There was also a picture of the guy with the finished bust and it looks pretty good.

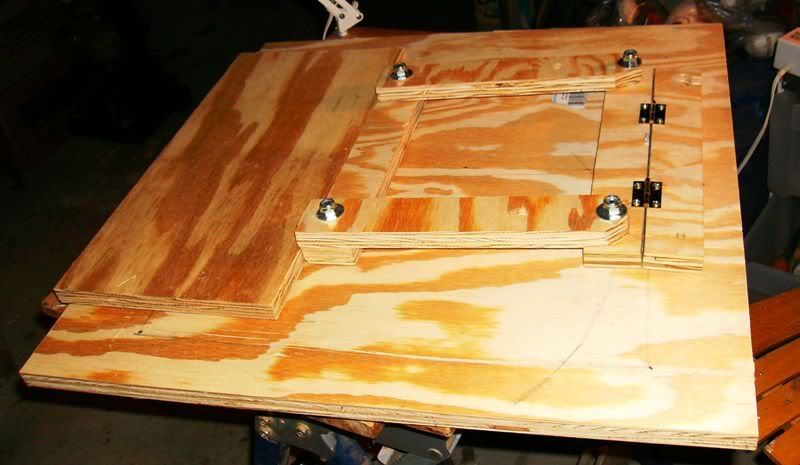
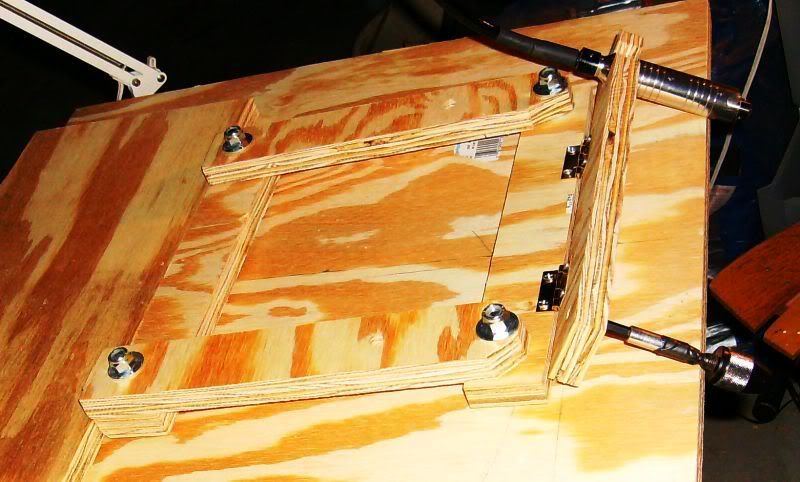
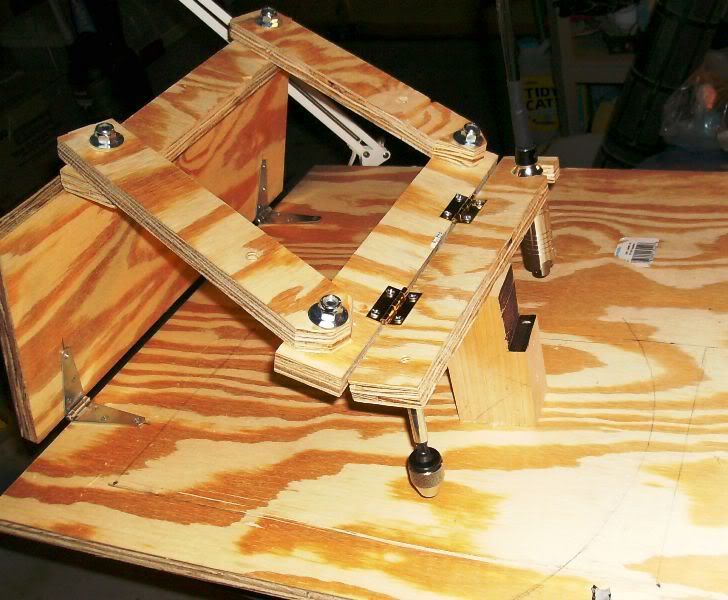
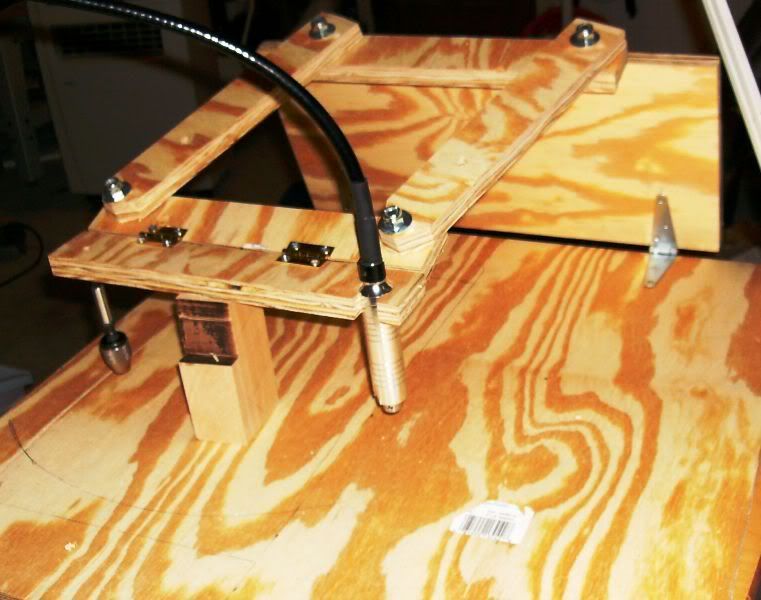
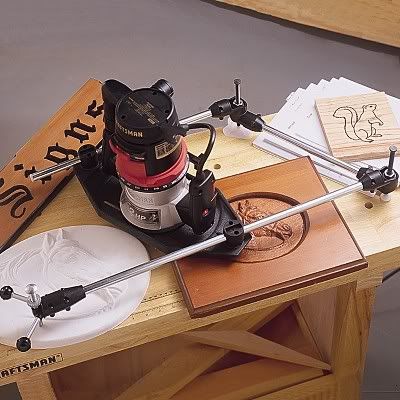
Anyway, I am curious if others here have any experience with a pantograph style. What I have gleaned from searching and reading is that are not quite as acurate as the CopyCarver wheel and rail type, but are fine for rough outs, aren't quite as sturdy and may need repair/replacement more often, but take up significantly less space and are easier to build. Those are big postives for me; all I want is roughing out and only occasionally.
 

ccccarving

New User
Charles
Hello Andy,
I've never used one, and I belong to Tarheel Woodcarvers. I checked with some of the members and They have'nt. I wish I could help.

Charlie
 

CarvedTones

Board of Directors, Vice President
Andy
I really need to develop my carving skills better so I am more confident that I won't booger it up. When your carving blank is an instrument you already have a lot of time in, you can't easily accept tossing it aside if you screw up. I think I understand why so many fine instruments have only the scroll carved. It requires talent to make a scroll look really good, but you can lay it out with straight radius lines and cut a lot of it with a backsaw, so even many of the old masters were making rough outs and only carving the final details.

EDIT - so as not to confuse you, I am not thinking of using that to make scrolls; but rather ornamental carvings on the sides and back of carved body instruments. This sort of thing (not my work and he did it by hand):
make60.jpg
 

Travis Porter

Travis
Corporate Member
I have used a pantograph for copying drawings that I guess you could call and accordian style and it was the pits to put it nicely. I think I remember seeing a couple in some of the woodworking catalogs (maybe Rockler or Woodworkers Supply) that used the same methodology I described above. Still, it doesn't seem to me like it would work well with the accordian style. I would think you would need a solid shaft and some way to move along the x, y, and z access smoothly and consistenly.

JMTCW
 

CarvedTones

Board of Directors, Vice President
Andy
I did notice one thing odd about both models (the one I linked to and the one in the B&W picture) - the cutting tool is on the right. I should email the guy whose site I linked to and ask him about it. It looks like you operate the carving tool constrained by the tracing tool instead of operating the tracing tool and forcing the cutting tool to follow. I may be reading too much into it, but in the B&W picture, if he really was using it and paused to look at the camera, he was operating the carver with his right hand.

EDIT - I emailed the carver with the DIY one I linked to in the first post (Paul Aydelott) and asked whether he traced or carved. His answer was some of both:
Andy,

Yes and No. It would not matter which side you placed the router on--left or right. I probably have the fingers of one hand gently guiding the stylus over the original carving and the other hand applying the pressure to move the router left, right, up or down. It's not complicated.

Paul

Andy Barnhart wrote:
>
> I am thinking of building something similar. I just bought “plans” on
> eBay that I suspect are just reprints of an old article, but should
> give me something to start from. Anyway, what I wondered is whether
> you trace with the stylus (the old drill) and force the cutter to
> follow or whether you carve with the cutter and have the pantograph
> restrict your movement to the proper locations/depths. The reason I
> wondered is noticing your cutter is on the right and also in this photo:
>
> http://i43.photobucket.com/albums/e396/arbarnhart/carver1.jpg
>
> from the “plan” description on eBay it looks like the guy is operating
> the carver rather than pushing the stylus around.
>
> Thanks!
>
> Andy
>


bitbight

New User
Ray
I know Sears has a router pantograph but I believe it is limited in its 3D capabilities. It might be something you might be able to duplicate and modify for your uses.
 

jack briggs

New User
jabguit
I use a Terrco Marlin 624 for roughing out guitar tops. It does have its idiosyncrasies, but saves me about 10 hours per instrument.

7013%20007.jpg


7013%20008.jpg


Cheers,
 

CarvedTones

Board of Directors, Vice President
Andy
That's an interesting setup. I found a picture of someone else's:

Picture095.jpg


Kind of a hybrid - a pantograph on rails. I like that.
 

CarvedTones

Board of Directors, Vice President
Andy
I know Sears has a router pantograph but I believe it is limited in its 3D capabilities. It might be something you might be able to duplicate and modify for your uses.

They sure do:

searpantograph.jpg


It is only $55, but if you take a look:

http://www.sears.com/shc/s/p_10153_12605_00925187000P

and click on Reviews it only gets 2.3 stars out of 5 on average. This guy is a really big fan:
The worst tool I have purchased in the last 30 years. Device is unstable and unrelable. It will not produce acceptable lettering. The tool did not follow the stylus and the result was firewood. Beware! The horsehead shown in the ad could NOT be produced on this tool.
Some people making signs with it seemed pleased though.
 

Travis Porter

Travis
Corporate Member
That is a pantograph! It looks like the real deal compared to the Sears model.

Funny, that horsehead in the ad looks sanded, stained, and finished with a top coat.

Creative advertising at its best.
 

CarvedTones

Board of Directors, Vice President
Andy
That is a pantograph! It looks like the real deal compared to the Sears model.

Funny, that horsehead in the ad looks sanded, stained, and finished with a top coat.

Creative advertising at its best.

Also notice the Sears one is a reducer, not a duplicator. I think only the top elbow on it is anchored.

I will have to say that Sears is showing some honesty in user reviews, though. I think a lot of vendors might have deleted the one I quoted (they are within their rights if they suspect it may be planted or uses inappropriate language and I think that is often construed to mean overly negative).
 

bitbight

New User
Ray
Andy,

I have one of the Sears pantograph although I have not used it in ages. If I recall it is adjustable to enlarge, reduce, or duplicate.
 

CarvedTones

Board of Directors, Vice President
Andy
Andy,

I have one of the Sears pantograph although I have not used it in ages. If I recall it is adjustable to enlarge, reduce, or duplicate.

This is second hand information; I couldn't find a maual on line. In this thread:
http://www.cnczone.com/forums/showthread.php?t=21653
in post #6 someone says it will only do reducing but the amount is adjustable.

As pictured, with the stylus further from the elbow than the router, it would reduce. If there is a way to get the stylus between the router and the elbow, then it would enlarge. My guess is that the reduction is a significant advantage in engineering the thing as it gives you leverage - the router is moved a shorter distance than the stylus so it is easier to move the stylus than the router. Enlarging, it would be harder to move the stylus than the router.
 

CarvedTones

Board of Directors, Vice President
Andy
I got "the plan" in the mail. It is an old magazine article, but even having the title and author's name (Wood Carver of Simple Design by Alfred Brosseau) Google still turns up nothing, so I don't feel too bad about having to pay $8 (with "shipping") for it. It is a very simple design:

pantograph.jpg


and it has a dimensioned drawing of all parts with instructions inside. I am not sure the seller really has a legit copyright (doubt it), but just the same I am not publishing those details on the net.

It calls for 3/4" stock and uses tight fitting carriage bolts; I actually expect it will be quite stable and reasonably accurate. Folds flat for storage (four of a small shop guy's favorite words :) ).

Yeah, I think I will make one...
 

Joe Scharle

New User
Joe
Andy,

I have one of the Sears pantograph although I have not used it in ages. If I recall it is adjustable to enlarge, reduce, or duplicate.

Same here: got one about 30 years ago to make a bunch of pineapple inlays and haven't used it since. If IIRC it was only for 2D.
 

CarvedTones

Board of Directors, Vice President
Andy
Same here: got one (Sear's router duplicator) about 30 years ago to make a bunch of pineapple inlays and haven't used it since. If IIRC it was only for 2D.

Yeah, it looks the Z axis is pretty limited and I suspect the router would tilt left/back pushing the bit to the right/front if you raised the stylus very high.
 

CarvedTones

Board of Directors, Vice President
Andy
I will hopefully post pictures tonight after a trial run; I built one loosely based on the plans I got that will use my hanging motor rotary carver and has a chuck on the stylus side. It should do up to 10 x 17 shallow and as depth increases the 17 will decrease to maybe 1' or so. Anyway, the reason for this post isn't just pregloat, but also to give anyone with experience with the thigs I chance to offer some last minyte tips - like the first thing to try (pattern, bit, whatever)...

More later; gotta take kids to the pool for last day before closing.
 

Gotcha6

Dennis
Staff member
Corporate Member
I can't see any way the stylus & cutter can move except in a complimentary arcing motion unless the vertical suppport rods also pivot. Is this the case, because if it isn't, there doesn't appear to be any way to move the device independently in either x or y axis? We all look forward to some results.
 

CarvedTones

Board of Directors, Vice President
Andy
I can't see any way the stylus & cutter can move except in a complimentary arcing motion unless the vertical suppport rods also pivot. Is this the case, because if it isn't, there doesn't appear to be any way to move the device independently in either x or y axis? We all look forward to some results.

Great minds think alike and just by coincidence, so do you and I. :gar-La;

One of the things I changed in my loosely based design was to move the cross pieces to the ends and add a hinged piece there to support the tool and stylus so I can keep them vertical.

I got back from the pool and I was checking to see if anyone gave me some hot tips, but I did take a few pics of it.

First, one of my favorite things about it (assuming it works well in testing, but it feels pretty solid so I am confident) is the way it folds flat. It is 2'x2' and about 3" in the high spots:
pantograph1.jpg


Here is the handpiece and stylus chuck both mounted:
pantograph2.jpg

one thing I like about the idea I came up with to address the arcing issue you mentioned is that the piece where they are attached is a separate small 2" x 12" piece that can easily be replaced if I find I need to use a different tool or whatever. Just because of how the cuts worked out, I already have a spare blank cut.

OK, here is a picture of it up fairly high with the tool vertical:
pantograph3.jpg

and then moved in all 3 axis a bit with the tool still vertical:
pantograph4.jpg


One last picture, which is the same as the previous one, but from the front:
pantograph5.jpg


I need to go find something simple to try copying and a blank to copy it to. I will hopefully post pictures of that later.
 

Gotcha6

Dennis
Staff member
Corporate Member
Me likee. I'd put a piece of thin UHMW plastic between the plywood mating surfaces of the parallelogram for a better glide. The nylock nuts should keep the joints snug, otherwise you'll get a distortion on the z axis. I'm sure you know to use a follower point with the same profile as your cutter.
C'mon now, show us some results soon!
 
Status
Not open for further replies.

Premier Sponsor

Our Sponsors

LATEST FOR SALE LISTINGS

Top