
tablesaw
-
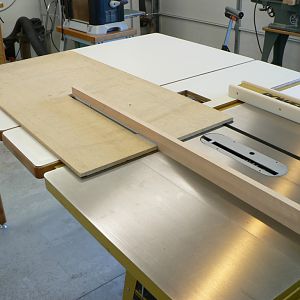
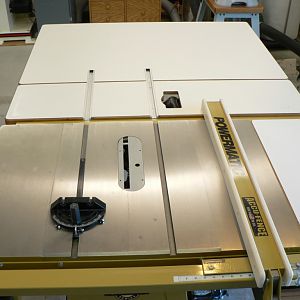
Setup for Cutting the Miter Slots.
This picture was taken after-the-fact, so you need to use your imagination to understand how this works. Install the table on temporary riser blocks (this is necessary to allow clearance for the router bit between the table saw and extension table). Temporarily place the Aluminum T-Track in...- KC7CN
- Media item
- 64a fold-up outfeed powermatic table tablesaw
- Comments: 0
- Album: PowerMatic 64A Outfeed Table
-
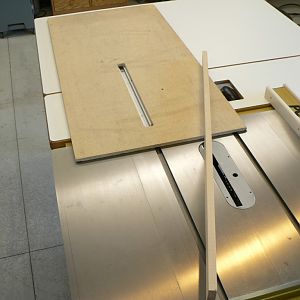
Miter Gauge Template
Location of the two T-slot Aluminum Miter gauge tracks must be dead on. The gap between the miter bar and the track is 0.005" on either side. The template was made for use with a top-bearing 1/4' height template bit.- KC7CN
- Media item
- 64a fold-up outfeed powermatic table tablesaw
- Comments: 0
- Album: PowerMatic 64A Outfeed Table
-
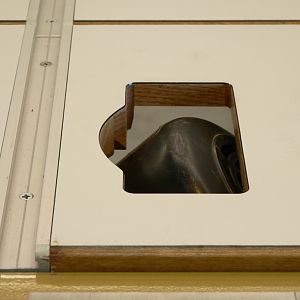
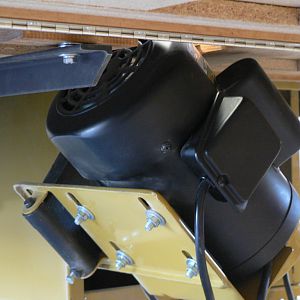
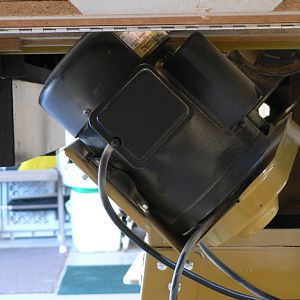
Motor Access Hole
Table saw blade fully retracted, tilted to 45 degrees.- KC7CN
- Media item
- 64a fold-up outfeed powermatic table tablesaw
- Comments: 0
- Album: PowerMatic 64A Outfeed Table
-
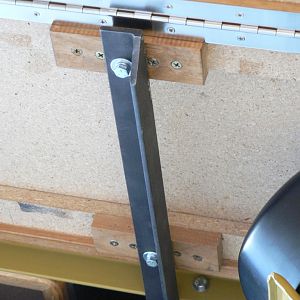
Table Support Detail
Angle iron attached to mounting block with 1/4'' bolt and T-nut. Mounting blocks are screwed, and glued, to table. Top is 5/8'' particle board covered with laminate. Underside of table is reinforced with 5/8'' x 1-1/2'' particle board.- KC7CN
- Media item
- 64a fold-up outfeed powermatic table tablesaw
- Comments: 0
- Album: PowerMatic 64A Outfeed Table
-
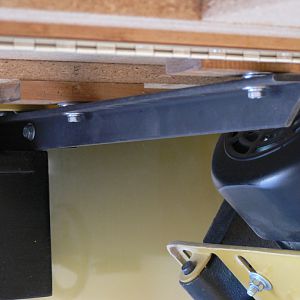
Angle Iron Table Mount
1-1/4'' x 3/16'' heavy-duty angle iron table support. Short pieces of angle iron are used to attach the table support to existing holes in the table saw. Note shims (washers) between angle iron and table top assembly.- KC7CN
- Media item
- 64a fold-up outfeed powermatic table tablesaw
- Comments: 0
- Album: PowerMatic 64A Outfeed Table
-

Adjustable Foot.
Coaster required on sloped floor.- KC7CN
- Media item
- 64a fold-up outfeed powermatic table tablesaw
- Comments: 0
- Album: PowerMatic 64A Outfeed Table
-
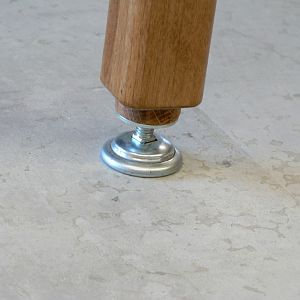
Adjustable Foot.
Whoops! Had to add small wooden disk to increase height of foot.- KC7CN
- Media item
- 64a fold-up outfeed powermatic table tablesaw
- Comments: 0
- Album: PowerMatic 64A Outfeed Table
-
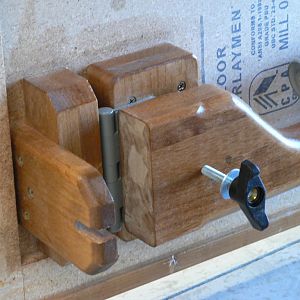
Fold-up Table Leg
Shown folded up position.- KC7CN
- Media item
- 64a fold-up outfeed powermatic table tablesaw
- Comments: 0
- Album: PowerMatic 64A Outfeed Table
-

Fold-up Table Leg
Shown folded down with leg locked. Knob is inexpensive lawn mower handle-replacement from Borg. Carriage bolt is 5/16'' x 4''L.- KC7CN
- Media item
- 64a fold-up outfeed powermatic table tablesaw
- Comments: 0
- Album: PowerMatic 64A Outfeed Table
-
PowerMatic 64A Fold-Up Outfeed Table
- KC7CN
- Media item
- 64a fold-up outfeed powermatic table tablesaw
- Comments: 0
- Album: PowerMatic 64A Outfeed Table
-
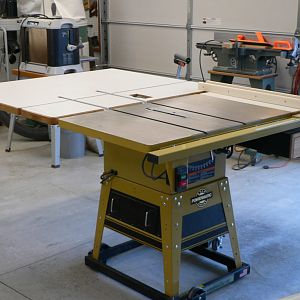
PowerMatic 64A Outfeed Table
PowerMatic 64A Aircraft Carrier.- KC7CN
- Media item
- 64a fold-up outfeed powermatic table tablesaw
- Comments: 0
- Album: PowerMatic 64A Outfeed Table
-
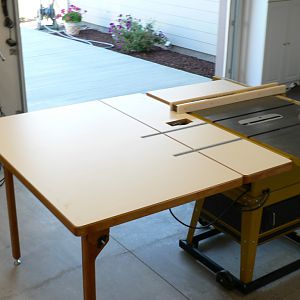
Table Dimensions
Full table: 46-1/2''D x 52-1/2''W. Permanent table: 12-1/2''D x 52-1/2''W Folding table: 31-1/2''D x 52-1/2''W- KC7CN
- Media item
- dimensions outfeed table tablesaw
- Comments: 0
- Album: PowerMatic 64A Outfeed Table
-
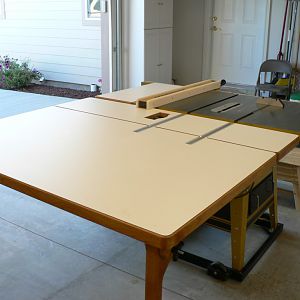
Outfeed Table Raised
Full table dimension in folded-up position is 46-1/2'' deep x 52-1/2'' wide.- KC7CN
- Media item
- 64a fold-up outfeed powermatic table tablesaw
- Comments: 0
- Album: PowerMatic 64A Outfeed Table
-
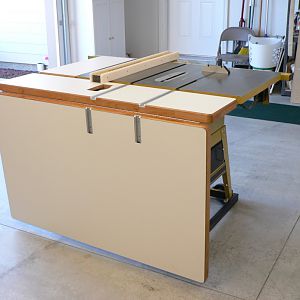
Outfeed Table Folded Down
The small permanently attached table is 12-1/2''D x 52-1/2''W, large fold-up table is 32-1/2''D x 52-1/2''W.- KC7CN
- Media item
- 64a fold-up outfeed powermatic table tablesaw
- Comments: 0
- Album: PowerMatic 64A Outfeed Table
-

Rockwell Tablesaw on CL
Usual disclaimers - not mine and no connection to seller. Looks like a fun project for someone with the time and the $$ though ... http://raleigh.craigslist.org/tls/424297205.html BTW - do we have a Forum policy on these types of posts?? Don't want to upset the fraternity ...- DIYGUY
- Thread
- rockwell tablesaw
- Replies: 3
- Forum: Found for Sale/Hot Deals
-

New tablesaw Gloat For you Dave actual shop pics!
Picked it up From Tom In Concordthis morning and got home at 11PM and unloaded it and Waxed the Cast iron. Very nice saw. I will need to wire in a 220 circuit tomorrow and get a blade on it and make some saw dust. Thank You Tom.- Jon
- Thread
- actual dave gloat pics shop tablesaw
- Replies: 17
- Forum: Power Tools and Their Use
-

CL RTP: Another $40 tilt top craftsman tablesaw...
Oh the humanity...... http://raleigh.craigslist.org/tls/419020983.html $40 What is the limit for the number of table saws one person dare own???? Jim- froglips
- Thread
- $40 craftsman rtp tablesaw tilt top
- Replies: 1
- Forum: Found for Sale/Hot Deals
-
CL: $50 Steal on old tablesaw....
http://raleigh.craigslist.org/tls/419443969.html Old time Craftsman tablesaw and a B&D wormdrive circ saw and belt sander only $50!!!! If only I didn't already have a pile of such tools laying around..... Jim- froglips
- Thread
- $50 steal tablesaw
- Replies: 0
- Forum: Found for Sale/Hot Deals
Premier Sponsors
Contact for your financial processing needs!
Our Sponsors
LATEST FOR SALE LISTINGS
-
 For Sale Powermatic PM 701 Mortiser, 4 Powermatic Chisels (3 unused in wrapper) $800
- Started by frankc4113
- Replies: 0
-
-
-
 Delta 6" Professional Jointer with Base - BNIB (Johnson City/Bristol, TN)
- Started by JSFoster75
- Replies: 0
-
