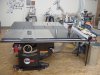
Quite some time ago, I visited the great shop of Bill Clemmons. It is loaded with great machinery and ideas. One of the things that I saw that I particularly liked was his table saw(s) island wherein he has a permanent dado setup in a saw that sits behind his main saw. A nicely made outfeed table connects the two saws. Since then, the more times that I had to switch back and forth between saw blade and dado set, the more I thought about the merits of Bill's setup. Finally, about 6 weeks ago, I decided to do it so I watched Craig's List with addiction like regularity. After a couple of false starts, I ended up with an older Grizzly 1023 cabinet saw which was a bit rough and rusty but the price was right and it was available locally. After spending a couple of days cleaning it up and adjusting it, I dragged the existing outfeed table out of the way and placed the 1023 in position behind the SawStop and then spent several hours getting the tops of the 2 saws in the same plane.
In place and ready for the design phase.

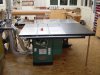
...and from the SawStop side

I wanted to leave both machines as undisturbed as possible so the design ended up with the connecting table top being supported by the existing angle iron that's a part of the saws. This meant that the top could only be 2 1/4" inches thick (max) so I decided to use a torsion box design.
Here's the smile maker. The torsion box grid was constructed using cross lapped joinery made on the dado saw and sized on the main saw. I used 3/4" thick poplar finished to 1 5/8" wide.

Here's the grid and frame in process.

Here's the first check of the grid and frame in position.

After adding blocking for attachment to the saws and backing for where I need to route-in the clearance slots for sled runners, I faced both sides with 1/4" MDF. I attached it with lots of glue and brads and clamped it as best I could. The total thickness is now 2 1/8".

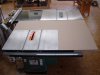
Here it is between the saws for checkout before I apply the Formica to the top surface. This addition will make the total thickness 2 3/16" so I'll have 1/16" left for adjusting it to be flush with both saw tables.")

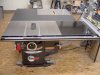
Next I added the Formica, trimmed it flush, placed it back between the saws and began the task of adjusting the vertical position so that everything is flush.

So today I will remove it once again, route the clearance slots into it and apply a couple of coats of shellac to the bottom and banding.
Thanks for looking and thanks again to Bill for the idea.
bobby g
(I don't know why there are repeat photos following this or how to remove them)
In place and ready for the design phase.
...and from the SawStop side
I wanted to leave both machines as undisturbed as possible so the design ended up with the connecting table top being supported by the existing angle iron that's a part of the saws. This meant that the top could only be 2 1/4" inches thick (max) so I decided to use a torsion box design.
Here's the smile maker. The torsion box grid was constructed using cross lapped joinery made on the dado saw and sized on the main saw. I used 3/4" thick poplar finished to 1 5/8" wide.
Here's the grid and frame in process.
Here's the first check of the grid and frame in position.
After adding blocking for attachment to the saws and backing for where I need to route-in the clearance slots for sled runners, I faced both sides with 1/4" MDF. I attached it with lots of glue and brads and clamped it as best I could. The total thickness is now 2 1/8".
Here it is between the saws for checkout before I apply the Formica to the top surface. This addition will make the total thickness 2 3/16" so I'll have 1/16" left for adjusting it to be flush with both saw tables.
Next I added the Formica, trimmed it flush, placed it back between the saws and began the task of adjusting the vertical position so that everything is flush.
So today I will remove it once again, route the clearance slots into it and apply a couple of coats of shellac to the bottom and banding.
Thanks for looking and thanks again to Bill for the idea.
bobby g
(I don't know why there are repeat photos following this or how to remove them)
Attachments

Last edited: