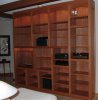
This is a 10' wide X 9' high mahogany cabinet I did for my daughter. There is about $1500 in material in it, 100 hours, and about $400 of low voltage lighting. Lights are on wall dimmers.
All power and stereo wiring is hidden in the walls and stubbed out into the respective boxes/walls.I let the reader figure what it is worth 'dollar wise'. I will say I did get paid very well for my labor.
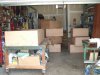
Basically its a bunch of different sized boxes made out of 3/4 mahogany plywood with 1/4" mahogany ply backs. Then the solid mahogany face frame is put on 'piecemeal' once the boxes were stacked and fastened to the wall. Everything was pre finished before it got to the house. All I had to do was trim the face frame pieces to length on site.
The whole thing is 16" deep with 2 of the boxes for stereo components 3" deeper. The wall was cut open and reframed to allow the additional depth. The shelves within each 'box' are sitting on shelf pins in drilled holes. So unless she wants the heights of the shelves changed there are no shelf pin holes showing.
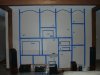
The second picture shows the 'detailed' design work. :lol:
Then a bunch of hours calculating actual sizes on some regular paper and I was off cutting. 8 sheets of 3/4 and 6 of 1/4 plywood. About 45 bd feet of solid mahogany for all the trim (front/sides). The 3/4 ply shelves have 1-1/4" mahogany strips on the front of them to give them some 'meat' and additional strength (although they really don't need it.
It was somewhat challenging since I only do things anywhere near this big about every 5 years or so. It also had to fit in and complement the rest of the house since its (the house) all done in stained mahogany trim and doors.
The daughter and her husband were very happy with it.
She is already planning the next project for me.:roll:
All power and stereo wiring is hidden in the walls and stubbed out into the respective boxes/walls.I let the reader figure what it is worth 'dollar wise'. I will say I did get paid very well for my labor.
Basically its a bunch of different sized boxes made out of 3/4 mahogany plywood with 1/4" mahogany ply backs. Then the solid mahogany face frame is put on 'piecemeal' once the boxes were stacked and fastened to the wall. Everything was pre finished before it got to the house. All I had to do was trim the face frame pieces to length on site.
The whole thing is 16" deep with 2 of the boxes for stereo components 3" deeper. The wall was cut open and reframed to allow the additional depth. The shelves within each 'box' are sitting on shelf pins in drilled holes. So unless she wants the heights of the shelves changed there are no shelf pin holes showing.
The second picture shows the 'detailed' design work. :lol:
Then a bunch of hours calculating actual sizes on some regular paper and I was off cutting. 8 sheets of 3/4 and 6 of 1/4 plywood. About 45 bd feet of solid mahogany for all the trim (front/sides). The 3/4 ply shelves have 1-1/4" mahogany strips on the front of them to give them some 'meat' and additional strength (although they really don't need it.
It was somewhat challenging since I only do things anywhere near this big about every 5 years or so. It also had to fit in and complement the rest of the house since its (the house) all done in stained mahogany trim and doors.
The daughter and her husband were very happy with it.
She is already planning the next project for me.:roll:
 I actually do much more general carpentry and interior trim work then 'woodworking'. I like it all though. Its just whatever comes along.