Matching End Tables

Status
Not open for further replies.

BenBen

New User
Ben
I finished up a couple of end tables to match the coffee table I completed earlier this year:

http://www.ncwoodworker.net/forums/f29/coffee-table-project-completed-30512/

I also snapped a photo of the drawer pulls I later put on the coffee table (I'll be putting the same pulls on the end tables too):

37922_410401744486_742774486_419079.jpg


Photos of the end tables (I was able to incorporate some re-claimed lumber into these as well which is what I used for the rails along the edges on the top):

37922_410401764486_742774486_419079.jpg


37922_410401774486_742774486_419079.jpg


37922_410401759486_742774486_419079.jpg
 

BenBen

New User
Ben
Thanks guys!

Very nice work, Ben. I really like how you attached the bottom shelf into the tapered leg. :icon_thum

Bill

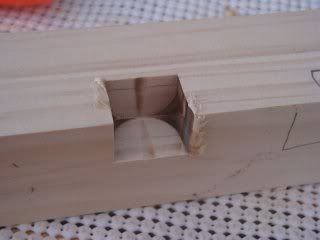
This is actually the 5th table I've made with a bottom shelf like that on a tapered leg and I've gotten a good handle on the process. The notch is cut using a straight router bit on my router table, cut one direction on two sides, then the leg is flipped completely over (left-to-right or vice versa) and repeated. It results in a nice square cut on both inside faces, just have to chisel square the inside corners a bit.
 

Canuck

Wayne
Corporate Member
Nice work, Ben!!:icon_thum:icon_thum

I find the top to very unique and interesting. How are the individual boards joined? Did you cut a reveal (along the edge and then glue it up as a panel or is the a batten underneath?:icon_scra

The reclaimed wood is a perfect selection for the design!

Well done!

Wayne
 

jhreed

james
Corporate Member
I did not understand your explanation of the bottom shelf. Please indulge me if you can explain a little more or send more pictures. I am intrigued by the attachment of that shelf.
James
 

BenBen

New User
Ben
Nice work, Ben!!:icon_thum:icon_thum

I find the top to very unique and interesting. How are the individual boards joined? Did you cut a reveal (along the edge and then glue it up as a panel or is the a batten underneath?:icon_scra

The reclaimed wood is a perfect selection for the design!

Well done!

Wayne

Thanks!

The top pieces are 4 individual pieces that were chamfered on 4 sides, then I glued them together along with biscuits, much like a panel. Once that was set up, I attached the outer rails all around with biscuits (they were also chamfered along the edges that adjoin the inside panel. Hopefully that explains it.

Jhreed,

Maybe this pic helps (it was of the leg of another table I made):

DSC02873.jpg


On that one, I used a 3/4" straight bit, set up the fence to the depth I wanted the groove, then fed the piece towards the fence while holding it parallel to the fence. I made two cuts, one of either side of the leg. I then flipped the leg and repeated. It is super complicated to explain, but not near as hard to accomplish. I hope this helps!
 

Canuck

Wayne
Corporate Member
Thanks!

The top pieces are 4 individual pieces that were chamfered on 4 sides, then I glued them together along with biscuits, much like a panel. Once that was set up, I attached the outer rails all around with biscuits (they were also chamfered along the edges that adjoin the inside panel. Hopefully that explains it.

:icon_thum:icon_thum:icon_thum

Thanks!

Wayne
 

Bas

Recovering tool addict
Bas
Corporate Member
Very very nice. Love the top, and the slight taper on the bottom of the legs make the proportions feel right. I do hope you like them, because they'll last a 100 years or so :)
 
Status
Not open for further replies.

Premier Sponsor

Our Sponsors

Top