How to butt together 4 walls?

Status
Not open for further replies.

reprosser

New User
Rick
Any framers out there?

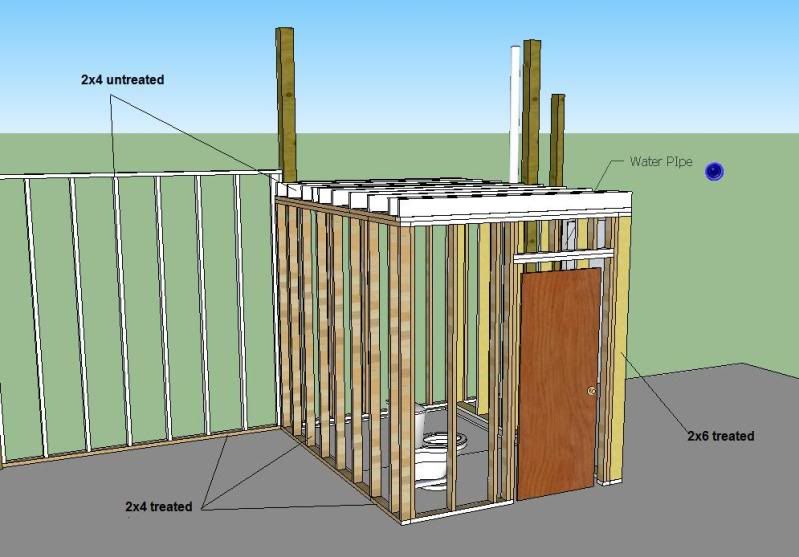
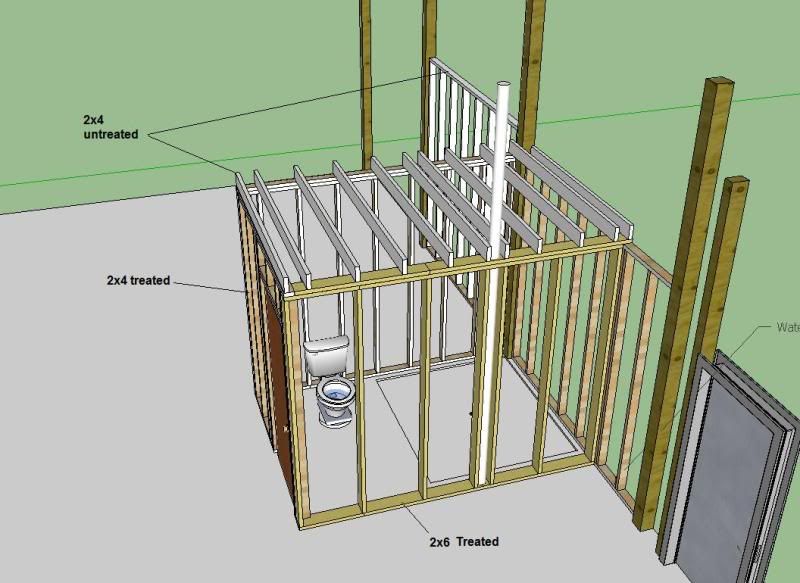
I need to put up walls for a bathroom in my shop. I can build the 4 walls, but is there a preferred or required layout for butting the walls together at the corners? 2 opposite walls inside the other 2 walls, or overlap each corner differently, or ??. :dontknow:(I know the top plates will overlap to lock in the corners.)

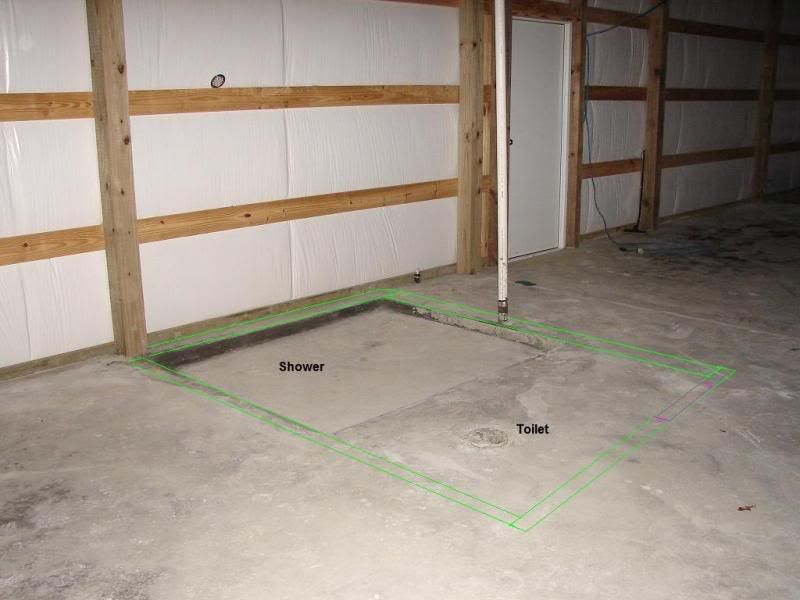
Also, the sewer (stack?) pipe is sticking up from the floor and should be inside one wall. What is the correct method to cut-out the plates for the pipe?
 

MrAudio815

New User
Matthew
2 opposite walls inside the other 2 walls will work. With the top plates it will hold them together. You will probably need some shim's as well as pine is not always the straightest wood to get it as level as possible vertically.
 

Glennbear

Moderator
Glenn
There are folks here with a heck of a lot more framing experience than me so I have little advice to offer other than my mistake when framing a closet in my shop. The picture shows my original mock up of the closet layout. When I had it all done and sheathed I realized that I had neglected to take into account framing thickness in my layout lines. :BangHead: The door wall as built is 1.5 inches off square in a 5 foot run. :embaresse Since woodworkers never make mistakes only design changes the wall has been designed to help airflow from the heater which is mounted in the adjacent wall. :gar-La; That's my story and I am sticking to it. :wsmile:


Ray Martin

New User
Ray
Rick,

Will the four all come to the same point, all at 90º to one another? If that's the case, I'd make it three walls; one long wall going through the point of intersection and the perpendicular walls connected to it. You can use what is called a "ladder T" as a connection point. That's a series of horizontal members between the king studs. If the kings are 16" OC then the members of the ladder T would be 14.5". I'd put in three of them; 2', 4' and 6'. This arrangement will allow for a single (long) cap plate to tie all three together.

This might help...
Framing_Parts.jpg

View image in gallery
 

James Davis

New User
James Davis
This article gives a pretty good overview of how to frame a wall. http://www.finehomebuilding.com/PDF/Free/021082042.pdf If I were framing the wall in question, I would build the tee post that they show and simply add blocks to both sides. That way you could have both short walls intersect a long wall to get what you are after.

For the plumbing stack, If it were me and I had all the room trhat you have, I would build a wall on either side of the stack and not worry about it. At least build the plumbing wall thicker than 2X4, use 2X6s or 2X8s so that you have meat on either side of the stack

JMTCW
James
 

Glennbear

Moderator
Glenn
Rick,

Will the four all come to the same point, all at 90º to one another? If that's the case, I'd make it three walls; one long wall going through the point of intersection and the perpendicular walls connected to it. You can use what is called a "ladder T" as a connection point. That's a series of horizontal members between the king studs. If the kings are 16" OC then the members of the ladder T would be 14.5". I'd put in three of them; 2', 4' and 6'. This arrangement will allow for a single (long) cap plate to tie all three together.

This might help...

Thanks for sharing your drawing Ray, exactly the kind of thing us framing challenged folks need. :gar-La;
 

Ray Martin

New User
Ray
Thanks for sharing your drawing Ray, exactly the kind of thing us framing challenged folks need. :gar-La;

Happy to. I'll go look through the graphics folders and see if there are any other interesting drawings. I did quite a few of them for the book (Habitat for Humanity Construction Manual.)
 

Bigdog72

New User
Geoff
Another way to accomplish the same thing is to use 3 2x4's nailed together. One flat and the other two sandwiching the flat one making a flat bottomed U. The intersecting wall is then nailed to the full length flat stud. This gives you full length nailing for wall coverings. Most production framers use this method to save time but YMMV....

Rick,

Will the four all come to the same point, all at 90º to one another? If that's the case, I'd make it three walls; one long wall going through the point of intersection and the perpendicular walls connected to it. You can use what is called a "ladder T" as a connection point. That's a series of horizontal members between the king studs. If the kings are 16" OC then the members of the ladder T would be 14.5". I'd put in three of them; 2', 4' and 6'. This arrangement will allow for a single (long) cap plate to tie all three together.

This might help...
 

Gotcha6

Dennis
Staff member
Corporate Member
Geoff's description is exactly how we used to do it when I was framing houses. Quick & simple. Looks like this: |_|

+1
You can also place 2 2x4s flat beside each other in the existing wall, then nail the intersecting wall lead stud to that. This would give you continuous nail area for the corner versus the ladder tee practice, and allow full width batt insulation to traverse the tee as well, threading it behind the two siamesed 2 x 4s.
 

reprosser

New User
Rick
Ok - a picture is worth 1000 words. I put the wall outline in green with a purple door outline.

BathArea.jpg


My outline is with the long walls inside the short walls. I could make a wall with the pipe a 2x6, and cut a notch around the pipe in the plates? I can utilize the 4x6 post as a support - maybe run one wall all the way from one 4x6 to the other 4x6 beside the door. I plan to mount the service panel there beside the door. Maybe I will put together a sketchup drawing for review to clarify the corners.
 

Gotcha6

Dennis
Staff member
Corporate Member
The wall with the plumbing riser should be a 2 x 6 wall. Be sure & use stud guards around ALL plumbing piping. Code requires it on all pipes located within 1-1/4" of the stud face. How you lap the top plate is your preference. Just get them lapped so they will tie together. Think of it as a half rabbet joint. You should probably go ahead & run the back shower wall all the way to the 6 x 6 @ the door & leave room for the electrical panel. Most 200 amp panels will fit in a 14-1/2" stud cavity if that's what you're using. You will want to use treated lumber for all shoe plates (obvious) but you may also think ahead & use it behind your shower walls. Treated studs are almost as cheap as SPF nowadays & good insurance against leaky grout lines.
 

reprosser

New User
Rick
The wall with the plumbing riser should be a 2 x 6 wall. Be sure & use stud guards around ALL plumbing piping. Code requires it on all pipes located within 1-1/4" of the stud face.
Thanks - had not thought of that.

You should probably go ahead & run the back shower wall all the way to the 6 x 6 @ the door & leave room for the electrical panel. Most 200 amp panels will fit in a 14-1/2" stud cavity if that's what you're using.
Yep, that is the plan. They are 6x6, not 4x6 as I posted.:eusa_doh:

You will want to use treated lumber for all shoe plates (obvious) but you may also think ahead & use it behind your shower walls. Treated studs are almost as cheap as SPF nowadays & good insurance against leaky grout lines.
I was warned that the treated wood would "pretzel" if I used it inside - but I like the idea of extra protection in the wet areas. The treated 2x4x8 lumber is the cheaper than untreated studs here.
 

Gotcha6

Dennis
Staff member
Corporate Member
I was warned that the treated wood would "pretzel" if I used it inside - but I like the idea of extra protection in the wet areas. The treated 2x4x8 lumber is the cheaper than untreated studs here.

Use a couple rows of purlins on the inside walls to help hold them straight & tie the 'dress wall' @ the outside to the purlins already there supporting the metal & insulation with clips or blocks.
Don't forget insulating the pipes.
 

reprosser

New User
Rick
Followup Vent question

Follow up question:
The plumbing rough-in only has the vent pipe about 8 ft tall. Does the vent pipe need to extend thru the roof, or just a certain height? (I have only seen them thru the roof, but thought I would ask). Maybe it is a matter of aroma :swoon: ?
 

Gotcha6

Dennis
Staff member
Corporate Member
Through the roof. If you set the water heater atop the walls be sure to have a p trap teed in it to pipe the drain pan & relief valve.
 

Gotcha6

Dennis
Staff member
Corporate Member
Since my earlier reply was pecked out on a B'berry, I need to add to it:

The plumbing pipe as it stands was roughed that way to provide a head of pressure for a static water test. The plumbing inspection for a slab requires there be a water column of at least 7 feet and the pipe filled with water for the inspector to observe there are no leaks in the drain system. The plumber will likely cut this pipe back off and install a waste arm to the riser to catch your lavatory. That is why it was left so high out of the slab initially. HTH
 

reprosser

New User
Rick
Here is what I came up with.
Any obvious problems?
The vent pipe lined up with the 16" and 24" centers. I put boards on each side - is that OK?
The ceiling is 2x6, and also the wall with the vent pipe is 2x6.

BathLeft.jpg


BathRight.jpg
 

Gotcha6

Dennis
Staff member
Corporate Member
Looks OK to me. :icon_thum A couple of things to make it better:
1. Be sure you get some blocking in the wall for your hand sink to mount to. One of my pet peeves is going into a restaurant or store & the lavatory looks like it's held on the wall with about 5 layers of silicone caulk. Have your plumber tell you what he needs.

2. Use purlins on the ends of the ceiling joists to help support the floor plywood for the deck above.

3. Going up & down to that storage area much? How about blocking out for a ladder out of 2 x 6 stringers & 2 x 4 rungs dadoed in. Attach it with 'L' clips & lag bolts.

4. Insulate EVERYTHING!
HTH
 

NCGrimbo

NCGrimbo
Corporate Member
Thanks for the great advice in this thread. I'm at the begining stages of finishing my attic space into heated/livable space and this thread gives me exactly what I had just started looking for. I've got several walls to build and a bathroom to get set up, so thanks again!

Now, does anyone have some pre-designed walls, etc that I can drop into Sketchup or links to some?
 
Status
Not open for further replies.

Premier Sponsor

Our Sponsors

Top