
You are using an out of date browser. It may not display this or other websites correctly.
You should upgrade or use an alternative browser.
You should upgrade or use an alternative browser.
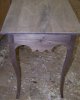
Creole Table
- Thread starter Larry Rose
- Start date
- Status
- Not open for further replies.
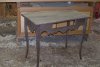
Dan, I think I'll use a dark walnut stain just to even out the differences in the color of the parts. Then I plan to use a wiping oil/varnish like Minwax Antique Oil. I've had good luck with this before. It seem a shame to use any stain but it does help even out the color.
Beautiful work Larry, someone is going to be very lucky.
Very nice job :eusa_danc
I'm working on a slightly smaller version. I made a quick prototype and I didn't like the way the curved legs looked with the smaller top (they look great on your full sized version) so I'll be going with a straight taper instead.
The wood (claro) for the top is in Kyle's klin so it will be a few weeks till I get started on it.
pete
Very nice work, Larry!:eusa_danc :eusa_clap :eusa_clap
The walnut looks very rich. I particularly like the way the detail at the apron ends seem to flow right into the curve of the legs! Was that detail made with a bandsaw or jigsaw (aprons)?
Whoever wins this piece have a real keeper:eusa_danc .
Thanks for sharing,
Wayne
The walnut looks very rich. I particularly like the way the detail at the apron ends seem to flow right into the curve of the legs! Was that detail made with a bandsaw or jigsaw (aprons)?
Whoever wins this piece have a real keeper:eusa_danc .
Thanks for sharing,
Wayne
The aprons were roughed out on the bandsaw and finished up with an OSS where possible. The rest was done with chisels and hand sanding. The legs were roughed out on the band saw and finished with spokeshaves and a card scraper.
The aprons were roughed out on the bandsaw and finished up with an OSS where possible. The rest was done with chisels and hand sanding. The legs were roughed out on the band saw and finished with spokeshaves and a card scraper.
Ah ha! I knew you had to be a skilled craftsman. And it shows :icon_thum
Roger
If I had known all you guys would look at this post, I would have swept up the shavings from the floor.
T
toolferone
No the shavings are a good thing:icon_thum . The table is great!!
J
jeff...
really nice - the lines are very sharp
Hey Larry, I was thumbing through the Feb. ’07 issue of Popular Woodworking at the store looking to see how the Greene & Greene side table on the cover was put together, but when I came across the Creole table, all thoughts of the first table were forgotten. It is an exceptionally beautiful little table and you did a great job of building one. It is definitely on my list and I’ll bet it will be hard for you to part with it, even though I’m sure gifting it for the auction and a good cause should bring satisfaction.Did you pretty much follow the instructions in the article regarding the scalloped front apron? Schwartz left waste on the ends of the apron to be removed after glue up so that the legs and apron would mate better.But an answer to a question I’m most interested in is how the drawer front was removed from the apron. I understand how you would rip the apron for the drawer front’s top cut, (to be re-glued) giving access to a saw to make the side cuts, but how is the drawer front’s bottom cut made with no access? Plunge cut?
Dan, I made a table with a drawer in the apron, and used a similar method. But I ripped both the top and bottom off the apron (it was sized to accommodate the kerf loss) to form the drawer front which was then cross cut from the remaining center piece. Glue everything back together using the drawer front as a spacer, and then cross cut the ends flush and to the correct length for final joinery.
Make sense???
Dave")
Make sense???
Dave
Thanks Dave,I've read somewhere else about the technique you used. Cut it all up and glue it back together, but I think the way the guy in the article did it was to rip only the top, then do stopped cuts for the sides and then some way of cutting the bottom. That way there is only one seam to conceal. But there isn't any access to make that bottom cut withoud doing a plunge. I thought Larry would know since he built one following the article's instructions.
- Status
- Not open for further replies.