Last June I planned to build a workbench this summer and asked several questions, many of you provided some good advice. So I wanted to provide a progress report.
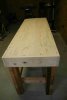
First, I found that I needed a workbench to build a workbench. I found a lumber mill that had some nice unplaned (inexpensive) 2x4 lumber and went to work building the completed workbench shown. Frame was all hand sawn, as I didn't have my power tools yet. Top is 2" thick, legs and rails are 4" square, and edge trim is 1x6 that is flush with top and bottom of top rail. A good solid bench, beefy, but still movable. Turned out real nice and was very handy in constructing the 'real' woodworking workbench.
Thank-you to the person who suggested rounding the bottom of the legs and sealing with a coat of epoxy. Worked well.
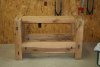
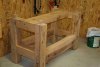
I found a great deal on some oak timbers and began building the workbench, based on Christopher Schwartz's design. Contractor said he had some 5x12 and 4x8 planed 4S timbers, so I made a plan and picked them up. I had to change my plan when I discovered that the timber size he had given me were the real sizes and not a half inch less from planing. I still had to plane some to get rid of aging due to sitting outside for several months. Bench Legs are 5x5", as are the side rails. Front, back and top rails are 4x8.
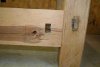
The mortises took some time. I hand cut two, 5 inches deep, 1x3, with great pride, and realizing that it was going to take quite a while to do them all, ordered a mortising machine. Used the machine to also cut the bolt nut holes. Still took a day and half to cut all of the mortises. Pretty good at it by the time I finished.
Bolted it all together, as you can see. Cut the 4" inch planks for the top, but my summer vacation was coming to an end as I went off to a workshop and the planer belt broke. So, next summer I have the top to finish and then seal it all. I already have the vise for the front board vise and another for an right end vise. Bench is rock solid. Still pretty happy with the result of this project and look forward to finishing it.
Guy
Woodworking School Teacher
First, I found that I needed a workbench to build a workbench. I found a lumber mill that had some nice unplaned (inexpensive) 2x4 lumber and went to work building the completed workbench shown. Frame was all hand sawn, as I didn't have my power tools yet. Top is 2" thick, legs and rails are 4" square, and edge trim is 1x6 that is flush with top and bottom of top rail. A good solid bench, beefy, but still movable. Turned out real nice and was very handy in constructing the 'real' woodworking workbench.
Thank-you to the person who suggested rounding the bottom of the legs and sealing with a coat of epoxy. Worked well.
I found a great deal on some oak timbers and began building the workbench, based on Christopher Schwartz's design. Contractor said he had some 5x12 and 4x8 planed 4S timbers, so I made a plan and picked them up. I had to change my plan when I discovered that the timber size he had given me were the real sizes and not a half inch less from planing. I still had to plane some to get rid of aging due to sitting outside for several months. Bench Legs are 5x5", as are the side rails. Front, back and top rails are 4x8.
The mortises took some time. I hand cut two, 5 inches deep, 1x3, with great pride, and realizing that it was going to take quite a while to do them all, ordered a mortising machine. Used the machine to also cut the bolt nut holes. Still took a day and half to cut all of the mortises. Pretty good at it by the time I finished.
Bolted it all together, as you can see. Cut the 4" inch planks for the top, but my summer vacation was coming to an end as I went off to a workshop and the planer belt broke. So, next summer I have the top to finish and then seal it all. I already have the vise for the front board vise and another for an right end vise. Bench is rock solid. Still pretty happy with the result of this project and look forward to finishing it.
Guy
Woodworking School Teacher