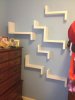
So that I do not forget (and as an archive of info for the future), here's how they are made (special thanks to everyone for ideas on mounting, particularly FredP and CrealBilly):
- Glued up two layers of 3/4 plywood (focus on good coverage across sheets - DAMHIK).
- Ripped sheet into shelves of widths desired.
- Crosscut strips into needed pieces (for proportions of all pieces I use golden ratios throughout).
- Routed long 3/4" wide and 1 3/16" deep mortises into all horizontal pieces (ie full length slots stopped an inch from each end).
- Used butt joint with pocketholes that are filled with plugs and sanded flush (pay attention to your clamping for square and flush).
- Used drywall spackle (multiple applications) to fill plywood edges smooth and hide any joints (messy).
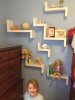
To mount, I used 3/4" thick x 1 1/8" deep wooden cleats screwed to the wall with countersuck screws. Each shelf then slides snugly over the cleat. To affix the shelf on the cleat, I used 3/4" wood screws countersuck in the tops near the intersection with the wall.
Hints:
1) If you leave the cleat a inch or two short of the length of the mortise slot, you can tweak the shelf locations by sliding them back and forth for perfect aligntment.
2) If you go shelf by shelf, you can pre-drill the cleat, insert a short screw, drop the cleat into the mortise, and then hold the shelf up to the wall and mark the exact level location for the cleat by push the screw tips into the drywall. Then just replace the screws with longer screws and mount to the exact dimples you created.
-