Part of my kitchen project includes a 12 x 12 wall cabinet, open on the front that will have about 9 to 12 wine bottles at the top followed by a shelf with wine glasses hanging down and lastly a plate rack. I know there is an easy way to make the rack for the glasses but it escapes me. Does anyone have any suggestions? I can't seem to find anything in my books or magazines. I am not using dowels for the plates, decided to us walnut strips secured to the bottom of the shelf. I would like to accent this cabinet with walnut where as the entire project is cherry. Lorraine

You are using an out of date browser. It may not display this or other websites correctly.
You should upgrade or use an alternative browser.
You should upgrade or use an alternative browser.
Suggestions on making rack for wine glass to hang from
- Thread starter lwhughes149
- Start date
- Status
- Not open for further replies.
I have had good luck using a panel raising bit (cove). I like to run both sides of a 2 1/2 inch board whatever the desired length is. Get about 6 boards ran, flip them cove up and space them apart. Attach some strips od wood perpendicular. The stem slides between the "panels" and the foot of the glass is suspended by the cove.
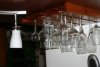
I made this one from african mahogany. the design is simple. I used a panel raisin bit on some scraps left over from the cabinet doors. Make 2 pcs with the panel bit routing both sides then attach them together to form the chanel for the glases to slide into then put a frame around them made to match your cabinets. I used 2 small strips on top so the rack could be screwed to the bottom on the cabinet without being seen.
Attachments
I see the example and I understand how it is done but I don't have a raised panel bit. Can you think of any other type of bit that might work. I have a cabinet full of average bits surely something in there would work.
Would an ogie bit work? I have one I use to make a profile on edge of molding.
Tablesaw is a little scary.
Tablesaw is a little scary. Think about a router bit.
Maybe I need to go buy a cove raised panel bit.
Rockler makes some, here's a link to theirs.
Rockler.com - Search Results for 'wine glass'
The Rockler's ones are 3/4" thick, I needed some 1 1/8" thick so I made my own. There's really nothing to it using the table saw, very straight forward and simple. Look at the technical data on the Rockler ones and you see that they are very simple.
Bob
Rockler.com - Search Results for 'wine glass'
The Rockler's ones are 3/4" thick, I needed some 1 1/8" thick so I made my own. There's really nothing to it using the table saw, very straight forward and simple. Look at the technical data on the Rockler ones and you see that they are very simple.
Bob
Yes Bob, it does look simple, lets go one step forward. I can see the angle from the tablesaw but how would I get that little straight edge? I would have to go set it up and look at it on the saw to see it fully. I need this in cherry or walnut so I must make it. Thanks for the help tonight guys. Wait until you see my new kitchen cabinets. Lorraine
M
McRabbet
Lorraine,
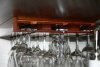
I made the ones in my Wine Cellar Project on the tablesaw, using a sliding sled fixture that I built some time ago for making raised panels. Here is a picture of the wine glass rack on its side as the finish dried. To determine the size you need, place two glasses that may be stored in adjacent slots, place them on a piece of paper so their globes are about 1/4-3/8" apart and draw around the base of each. Measure center-to-center to get the slot spacing. I used 3" wide x 3/4" stock and measured the angle formed by clipping off corners to leave a 1/4" edge and back to 1" from each side. Set the saw blade to the proper angle and secure the strip under the clamping bar in the sliding sled fixture -- here's two pictures from my gallery showing how the fixture is made:
 Front view
  Back side
(The panel fixture came from a plan found on pages 60-62 of the Sept 2005 issue of Wood Magazine; I modified it for larger panels). For the glass rack, the saw bevel was closer to 20 degrees, but the clamping bar holds it securely as you make the cut. After cutting both sides, I added a 3/4 x 3/4 "standoff" piece that adds room between the rack and the shelf you screw it to. I cut one of the double beveled pieces in half to form the outside rack pieces (see 1st picture).
Hope this helps. Rob
I made the ones in my Wine Cellar Project on the tablesaw, using a sliding sled fixture that I built some time ago for making raised panels. Here is a picture of the wine glass rack
 on its side as the finish dried. To determine the size you need, place two glasses that may be stored in adjacent slots, place them on a piece of paper so their globes are about 1/4-3/8" apart and draw around the base of each. Measure center-to-center to get the slot spacing. I used 3" wide x 3/4" stock and measured the angle formed by clipping off corners to leave a 1/4" edge and back to 1" from each side. Set the saw blade to the proper angle and secure the strip under the clamping bar in the sliding sled fixture -- here's two pictures from my gallery showing how the fixture is made:
 Front view
  Back side
 (The panel fixture came from a plan found on pages 60-62 of the Sept 2005 issue of Wood Magazine; I modified it for larger panels). For the glass rack, the saw bevel was closer to 20 degrees, but the clamping bar holds it securely as you make the cut. After cutting both sides, I added a 3/4 x 3/4 "standoff" piece that adds room between the rack and the shelf you screw it to. I cut one of the double beveled pieces in half to form the outside rack pieces (see 1st picture).
Hope this helps. Rob
Yes Bob, it does look simple, lets go one step forward. I can see the angle from the tablesaw but how would I get that little straight edge? I would have to go set it up and look at it on the saw to see it fully. I need this in cherry or walnut so I must make it. Thanks for the help tonight guys. Wait until you see my new kitchen cabinets. Lorraine
Not sure what you mean by the little straight edge.
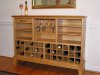
With the board on edge I set the blade to the angle I wanted and made the cut, then flip the board over and cut the angle cut on the other side. Now set the blade to 90 and lay the board down, set the height of the blade for the vertical cut and make it, remove the waste and turn the board around and do it again. Nothing to it and I don't see where any of the cuts are a risk to safely. I then rounded the narrow edges with a block plane. Below is a picture of the wine buffet I made.
Bob
Attachments
To Bob and Go, Within a few days I will decide which method I will be using to make the rack for the wine glasses. I know there is always a need to buy something new for the shop and I don't usually have trouble resisting. I have a new tongue and groove bit now that I will soon be using for the doors to all these cabinets. I have a new cabinet and top for my router now and anxious to put it to use. Bob, I made a jig for my tablesaw some time back that covered the fence but I didn't like it. It didn't fit the fence snug enough to be accurate so I tossed it. Yours looks better. My question today, as I try to use what I already have is, could I use a 1/2" cove router bit or a 3/4 straight router bit and cut a section off of it? I am trying.:drunken_s Just looking at the possibilities. Lorraine
- Status
- Not open for further replies.
Premier Sponsor
Our Sponsors
LATEST FOR SALE LISTINGS
-

-
-
-
-
 SOLD -- $75: Gast moa v113 Vacuum Pump Veneer, 60" bag and board
- Started by peterdnight
- Replies: 1