Starting desk/bookcase project

Status
Not open for further replies.

Charlie Buchanan

Charlie
Corporate Member
Haven't posted to this thread in a while but some progress along the way.
attachment.php

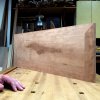
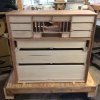
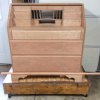
Finally got all those drawer pockets filled. Here is the back view. Will use random width shiplap poplar for the back.
attachment.php

For the large drawers I took Danmart's suggestion and built the drawer boxes flush and then added on the 1/4" lipped moulded fronts. Also decided to use slips and divided bottom to save weight by using thinner sides and bottom panels.

attachment.php

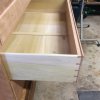
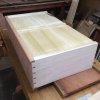
Here's the bottom of the bottom drawer showing the split bottom. The dark mark on the far corner is a spalt mark in the poplar.

attachment.php

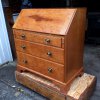
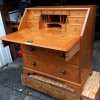
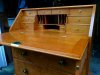
Here's the front with all drawers installed and stopped. The bracket feet and frame are not really attached yet. I just wanted to show the final look. The stick of base moulding is just set there to see if fits/looks OK. It's just a cove and fillet. Going to finish this part and move it out of the shop to have room to build the bookcase that sits atop the desk.
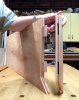
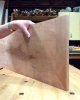
Next is the fallboard. Found a piece of 14" wide cherry for the fallboard. Its a nice piece but I'll need to joint and thickness by hand.
 

Attachments

  • IMG_0003.JPG
    IMG_0003.JPG
    742.9 KB · Views: 182
  • IMG_0001.JPG
    IMG_0001.JPG
    691.7 KB · Views: 178
  • IMG_0002.JPG
    IMG_0002.JPG
    628 KB · Views: 190
  • IMG_0005.JPG
    IMG_0005.JPG
    679.6 KB · Views: 184
Last edited:

DannysBoy

New User
Connor
Have you experienced much tear out with you were cutting your doves using poplar? I always seem to get that headache. Did you end up doing half blinds or through dove's with a drawer front that appears so? I can't remember what you went with at this point
 

Charlie Buchanan

Charlie
Corporate Member
Have you experienced much tear out with you were cutting your doves using poplar? I always seem to get that headache. Did you end up doing half blinds or through dove's with a drawer front that appears so? I can't remember what you went with at this point
Connor,
I have had a problem with chippy poplar in the past, but not so much lately. I think it depends on the way the wood has been dried. This batch of poplar gave no problems, it chopped out cleanly. I made through dovetails on the drawers fitted them as I would flush drawers and then glued on the face.
 

Charlie Buchanan

Charlie
Corporate Member
Getting around to the fall board. Roughed out the tenons with a palm router and fitted them with a hand router plane and chisels.

attachment.php

Mitered breadboard ends. And eventually a moulded edge to match the drawers.
attachment.php

Plannng to glue the mitered end tenon and pin them both leaving some expansion/contraction room on the hinge side pin and tenon. It's bound to move with the almost 14 inch width of the fallboard. Probably mostly contraction from this time of year. Have seen a few cracked ones around.
attachment.php
 

Attachments

  • IMG_1582.JPG
    IMG_1582.JPG
    245.6 KB · Views: 127
  • IMG_1583.JPG
    IMG_1583.JPG
    234.7 KB · Views: 134
  • IMG_1578.JPG
    IMG_1578.JPG
    180.9 KB · Views: 131

Jeff

New User
Jeff
Charlie, a mitered breadboard end cap is sure an interesting touch. I've never seen one or thought of it. Neat!
 

Bill Clemmons

Bill
Corporate Member
Charlie, thank you for continuing to share your progress on this project. Your attention to detail is just amazing. What kind of finish are you going to put on it?
 

Charlie Buchanan

Charlie
Corporate Member
Charlie, a mitered breadboard end cap is sure an interesting touch. I've never seen one or thought of it. Neat!
The desk I'm modeling this on had the mitered detail. I've never done one before now. They're hard to fit--still don't have this quite closed up. Needs a little more adjusting.
 

danmart77

Dan
Corporate Member
Charlie the desk fallboard is stunning. This is the toughest part of the build in my view. The decision on fitting the hinges on the desk surface and fallboard differs depending on what time of year you make the connection.

As a rule, I fit my hinges BEFORE I glue in the desk board. I leave extra width on the deskboard so I can make corrections if needed. As you can see in the photo, I have temporary loppers to hold the lid flat in the open position so I can check all is in plane. This is just my technique for keeping the tension in check during a very delicate phase of fitting.
lid_tenon_on_desk_out.jpg


The full length breadboards without the top miter are much easier to build and easier to deal with expansion issues down the road. They do look pretty when done well.

In the lid above, you glue the middle tenon and let the outer tenons "float" during the movement.

desk_drawer.JPG


In the photo here, the mitered end is glued. So the breadboard rides out when the fallboard shrinks. This is the critical calculation you have to consider NOW.

When looking at the lid plans, you might notice the thumbnail edge is the same on the top and sides but it is bigger on the bottom of the board as you look at it in the closed position. This is calculated and something that will help you down the road.

What?

When the lid shrinks the breadboards will protrude more on one end than the breadboard glued in the middle. Unlike the board glued in the middle which can expand/shrink on both ends, the mitered board moves on one end. It happens to be the end that contacts the desk board and causes binding.

So Krause and the other builders of the time made the finished edge(thumbnail)on the bottom big so you could plane the breadboard on the bottom where it extends and hits the deskboard before the lid is down.

This is EXTREMELY important for you to watch the first year of movement. If you fit your fallboard nice and tight the hinge area can crack as the pull from contraction increases

Keep that in mind.
 
Last edited:

Charlie Buchanan

Charlie
Corporate Member
Charlie, thank you for continuing to share your progress on this project. Your attention to detail is just amazing. What kind of finish are you going to put on it?

Planning on shellac. Probably amber but I need to do some tests on samples. There some color differences I see that need work.
 

danmart77

Dan
Corporate Member
Charlie, a mitered breadboard end cap is sure an interesting touch. I've never seen one or thought of it. Neat!

ACC_2664_1-jpg633269384170000000.jpg


Jeff here's another desk by Krause. You can see double ended miters. The lid here is in style with the design of the desk sides. There is a broad inlay in the fields of the lid and sides to enhance the joints of the veneer. The inside of this desk is just beautiful. More elaborate than the one Charlie is building but it is "stair stepped" like the design of the desk Charlie is building.


This cherry piece above is different than the one Charlie is building. Its a great example of tasteful veneer work done well.

The door panels, desk sides, drawer fronts and fallboard are all veneered.

The gooseneck continuous molding on the upper case was hand carved and scraped to match the straight pieces on the sides. Lots of work.

Wanted to do this one 25 years ago but I didn't have 10' ceilings. I spent 1 full day measuring this for a potential customer. Never happened so I considered scaling it down for an 8' ceiling house. Time got away.


desk_drawers_face.JPG

This is the "stair step" lay out common to Moravian desks.


Penn_Desk_29_aug_001.jpg


This type of elaborate gallery was more commonly found in pieces built in the larger cities in the 18th century. Lots of competition and the builders had to make things fancier to attract the customers.


Charlie Buchanan

Charlie
Corporate Member
Time to move on to the bookcase half of this project. Have to move the desk half out of the shop to get some working room. Finished the back today--1/2 in poplar shiplap with a little bead. Here's some finished photos in the shop door.
attachment.php
M

attachment.php
 

Attachments

  • IMG_1621.JPG
    IMG_1621.JPG
    887.6 KB · Views: 136
  • IMG_1624.JPG
    IMG_1624.JPG
    692.7 KB · Views: 138
  • IMG_1627.jpg
    IMG_1627.jpg
    253 KB · Views: 96

Raymond

Raymond
Staff member
Corporate Member
That dark patch, is very similar to the outline of North Carolina. Beautiful craftsmanship, Charlie!
 
Status
Not open for further replies.

Premier Sponsor

Our Sponsors

Top