Risers and treads - how do you do you prefer to do them?

Status
Not open for further replies.

Brogan

New User
.
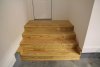
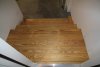
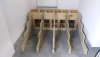
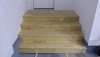
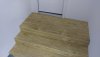
Stringers and the frame are done.

I officially hate stringers.
I can imagine that doing two probably isn't so bad but getting 5 to be perfectly level, etc. was a pain (it needed 5 due to the span and the infamous code).

attachment.php


I did learn something else in the process - level the floor first and use that to rest the stringers on.

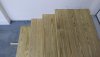
Zach, standard 5/4x1x6 is the default option but I'd like something a little less utilitarian.
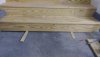
I could go for SYP though and insulate the bottom riser where it touches the garage floor, to avoid any damp issues.

Thanks again for the input Henry - it has been invaluable.
I'm so glad you mentioned the landing - the steps wouldn't have been anywhere near as good without it.
 

Attachments

  • 20171009_182537.jpg
    20171009_182537.jpg
    146 KB · Views: 182

chris_goris

Chris
Senior User
Not to knit pick, but why didnt you make the stairs with just 3 risers?. Also, the stringers should be notched to sit on a horizontal ledger at the top.
 

Brogan

New User
.
I looked at both options - standard stringer and flush stringer.

Notching is not required - this is no different to attaching a stringer to a double height ledger.

In hindsight, I would have gone with a standard stringer, but this is also a valid option.
 

chris_goris

Chris
Senior User
I looked at both options - standard stringer and flush stringer.

Notching is not required - this is no different to attaching a stringer to a double height ledger.

In hindsight, I would have gone with a standard stringer, but this is also a valid option.

So, you build the landing strong enough to park the car on and leave the steps supported by the nails?
 

Brogan

New User
.
I'm using stringer hangers which is what they're designed for.

It's far better than what the builder did which was a few nails toenailed in.
 

chris_goris

Chris
Senior User
I'm using stringer hangers which is what they're designed for.

It's far better than what the builder did which was a few nails toenailed in.


Im just old school. I know stringer hangers are "designed" for this application, but truth be told, they are really "designed" to speed up building stairs that meet codes. Im certain the codes vary from jurisdiction to jurisdiction on stair construction but Ill bet they dont get to that level of detail. Now codes are a tricky thing, people think they mean they are the best of the best when it comes to building. They are not. Codes are a minimum set of rules and standards to allow building safe structures. Personally, I wont build something where the fasteners are load bearing when it can be avoided, like in this case (stringer hangers). But again, Im just old school. I revert to my Audel's framing manuals published in the 1930's usually.
 

Tom Queen

New User
Tom
Interesting post as to I am getting ready to redo my garage steps to a universal adapted handicap platform with steps and a ramp in garage. We had our garage built larger just for this not to code ramp. Planning to have the ramp set up to remove easily if we ever sell our home. That is not going to happen probably. This is our dream home we moved i back in April '17.

Tom
 

Brogan

New User
.
Steps are almost done.

attachment.php
attachment.php
attachment.php


Made a few mistakes along the way but overall, I'm happy with how they turned out.


The only issue I have is how to deal with the tapering gap under the bottom riser - it's about an inch or so on the left tapering to nothing on the right.

attachment.php


If I had a table saw and a jointer, I'd rip two pieces and join them, but I don't, so I can't.

I could get a piece of 1" beading but that seems like a poor solution.

I may just have to leave it as a gap, which isn't ideal.

Then there's just baseboard and painting to do.
 

Attachments

  • 20171013_200525.jpg
    20171013_200525.jpg
    163.9 KB · Views: 192
  • 20171013_200809.jpg
    20171013_200809.jpg
    150.7 KB · Views: 197
  • 20171013_200838.jpg
    20171013_200838.jpg
    150.2 KB · Views: 206
  • 20171013_200543.jpg
    20171013_200543.jpg
    194.8 KB · Views: 201

Skymaster

New User
Jack
At this point make a tapered trim pc to cover gap. Ez to do, pick the dimension you want finished, add to that the width of the widest gap, place on floor on right, level it,pin place, make a block the thickness of the gap, place on floor, slide it across floor marking pc with pencil, pull it cut to line, wally scribed to floor
 

Jeff

New User
Jeff
Wow, that sure is a huge improvement! A small point, you may want to add a hand railing on each side for safety.
 

Brogan

New User
.
Oh and to follow up on my original question, I didn't do them either of the two ways :D

I did them like this to get extra wide steps.

attachment.php
 

Attachments

  • steps.JPG
    steps.JPG
    28.3 KB · Views: 189

Brogan

New User
.
Zach, I think I'm just going to sand them to remove any marks, ink stamps, etc.

I picked out some decent boards so they look fairly good as is.
 

Brogan

New User
.
I've just given everything a good sanding, first with 100 grit, then 150.

The boards look surprisingly good.

Would Danish Oil be a good finish for them?
 

Henry W

Henry
Corporate Member
Paul
Remember these are stairs treads - to be walked on with feet that are just a few steps away from the wild outdoors. Feet may be wet and or muddy when using these stairs (unless you don't get rain, that funny white stuff, or have mud in your area :D).

Whatever you do, don't make this surface too smooth, and definitely not slick.

If you insist on a finish, I would recommend use of those black non-slip strips for the top surface. Yes I am paranoid about slipping, especially on stairs.
 

Brogan

New User
.
The steps are done.
It's not exactly fine woodworking but they're made of wood and they work :D

I covered the gap caused by the sloping floor with a piece of 'stop moulding'.
It was a simpler option than trying to split two boards and I think I prefer it now anyway.
attachment.php


I tidied up the cinder block by capping it and put a little return on the end to cover the gap (that bottom miter could be better ...).
attachment.php


The best part is the landing (thanks again Henry) - they are so much more useful and it's far easier to get in and out of the house, especially with bags, etc.
No more potential broken ankles.
attachment.php


I'll get the baseboard and painting done this week hopefully.

Then it's on to the next project - the drop zone.
 

Attachments

  • IMG_1310.jpg
    IMG_1310.jpg
    182.8 KB · Views: 149
  • IMG_1314.jpg
    IMG_1314.jpg
    216.6 KB · Views: 157
  • IMG_1316.jpg
    IMG_1316.jpg
    194.7 KB · Views: 147
Status
Not open for further replies.

Premier Sponsor

Our Sponsors

LATEST FOR SALE LISTINGS

Top