Queen Anne Desk

creasman

Jim
Staff member
Corporate Member
I recently accepted a commission to build a work desk in the Queen Anne style. This is for a very important client. In fact, I'm wondering if accepting this job is a conflict of interest as I'm also married to the client. I've already had to relearn those two fundamental axioms of running a business -- "The client is always right", and "What the client wants, the client gets." BTW, you can substitute "wife" for "client" if you like. These hold true either way.

All kidding aside, I am looking forward to the project for the LOML. I'll document my progress here, and (hopefully) will wrap it up before the end of September. The first round of negotiations covered the basics -- mainly style and wood selection. These were pretty easy. She has another table that is Queen Anne style with Dutch feet turned that is cherry. The desk will be in the same style and fortunately I have some very nice cherry. It's air-dried, from old growth timber that was cut and milled around 50 years ago -- a woodworker's fantasy.

Next, we tackled the desk size. I have an adjustable desk for my day job. Using this we determined the optimal height for her would be 26". The width took a bit more consideration. She wants room for the chair to fit under the desk (at least up to the arms), enough room on each side to spread out her books, and a file drawer. I argued for symmetry, so we settled on an overall length of 60" with matching drawer fronts on either side. Depth is pretty standard at 24".

I spent time pouring over the books I have on furniture of this period and the internet to come up with a design. Even though my preference is to jump straight into building, I force myself to draw up plans. This makes me think through the process ahead of time so I don't "build myself into a corner." More importantly, it gives the client a visual they can sign off on. With that in mind I'll share the plans here so you can see where this project is heading.

QueenAnneDesk-p1.jpg
QueenAnneDesk-p2.jpg


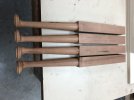
I started working on the project a couple of weeks ago. The legs are turned and the case work is underway. If you're interested in the process continue to watch this thread for more updates as I have time.
 

Wilsoncb

Williemakeit
Corporate Member
Lol, wife/client. See, that’s what happens when you are an overachiever.😂

I look forward to your updates.
 

creasman

Jim
Staff member
Corporate Member
Turning the legs.

I described the geometry involved in the offset turning of the legs previously in this thread. I won't go into that detail again here, but one aspect that is worth mentioning is that the legs themselves are from 2" x 2" stock. However, there is a ring around the base of the foot that is 2-1/8" in diameter. That means you need a little extra at the base.

My rough stock only allowed for 2" thickness. Even if I had the full 2-1/8" it would be wasteful and a lot of extra work just to get the extra diameter for the ring. The easier solution is to glue a small block on each side at the base of the leg. That can be tricky with turning as I don't want any glue joint to be seen. You need to match the wood for color and grain. I managed this by leaving each leg about 1-1/2" longer than I needed at the foot. Next, I trimmed and quartered this extra length on the diagonal. Flipping each of these triangles and attaching them to the same side they came from means both the grain and color match.

The next series of photos explain what I mean.
IMG_3961.JPG
IMG_3962.JPG
IMG_3963.JPG
IMG_3965.JPG


Below are the four legs. Can you spot the glue joints? Perhaps, if you look carefully.
IMG_4045.JPG
IMG_4046.JPG
 

Attachments

  • IMG_4046.JPG
    IMG_4046.JPG
    1.2 MB · Views: 68

Rwe2156

DrBob
Senior User
Is a Queen Anne leg basically a straight cabriole or is this your own design? I'm not familiar with it.
 

creasman

Jim
Staff member
Corporate Member
Most frequently you do see cabriole legs on Queen Anne furniture. These are either fully carved, or mostly carved with only the foot being turned.

The design that I am following is a fully turned leg (no carving). This is much less common. I have this book which has several examples with this style of leg/foot. Other names for this style is Dutch foot, pad foot or camel foot.
 

drw

Donn
Corporate Member
Jim, thank you very much for documenting this build, it will be interesting and I am confident the final product will be beautiful (the legs already point to a stunningly beautiful desk).
 

Jim Wallace

jimwallacewoodturning.com
Jim
Corporate Member
Freddie Pain describes these legs in detail in his book “The Practical WoodTurner”. He calls them mock cabriole legs. He shows how to turn various feet and how to make legs for a 4 or 3 legged stool. He was the WoodTurner in the Queen’s Shops in England during his working career, and was Peter Child’s first teacher.
 

creasman

Jim
Staff member
Corporate Member
Desk side panels.

I've been working on the back and sides of the desk as the next phase. The design of this desk is somewhat low and long. To counter how this might look visually I decided to run the grain of these panels vertically. For this to work structurally it means using cherry veneer on a proper substrate that will take the load. Gluing solid panels with the grain running vertically and then ripping these down to 12-3/4" (height of the panels) would be subject to major wood movement.

I am using 3/4" poplar for the substrate. The grain in these runs horizontal, so there is no concern in wood movement laterally. I will need to account for vertical movement, but that is a subject for a later post. At 13" wide these panels just fit through my DW 735 planer. I ripped wider boards down to around 2-1/2" to better orient the grain and mix up the pattern, then glued these to create the substrate panels.

All the cherry veneer is ripped from a single board that was about 10" wide and 30" long (enough for two vertical sections per slice). I prefer sawn veneer over the sliced variety you typically find in the woodworking stores for a number of reasons:
  • Sawn veneer is almost always thicker. I sawed this at 1/16", whereas the typical sliced veneer is 1/32" (sometimes less).
  • Sawn veneer is a thin board and works like any other board you mill. Sliced veneer is basically a plane shaving. One side is stressed and has minute cracks.
  • The log that is sliced into veneer has usually been steamed or boiled to soften the fibers before slicing. This changes the character of the wood in subtle ways.
  • I can saw my own veneer. This gives me quality control that I don't have when purchasing veneer. My veneer will match the rest of the project because it's from the same tree.
Here's the bandsaw set up for slicing. Before beginning I spent an hour or so tuning the saw, table and fence so it cuts the full width evenly. Still, it's a good idea to flip the board on each pass. With a 1-1/4" thick board I was able to get 9 sheets of veneer. Even though the bandsaw leaves a smooth cut I used a #7 to resurface the sawn side in between cutting the next piece. It only takes a few passes and ensures you have a smooth, flat side on each sheet.

1692556576443.png
1692556631233.png


Preparation includes cutting each sheet to length, then matching these for grain and color. I don't like to rush this part of the process, choosing to spend time swapping and interchanging the pieces until I like what I see. I add reference marks with a white pencil (easier to see on a dark wood like cherry). You'll note that I also number each sheet as it is sawn, and then number the pieces as I cut them. It's easy to accidentally "shuffle the deck" and then not know which boards should be neighbors.

1692557071480.png
1692557129024.png

1692557218022.png


There are a couple more preparation steps. I use a toothing plane to score the surfaces that will be glued. This includes both the substrate and the back side of the veneer (not something you could do with a thin, sliced veneer). Scoring gives the glue more surface area.

Once the surfaces are scored, I plane the adjoining edges of each pair of veneer sheets so these fit perfectly. This is done by folding them together (face to face) and jointing the edges on my shooting board. Pressure on the bar with my left hand holds the sheets firmly in place while I "shoot" with the plane in my right hand.

1692557584248.png
1692557750097.png


Now the fun starts! With over 12 square feet of veneer I need more hide glue heated than my small glue pot could handle. Fortunately, I found the best glue pot ever. Actually, I saw Steve Latta using one during his demo. It's a repurposed water bath from a scientific laboratory. I found one on eBay a few years ago at a good price b/c it was missing the cover. My solution was to make a cover from 1/4" plexiglas and use two 300 mL beakers for the glue pots. The waste from the holes cut for the beakers is used as lids after adding a knob. The water bath is meant to be precise and once you set a temperature it holds it there -- no variance.

I use the hammer veneer technique. First, apply glue to the substrate. Next, lay the veneer face down into the glue you just applied and apply glue to the back of the veneer. Now turn the glue over and put it in place. The "hammer" really works like a squeegee. As you work out the glue it begins to set and within a short time the sheets are sealed to the substrate. The glue on the face acts as a lubricant to allow the hammer to slide easier. If a spot isn't sticking I keep a hot iron and damp cloth nearby. Place the cloth on the spot, heat with the iron, and then clamp or use the hammer to reseal. As hot hide glue cools and dries it contracts, literally pulling the pieces together in a strong bond -- no clamps or press required. Push the seams together as you work.

1692558141238.png
1692558207291.png


I'm in the process now of smoothing each panel before they are cut to the final size. Again, because the veneer is sawn I can plane it just like a solid board. I use a #4 to bring everything down to the same level, then finish with a Stanley 12-1/2 veneer scraper plane. A sharp, properly tuned scraper plane is thing of beauty.

1692558823385.png


These are some of the finished sections.

1692558894442.png
1692558918603.png


If you made it this far, thanks for humoring me by reading such a long post. Stay tuned for more!
 

pop-pop

Man with many vises
Corporate Member
At first glance, the sawdust on your bandsaw table looked like rust.

I admire your work!
 

Jim Wallace

jimwallacewoodturning.com
Jim
Corporate Member
A couple of questions, Jim.

What blade are you using on your band saw?

When you say that you use the toothing plane on the side that will be glued, which side is that: the side that you planed with the #7, or the side that was recently passed through the saw?

How do you hold the thin veneer still for the toothing plane?

For veneer work Is the toothing plane always used in the same direction as the grain?

Do you ever use the toothing plane before making a normal edge (butt) joint? (After the jointer plane, #7).
 

drw

Donn
Corporate Member
Jim, thank you taking the time to write such an interesting and informative post. My experience with veneering has been minimal, so I appreciate all of the details. The panels are beautiful!
 

creasman

Jim
Staff member
Corporate Member
A couple of questions, Jim.

What blade are you using on your band saw?
I purchased the saw (18" Laguna) used with the blade included. I don't have the box, but I'm pretty sure it is the Resaw King carbide blade by Laguna. It's 1-1/4" with about 2 TPI. I've used their resaw blade on my 14" Delta. They are good blades.

When you say that you use the toothing plane on the side that will be glued, which side is that: the side that you planed with the #7, or the side that was recently passed through the saw?
It's the side that I planed with the #7. I debated whether it was better to put that side down, or not. The bandsaw cuts smooth but there is still the occasional ripple that might hinder the glue. It might have been easier to tooth the sawn side down to flat. I think you can make an argument either way.

How do you hold the thin veneer still for the toothing plane?
I clamp it at two of the corners and then tooth away from the clamps (i.e., so I'm pulling rather than pushing the veneer).

For veneer work Is the toothing plane always used in the same direction as the grain?
No. I work in a criss-cross pattern, working somewhat diagonally to the grain one way, then reversing the direction in a second pass. You could tooth with the grain. I believe it would have the same effect. I just find it easier to see how I'm doing by working across the grain. Part of the reason to tooth is to remove any high spots that might remain.

Do you ever use the toothing plane before making a normal edge (butt) joint? (After the jointer plane, #7).
I don't, but it would help create a stronger joint there as well. The problem I see is if you are wanting to hide the seam. It would be easier to spot the glue line in this case.
 

creasman

Jim
Staff member
Corporate Member
Edge mouldings

The desk top and bottom trim have the same moulding design, only the trim is scaled down from 7/8" to 5/8".
1693684534111.png

As mouldings go these are pretty simple. My original plan for creating them was to use a combination of hollows, rounds and a rabbet plane to create each. As I thought about it more I decided I stood a much better chance of getting consistency by making a custom moulding plane for each profile.

I took a class last year on plane making at the WoodWright's school taught by Stephen Slocum. I also completed a set of snipe bill planes around the same time that I describe in a previous post, so I have some experience. Most important I still have Stephen's excellent set of instructions. The only part I hadn't done was to create the scraper for shaping the sole.

I'm still working on the joinery for the desk, but decided to make the first of the two planes now as sort of a side project. The first part was to make the scraper blade. I broke off a section of an old hand saw, marked and filed it to match the larger of the two profiles.

1693685371046.png


Next was to decide on the spring angle I would use. This is the angle you hold the plane at with respect to the edge of the board. Spring is a way to keep the mouth narrow across the width and reduce the actual and effective cutting angle to get smoother cuts. After drawing several examples, ranging from 20 to 40 degrees I went with a 40 degree spring.

1693686018226.png


It's important to mount the scraper blade in the scratch stock at this angle.

1693685801604.png


Of course before any of this could start I needed a plane billet to use for the body. My preference is QS beech, but the thickest I could find was just 1". Instead I went with an (almost) QS block of cherry. This gave me the 1-3/8" thickness needed. I used a saw guide from making the snipe bill set to create a bed angle of 55 degrees (shown is the breast angle, which is 65 degrees).

1693686283997.png


Once these cuts are made you can begin shaping the sole. After drawing the shape on each end, next action is to rough it out with rabbet, hollows and rounds, making sure to stay above the lines. When you're close enough then begin scraping. This is where I use my plane vise.

1693686563106.png


The end result is a smooth, evenly finished sole that is burnished from the scraping action. After a quick check to make sure it matched it was time to cut the mortise, shape the iron and fit the wedge.

1693686677259.png


I didn't take a lot of pictures beyond this step. If you have questions about making tapered irons see this thread. End result is I have a new tool in my collection that will be ready to use when it comes time to make the moulding around the desk top. I can even use it to create the bullnose shape by planning the other edge up to where it begins cutting the cove. Note the spring line incised in the toe of the plane for reference.

1693687021473.png


1693686930357.png
 

Premier Sponsor

Our Sponsors

Top