Oramask and CNC trial

JNCarr

Joe
Corporate Member
After getting several good ideas from fellow WWers, on how to darken cherry under a CNC-cut maple veneer I tested the Oramask film. In a word - Excellent.

Here's the process for those with similar interest:
1) After sanding the maple veneer to 220, coat with 2 coats dewaxed shellac, lightly sanding with sanding pad between coats. Let dry 12 hours to make sure all volatiles are out.
2) Apply Oramask with medium/soft wallpaper roller. Let sit 2 hours.

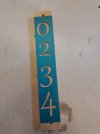
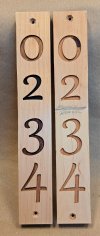
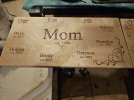
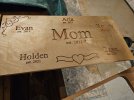
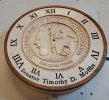
The attached shows the as-cut mask and a side-by-side comparison of previous cutout and the new mask-cut post-stained. The as-cut has not been cleaned up in any way and it shows very little fuzzies on the film. The 3 was cut first with a 60deg Vee bit with a lot of mileage on it. I then interrupted the CNC and change to a fresh bit. The other numbers were cut with that. Both cleaned up very well with an X-acto. The various stains were just "slogged on" intentionally heavy to see if there was any bleeding. The mask peeled off easily.

As mentioned before, I usually use india ink with a shellac mask for my clock numbers, but will now use the Oramask exclusively since it was so easy. There's a guy on YT touting just using self-stick shelf liner because it's 1/5th the cost and "almost as good". The way I look at it, when cutting $25-100 worth of hardwood, and adding my time for glue-up, planing, etc. - who cares that the film is $10 vs $2?
 

Attachments

  • NYGFC Frisket Mask.jpg
    NYGFC Frisket Mask.jpg
    1.6 MB · Views: 81
  • NYGFC Stain after Frisket Mask.jpg
    NYGFC Stain after Frisket Mask.jpg
    756.3 KB · Views: 83

Grimmy2016

Administrator
Scott
as an aside, I tried to do something similar with my CNC laser and found blue and green masks make it so the laser never makes it to the wood unless I go reallllllllly slow, to the point I am burning the paper almost to being on fire. Looks like this approach may better server me with actual CNC bits. Thanks for the info.
 

Echd

C
User
I tried the Walmart shelf liner. I had a request to do cuts in a piece of inexpensive plywood. Not my first choice for doing unfilled v carves, but whatever.

I used plain old rustoleum to fill the letters and cover up all the voids in the ply. It did a decent job. You can see where my shelf liner tore off around some lettering at times. I'm sure I did not apply it very well. Oramask is definitely the superior product but with better execution the shelf liner may be very usable. Possibly either a light sanding to 120 or using a flat edge to activate the adhesive better would yield more uniform results. The sign with the heart was my second attempt and you can tell I learned at least a little from my mistakes- it did much better.

As a side note, I was trialing a new vbit (30 degree 3 flute from RIP tools) and I called the vendor to ask about feeds and speeds. Very helpful guy. I got into a conversation with him about why I bought the bit- it has a similar profile to the cadence manufacturing Vbits I bought.

There is some marketing wank with them- they're really just chamfer mills with a downshear about them. I mentioned to the RIP guy that I got a lot of fuzziness with the cadence bits where his were cutting cleaner (The RIP brand being a more traditional upcut) He pointed out that the idea of the Cadence bits was that they worked well with oramask as they push the material down into the cut. I had not used any mask until these two cuts, so I did not have a frame of reference. Indeed there was some slight fraying around small details with the shelf liner that perhaps higher quality adhesive on oramask or a downcutting bit may correct. my overspray was easily sanded off so it was not a problem. Just food for thought. If you really like Oramask the GrooVee series vbits from Cadence Manufacturing might be worth looking into. If you aren't using a mask, I find them to leave fuzziness on edges.
 

Attachments

  • 20230512_132423.jpg
    20230512_132423.jpg
    1.6 MB · Views: 53
  • 20230512_131008.jpg
    20230512_131008.jpg
    1.8 MB · Views: 51
  • 20230512_205337.jpg
    20230512_205337.jpg
    3.6 MB · Views: 55
  • 20230512_205340.jpg
    20230512_205340.jpg
    3.6 MB · Views: 60
Last edited:

Davidj

New User
Dave
I have used the Oramask for a while now and I agree it is a great product. I have never tried shelf liner but I have my doubts as to how well it would work. A roller on the Oramask is a great addition to the process. If you can put a coat of finish on the surface before applying the Oramask it will definitely stick better. When I am going to paint the carving I first spray some clear finish, this keeps the darker paint from bleeding into unwanted/uncarved areas. I am staining the carving I stain with the mask on then use abrasive brushes in my rotary tool to get the bleed removed without removing much wood.

FPPO 50PCS Abrasive Buffing Polishing Wheel Set for Rotary Tool,Mini scouring pad Brush Polishing kit, Removal of Rust,Deburring on Metal Surface,with 3mm Mandrel​

I get these on Amazon. They don't last very long but they do a good job and are pretty inexpensive.
 

JNCarr

Joe
Corporate Member
While the original use for the mask was a different project, I used it on the attached state seal clock and it performed really well. Note a few fuzzies and one loss in the "e" in "Senator".
Also - a few months back there was a question about making segmented rings or arches. This shows an example of a 6 segment ring. Happy to provide details if anyone is interested.
 

Attachments

  • T Moffitt Oramask cut.jpg
    T Moffitt Oramask cut.jpg
    531.4 KB · Views: 39
  • T Moffitt State Seal Front.jpg
    T Moffitt State Seal Front.jpg
    1.7 MB · Views: 52

Premier Sponsor

Our Sponsors

LATEST FOR SALE LISTINGS

Top