Seems like an opportunity for a great article on the Resource forum. Please consider.A few just to amuse myself. I collect saws....and other things. Not trying to be the next Jared Greene. It's just something to do.
I'm making the whole thing ... Milling the back , turning saw nuts, cutting the plates and punching the teeth, handle... everything in house. I just about have it down quality-wise.
View attachment 222123
View attachment 222124
View attachment 222126
View attachment 222127

You are using an out of date browser. It may not display this or other websites correctly.
You should upgrade or use an alternative browser.
You should upgrade or use an alternative browser.
Dovetail saw
- Thread starter Westpacx3
- Start date
Lots of excellent responses on the saws. My 2 cents: I've used both styles and prefer the Japanese style pull saws. I believe the thinner blade makes for cleaner cuts because it is easier to start the cut and stay on the line.
A second saw you will be glad you have is a coping saw to cut out the waste on the tails. I use one that utilizes thumb screws to clamp scroll saw blades. A really fine tooth blade gets you real close to your scribed base line, minimizing clean up with a chisel.
You are correct about needing a marking gauge. Be sure to get one that has some sort of knife blade rather than a needle point scratcher. A needle point rips across the wood fibers; a blade cuts through the fibers, leaving a cleaner line. This becomes important when you put the finish on your piece. Also, a blade leaves a cleaner guide for your chisel when you clean out the waste and square up the pin pockets.
There are 2 types of blade marking gauges. I strongly recommend spending a little bit more $ and getting a gauge that has a roller wheel cutter rather than a tiny knife blade. The roller will stay sharper longer and is less likely to get cocked when you drag it across your board.
I encourage you to dive in head first in hand cutting dovetails. It won't take a lot of time to get proficient, and few skills show off hand craftsmanship better than clean dovetails. There is a bonus satisfaction just in cutting the joinery that goes above and beyond the satisfaction of making the whole piece.
OK, Jim and Mike, I've put them on my list of of things to bring to the ExtravaganzaPlease do. I am interested in the difference also
I always recommend the 14 ppi rip dovetail saw by Veritas. I think Klingspoor sells them. Good value and it has a thicker plate saw that is safer to learn with. No need for more than 14 pt unless you are doing very thin pieces. Sharp is more important than teeth per inch. 14 point is easier to sharpen than finer teeth.
Nothing wrong with a good japanese saw. Just depends on what you get used to.
Nothing wrong with a good japanese saw. Just depends on what you get used to.
Well it sounds as if we will have the opportunity to see what’s what between the two. Like anything involving using a saw, if you do not practice you will never get better. You also need to know how to maintain your tools to remain proficient. It all takes a willingness and dedication to practice.I look forward to seeing you at the Extravaganza.
Thanks, very helpful as have others. Is there a brand of marking gauge you like?Lots of excellent responses on the saws. My 2 cents: I've used both styles and prefer the Japanese style pull saws. I believe the thinner blade makes for cleaner cuts because it is easier to start the cut and stay on the line.
A second saw you will be glad you have is a coping saw to cut out the waste on the tails. I use one that utilizes thumb screws to clamp scroll saw blades. A really fine tooth blade gets you real close to your scribed base line, minimizing clean up with a chisel.
You are correct about needing a marking gauge. Be sure to get one that has some sort of knife blade rather than a needle point scratcher. A needle point rips across the wood fibers; a blade cuts through the fibers, leaving a cleaner line. This becomes important when you put the finish on your piece. Also, a blade leaves a cleaner guide for your chisel when you clean out the waste and square up the pin pockets.
There are 2 types of blade marking gauges. I strongly recommend spending a little bit more $ and getting a gauge that has a roller wheel cutter rather than a tiny knife blade. The roller will stay sharper longer and is less likely to get cocked when you drag it across your board.
I encourage you to dive in head first in hand cutting dovetails. It won't take a lot of time to get proficient, and few skills show off hand craftsmanship better than clean dovetails. There is a bonus satisfaction just in cutting the joinery that goes above and beyond the satisfaction of making the whole piece.
I also noticed several jigs for laying out the dovetails, is there one you prefer or just measure over and use a t bevel, I think?
I do like nice finishing touches and the mental reward of a nice looking project. Details matter to me...
Most of my box builds have been 3/8 to 1/2 inch thick.I always recommend the 14 ppi rip dovetail saw by Veritas. I think Klingspoor sells them. Good value and it has a thicker plate saw that is safer to learn with. No need for more than 14 pt unless you are doing very thin pieces. Sharp is more important than teeth per inch. 14 point is easier to sharpen than finer teeth.
Nothing wrong with a good japanese saw. Just depends on what you get used to.
Thanks
Agreed, practice, the one thing most don't like to do. It's like prep work, it takes a lot of time but the finish depends on it. Anything less, you are wasting time putting out an inferior product. I don't believe in perfection but I like to get close and hope for a way to belnd it in.Well it sounds as if we will have the opportunity to see what’s what between the two. Like anything involving using a saw, if you do not practice you will never get better. You also need to know how to maintain your tools to remain proficient. It all takes a willingness and dedication to practice.I look forward to seeing you at the Extravaganza.
Thanks
You can make your own little jig for laying out dovetails... I made the one Paul Sellers uses... super easy.... as for saws I have both but my pull saw does not rip well. Yours might be great..... I have the veritas and a florip for dovetails and if it matters - the push saws can be re sharpened but my understanding is that the pull saws cannot..... or at least not the one I bought..... YMMV..Thanks, very helpful as have others. Is there a brand of marking gauge you like?
I also noticed several jigs for laying out the dovetails, is there one you prefer or just measure over and use a t bevel, I think?
I do like nice finishing touches and the mental reward of a nice looking project. Details matter to me...
I started making dovetails with a Gentleman's saw I bought at Woodcraft. Nothing fancy and a good tpi (often higher). I still use that Gentleman saw along with my Veritas dovetail that was suggested by the first response. Enjoy making dovetails, they are fun to make the more you do it.
Nice looking saw Chris.
Woodcraft sells 2 models--#153490 and #154340. Either one will do. Dovetail jigs are convenient only because you don't have to reset a bevel gauge every time. I've got one, don't even know the brand. I think they're all pretty much the same. The Woodcraft model # is 167553. Most often I use a saddle style fixture I made a long time ago. Amazon has a bunch, including package deals that include marker gauge and dovetail marker.Thanks, very helpful as have others. Is there a brand of marking gauge you like?
I also noticed several jigs for laying out the dovetails, is there one you prefer or just measure over and use a t bevel, I think?
I do like nice finishing touches and the mental reward of a nice looking project. Details matter to me...
Look at the dovetail cut in wood. At NO time are you crosscutting. Ever. Dovetails are always a rip cut (with the grain, not across the grain). Years back there were various boutique saws sold as 'dovetail' saws. Those I've bought and seen all had crosscut teeth. I took a cheapie straight handle Disston and resharpened the teeth for a rip cut. It made all the difference in the world. Study the difference between a saw tooth made for ripping and a tooth made for crosscut. Major difference. With a 4" triangular file, some magnifiers and good light, you can make a cheap crap saw cut great. Mark the saw as a rip cut because it makes an awful crosscut saw.I'm planning on trying my hand at dovetails on small boxes. I have some decent chisels but no saw.
I realize too cheap a tool will make it more difficult and most likely frustrating but I don't have a budget right now for 200.00 saws.
Just something to consider.
Thanks, that's an interesting thought. I'm pretty sure there is a saw at my dad's I can change/experiment with at no cost while figuring this out. Dovetails where made long before high end engineering and mass marketing was done.Look at the dovetail cut in wood. At NO time are you crosscutting. Ever. Dovetails are always a rip cut (with the grain, not across the grain). Years back there were various boutique saws sold as 'dovetail' saws. Those I've bought and seen all had crosscut teeth. I took a cheapie straight handle Disston and resharpened the teeth for a rip cut. It made all the difference in the world. Study the difference between a saw tooth made for ripping and a tooth made for crosscut. Major difference. With a 4" triangular file, some magnifiers and good light, you can make a cheap crap saw cut great. Mark the saw as a rip cut because it makes an awful crosscut saw.
Just something to consider.
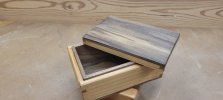
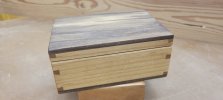
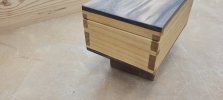
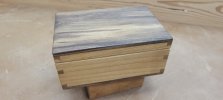
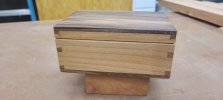
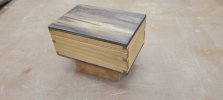
To bring this back full circle, sort of, Raymond give me his Japanese Dovetail Saw so I got a little practice in with it. I made a few saw guides based on a few YouTube guys and did my first box after a little practice. It got better as I worked around the sides. I hit the line a few times, went past a few time since I used Alder and it's super soft to cut. Chisel work was off but for a first, I'm happy. I went ahead and glued it up and salvaged it a bit with glue and duat in the gaps. Somebody here suggested white glue because it dries lighter. I'll try that next time as I saw the tip too late.
Anyway, I appreciate you guys and your input.
Ps. I was off a bit with the block plane as well on the corners. Not sure why yet...
Critiques and tips are most welcome
Anyway, I appreciate you guys and your input.
Ps. I was off a bit with the block plane as well on the corners. Not sure why yet...
Critiques and tips are most welcome
Attachments
Looks to me like a very nice effort. My rule of thumb is that I make most of my mistakes and fixes until the third attempt, i.e. The third and subsequent attempts usually have very few issues.
And- another rule of thumb suggestion: Don’t point out your errors and fixes, chances are that you are the only one that knows where they are. I don’t see any signs in the photos of the things you wrote in your post.
And- another rule of thumb suggestion: Don’t point out your errors and fixes, chances are that you are the only one that knows where they are. I don’t see any signs in the photos of the things you wrote in your post.
Thanks, I appreciate the input. I'm pretty pleased. I figured to point out what I knew of my mistakes here since most here are pretty skilled and also so any critiques would be towards areas I did not see.Looks to me like a very nice effort. My rule of thumb is that I make most of my mistakes and fixes until the third attempt, i.e. The third and subsequent attempts usually have very few issues.
And- another rule of thumb suggestion: Don’t point out your errors and fixes, chances are that you are the only one that knows where they are. I don’t see any signs in the photos of the things you wrote in your post.
I kinda enjoyed doing it and I assume I can only get better and faster once I fully understand the process and procedures.
I have a porter cable jig that's missing some bits and a few guides and replacing them will cost more than learning to use my saw so I think I'll just work on skill and not the technology.
Speaking of which, what's the consensus on marking gauges..
I see them from 17 to 150.00. For a hobbyists, is there a middle ground for scribing a line?
I made a combination marking/cutting gage.

That's what I did as well Mike. Since I was on a roll I made them for 1:4 to 1:8. Seems to be various opinions on what to use for what. What are you doing to scribe across the grain to mark where to stop the cut. Fine woodworking has a story about using blue tape and and knife to mark and them leave the outline as a guide. I have not tried that yet.
I tried freehand and it was off then the guide. My main issue is to get off the line and watch when to stop the cut. I overshot the line a few times mainly due to the Alder cutting so easily.
Premier Sponsor
Our Sponsors
LATEST FOR SALE LISTINGS
-
-
-
 SOLD -- $75: Gast moa v113 Vacuum Pump Veneer, 60" bag and board
- Started by peterdnight
- Replies: 1
-
GONE: Gladiator 5 cleats, 10 hangers, Paper Towel and Shelf
- Started by peterdnight
- Replies: 3
-
SOLD -- $100 Makita mac700 portable air + grex pin nailer + 2 others + 50' hose
- Started by peterdnight
- Replies: 1