Bookcase - WIP

Plunkett

Lee
Senior User
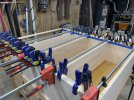
I thought I'd post some work in progress photos of the bookcase I promised to my wife two years ago! I've been building it with maple to match a credenza I built at the end of 2021. I'm using this Finewoodworking article as the design. Elegant Bookcase, Top to Bottom - FineWoodworking Ever since I saw it, I knew I wanted to try some variation of it. I won't have any drawers at the top, and the legs will be different to slightly match the credenza. I started with 8/4 and resawed. It almost worked! Some of the boards for the shelving twisted too much, so I had to use some other maple on the shelf. The goal was to book match all of it, but the sides are the only parts that are truly book matched now.

IMG_1713.JPEG

IMG_1714.JPEG


After glue up, I used a Stanley #80 to clean up the glue lines and smooth any irregularities. As you'll see, my hand tool skills are still limited, I'm enjoying learning and seeing positive results.

IMG_2281.JPEG


IMG_2291.JPEG


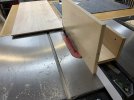
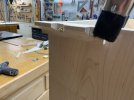
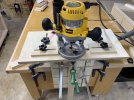
I rabbeted the sides to accept the face frame on the table saw with a dado set, and then I used my router at my first attempt at sliding tapered dovetails. I used an old piece of plywood I squared up as the guide/jig. I cut it down each time I moved to the next cut for the shelf. You can see the small piece of edge banding with tape on the end that I used to create the taper. I used a caul to ensure the side was flat as well. Due to the length of time in between all the steps, some of the wood moved again - but I had to make due. I'm a big fan of the dust collection on this dewalt router.

IMG_2331.JPEG


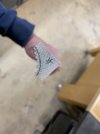
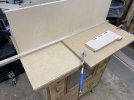
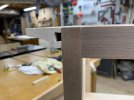
I then went to the router table to cut the dovetail angle on the ends of the shelving. I saw this set up in another finewoodworking video. I took a piece of 1/4" mdf and covered the top of the table to ensure a smooth and flat ride. I then screwed in a piece of plywood to the fence that was already there. I did have to shim it slightly to get it perfectly square. Then I ran it through using a microjig pushblock with a heel on it. I used a piece of edge banding taped to the end for the tapered side. Surprisingly it worked!! I was able to dial it in slowly and then used a sanding block cut at the same angle as the dovetail to clean up any tightness when dryfitting. And of course I used the best looking joint for the picture! I had some blowout on the other shelving, but it will be covered by the face frame.

IMG_2333.JPEG


IMG_2336.JPEG


I then resawed and milled some additional boards to 3/8" for the back. I'm using the spline method for the joinery and leaving about a 1/16" between each board. The back sits into a dado that was cut into the sides and bottom and back rail using a 1/4" box cutting blade on the table saw. Here is a dryfit before cutting the front top rail and face frame to length. I notched the bottom using a handsaw with a guide. It seemed to work, but I overcut from one side...fortunately it wasn't the show side.

IMG_2360.JPEG


IMG_2382.JPEG


IMG_2381.JPEG


I'd like to place one screw in the center of each back board into the shelf to tighten up any gaps between the back and shelving. I think this would still allow for wood movement without causing stress on the joinery. Does anyone see any glaring issues with that?
 

ssmith

New User
Scott
Nice looking shelf! Unlike some maple out there, the boards you chose have some character - it should turn out great.

As far as screwing the back boards into the shelves goes, my guess is it'll be fine provided you maintain your 1/16th gap between boards when you secure them. Just my opinion - maybe someone here has a solid rule of thumb to pass on for spacing, given the species and board width.
 
Last edited:

Plunkett

Lee
Senior User
Nice work. Looks rock solid. How do you plan to finish it?
We used General Finishes HP Topcoat in Satin on our other piece and liked the way it turned out. I wanted to avoid the amber tint with the oil base, after showing my wife two samples. She is the sprayer though. She lays it on with a Fuji 3 turbine sprayer. She loves it!
 

danceswithwindows

danceswithwindows
Corporate Member
Very nice work! Beyond the work on the bookcase, I like your clamping system on your assembly table, and what looks like a Oneida dust collection system - I’m in the market for one of those.

Also, the No.80 is one of my favorite tools - very satisfying to use!

Please share pictures of the final product when done. Thanks for the great write up!
 

Plunkett

Lee
Senior User
Very nice work! Beyond the work on the bookcase, I like your clamping system on your assembly table, and what looks like a Oneida dust collection system - I’m in the market for one of those.

Also, the No.80 is one of my favorite tools - very satisfying to use!

Please share pictures of the final product when done. Thanks for the great write up!
Thanks! The Oneida was a perfect fit for my size shop and tools. As another poster mentioned, the flex hose is a beast to move. I've shortened the portion of the hose that I move between the bandsaw, planer, and jointer. However, my shop is small enough to do that, and I have the system permanently mounted rather than mobile. I've made a run with a junction right over my table saw for it that also has a drop down I can attach to my sander. It all works well for me. I was nervous about buying something so expensive and not getting the performance, but so far it's been worth the investment for me. (I also saved up credit card points for three years to help offset the cost!)
 

Howie

Howie
Senior User
Very nice work! Beyond the work on the bookcase, I like your clamping system on your assembly table, and what looks like a Oneida dust collection system - I’m in the market for one of those.

Also, the No.80 is one of my favorite tools - very satisfying to use!

Please share pictures of the final product when done. Thanks for the great write up!
He still has this as of last nt. I wanted it but found one w/motor before he got back to me. I have a Cincinnati blower that would work w/it you could buy. It's a heck of a deal. You could be into completed unit for under $500. His CL email address
1676467680462.png
 

Howie

Howie
Senior User
Very nice, noticed a little blow out on your DT, did you leave the panels a little wide before routing then rip to final width? Another way to do the back would be a V T&G to allow for movement.
 

Plunkett

Lee
Senior User
Very nice, noticed a little blow out on your DT, did you leave the panels a little wide before routing then rip to final width? Another way to do the back would be a V T&G to allow for movement.

No…the blowout occurred when routing. I thought about using a wood backer but realized it would be covered with the face frame later.


Sent from my iPhone using Tapatalk
 

Plunkett

Lee
Senior User
Finally finished! I think this was one of my longer projects. Trying new joinery for me and setting it up took some time. It was worth it, and I learned a lot. Here are a few WIP pics, but as I neared the finished line my mindfulness to take pics diminished rapidly. Here is the face frame glue up. A few clamps...my daughter counted 42 😆

IMG_2396.JPEG

After I got the top glued up, I cut the bevel on the table saw. I made a quick jig to add some height to the fence. The top when on edge barely missed an hvac run by an inch!

IMG_2400.JPEG

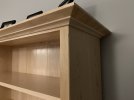
I next got to work on the molding. The plans called for an elliptical shape, and I liked the look. I milled the stock and nibbled up to the line on the table saw first. See the end grain pic. Then I used a cove bit in the router table to get closer to the line and smooth it out some. I finally finished with a scraper and sandpaper. This took quite a bit of time for me, but I liked the end result. The plans also called for screwing the molding in from the inside which I did. To deal with the case side expansion, the back miter return was glued as a separate piece on each side. Then I attached the back molding separately (which was square cut at each end). I've seen several do that on here. I was not particularly happy with how it looked...but it's hidden!!

IMG_2401.JPEGIMG_2402.JPEGIMG_2403.JPEG

Here's where my picture taking declined...I cut a dovetail on the router into the back of of the cove molding for each case side. Then I milled a dovetail cleat for the back end of each case side and screwed them on. The pick is a piece of molding notched and drilled that held the dovetail cleat and gave access to screw it into the side. This was the way the plan said it was done, and I found it very, very clever and helpful. I forgot to take a pick of the cleat itself, but the second pic is the molding with the dovetail routed out.

IMG_2405.JPEGIMG_2406.JPEG

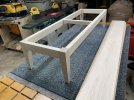
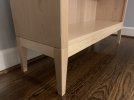
For the bottom, I created a base where I used slip tenon and mortise joinery to join the "aprons" (right word?) to the legs. I tapered the legs on the table saw. To do the mortise work, I used a morley mortiser another member sold to me a couple of years ago. I still haven't perfected it, but its close enough for my level of work at the moment. Once again, I LOVE the dust collection on this router. So nice. I used a spiral bit to rough out the notch that held the middle stretcher and chiseled the remaining bit. I did add two screw plates to each end to help with attachment to the case bottom. No pics of that. I also cut a rabbet around the top of the base to give it a slight floating top look. It was a "design change" to cover up a funky joint at one of the corners. It hides my mess up a little.

IMG_2408.JPEGIMG_2411.JPEG

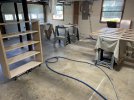
Here was the spray setup...after it was done and had started the final polish. Very high tech! 😁My wife uses a fuji mini 3 turbine and sprayed General Finishes High Performance Topcoat in satin. We've really like the end result. Great stuff to work with and it dries pretty quick.

IMG_2424.JPEG

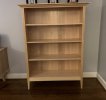
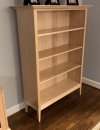
Here's the finished product. I attached the top with brass tabs that I cut from some stock I got at the local Ace Hardware. I didn't have great color match throughout the piece as I decided to use a lot of what I had on hand with newly purchased lumber. Sometimes I look at it and like the variation and sometimes I don't. Ha! My favorite features are the way the back turned out and the bookmatched sides. I hadn't done that before, and on one side the figure creates a cool v look that's hard to see in the pic of the side. My wife is happy, so the bookcase was a success!

IMG_2425.JPEGIMG_2427.JPEGIMG_2428.JPEGIMG_2429.JPEG
 

Plunkett

Lee
Senior User
Thanks, John. I ended up going with one screw through each slat into the shelves. There's no glue where the slats meet the case sides, top, and bottom. With a 1/16" gap at least between the slats, I'm hoping this thing doesn't explode this summer!
 

Wilsoncb

Williemakeit
Corporate Member
Very nice, that’s what I call some next level workmanship!

Also, thanks for including the pictures that include some of your setups. It’s always helpful to see how a pro does it.
 

Plunkett

Lee
Senior User
Very very nice work.

Did you consider pinning the slats to the shelves with wood pegs?

Not once can you give some more detail on how that would be done? That sounds much better than brass screws that can break off even using wax and screwdriver to drive them in. Not that that happened to me 3x on this project.


Sent from my iPhone using Tapatalk
 

pop-pop

Man with many vises
Corporate Member
Not once can you give some more detail on how that would be done? That sounds much better than brass screws that can break off even using wax and screwdriver to drive them in. Not that that happened to me 3x on this project.


Sent from my iPhone using Tapatalk

I use a lot of brass screws and use these to pre-drill and drill a clearance hole in the upper piece using the bits behind. Very little breakage this way.
 

Premier Sponsor

Our Sponsors

Top