
You are using an out of date browser. It may not display this or other websites correctly.
You should upgrade or use an alternative browser.
You should upgrade or use an alternative browser.
Bandsaw Tire Troubles: Beware Urethane users
- Thread starter danmart77
- Start date
- Status
- Not open for further replies.
I looks like you have been working with this machine for a while.
For a while, yes. Probably since the late 1980s when I first started repairing woodworking machines for school shops. Next to the Powermatic model 81, this is my second favorite band saw. Sometimes I prefer its smaller footprint and lighter weight (relatively). The steel guides are far superior to any 20" saw since they emulate the Delta 14's design, just bigger. Everything is easy to adjust and everything is adjustable.
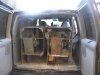
I even found out that two of them will fit inside a GMC Safari mini van.
Taken in Feb, 2004
Attachments
Bob the story gets better on this one. Without a 3 prong puller I elected to take the entire trunnion assembly out .. wheel and all.
Once it was out I looked at the wheel holes where 3 bolts hold the brake drum. One bolt is broken. Someone fooled with it and I noted this on the inside of the cover and kept moving last time I had it apart and put a tire on the lower end.
For clarification: I never took the lower wheel off the shaft fearing a broken wheel would be a disaster. This time took the entire trunnion out and tapped on the end of the shaft that seats the bigger pulley. The entire shaft and 2 bearings come out with a few more taps. This should not happen so I knew something is not right here?? No retaining nut.
Guess what? The guy who broke the one bolt holding the brake drum to the wheel did not put the big retaining nut back on the shaft. Yes no retaining nut.
http://www.renovoparts.com/426-04-079-5006-bearing-retainer-nut/

I don't know where to find the exact match for this but the address above mentions it fits all Delta/Rockwell shafts. Not sure of the fit but I know I will need one if I ever get the wheel to come off.
I guess I am going to Advance or Napa to see if I can get a 3 pronged puller today.
The tires should arrive today. Not that I will get the other things done.
Question Bob-- do you know of a good supplier who might have one of these retaining nuts? Also thinking of replacing the bearing even if they feel tight. Any info would be great.
Dan
Once it was out I looked at the wheel holes where 3 bolts hold the brake drum. One bolt is broken. Someone fooled with it and I noted this on the inside of the cover and kept moving last time I had it apart and put a tire on the lower end.
For clarification: I never took the lower wheel off the shaft fearing a broken wheel would be a disaster. This time took the entire trunnion out and tapped on the end of the shaft that seats the bigger pulley. The entire shaft and 2 bearings come out with a few more taps. This should not happen so I knew something is not right here?? No retaining nut.
Guess what? The guy who broke the one bolt holding the brake drum to the wheel did not put the big retaining nut back on the shaft. Yes no retaining nut.
http://www.renovoparts.com/426-04-079-5006-bearing-retainer-nut/
I don't know where to find the exact match for this but the address above mentions it fits all Delta/Rockwell shafts. Not sure of the fit but I know I will need one if I ever get the wheel to come off.
I guess I am going to Advance or Napa to see if I can get a 3 pronged puller today.
The tires should arrive today. Not that I will get the other things done.
Question Bob-- do you know of a good supplier who might have one of these retaining nuts? Also thinking of replacing the bearing even if they feel tight. Any info would be great.
Dan
Attachments
Last edited:
I can’t help you with the nuts, but the bearing part number info will typically be etched into the existing bearing, you just order another of the same type. Otherwise you would carefully measure the dimensions with a caliper and look up the part number. As a woodworking machine, you generally want a shielded bearing to help keep dust out — shields are denoted with the letter “Z” appended to the bearing part number, so a double-shielded bearing will have “ZZ” appended to the bearing number (meaning there is a shield on both sides of the bearing — assuming both sides are open to dust, otherwise only the exposed side needs shielding, thus a single “Z”). If no sides are exposed to dust then shields are totally optional and unnecessary since dust can not enter, but usually at least one side is open to dust.
When installing the bearings remember that you don’t want to transfer forces through the bearing balls anymore than absolutely necessary if they need pounding or pressed in by force, so you will want to use a ratchet socket or other appropriate diameter item to hammer in a bearing such that you apply the force to the bearing race that avoids applying forces to the bearings — so if installing onto a shaft you apply force onto the inner bearing race, when installing the bearing in its receiving “cup” you apply force to only the outer bearing race. If the fit is loose and you can press things into place by hand then it matters very little, but if you have whack at things with a mallet then you want to be careful to try and avoid transferring forces across the bearing balls so that you get the maximum life out of your new bearings.
When installing the bearings remember that you don’t want to transfer forces through the bearing balls anymore than absolutely necessary if they need pounding or pressed in by force, so you will want to use a ratchet socket or other appropriate diameter item to hammer in a bearing such that you apply the force to the bearing race that avoids applying forces to the bearings — so if installing onto a shaft you apply force onto the inner bearing race, when installing the bearing in its receiving “cup” you apply force to only the outer bearing race. If the fit is loose and you can press things into place by hand then it matters very little, but if you have whack at things with a mallet then you want to be careful to try and avoid transferring forces across the bearing balls so that you get the maximum life out of your new bearings.
Well many hours later and a trip to Advance for a pulley remover, I have the shaft separated from the lower wheel. Reading Ethan's post I tried to find bearings with z or zz and I am having no luck.
The bearing numbers to get started on the lower wheel shaft are 87506 and 87505. The bearings on the shaft seem to be in good shape but since I'm in the middle of all this surgery, I might as well put new bearings in the saw.
My big challenge will be finding a retaining nut to hold the shaft in place in the front. I can't believe the person who took it apart forgot to put it back in?? The cost of the part new is unreasonably expensive. Maybe he thought the heck with it and we'll see if this works.
I would like to get the part some way.
Any recommendations are appreciated. I am having a little search frustration trying to find the used parts section of the OWWM site. I'll have to work on that tomorrow.
Here is a photo of the trunnion that hold the shaft that the lower wheel is attached to. On the back of the shaft is the large pulley driven by the motor. Its very hard to see but there is threading at the very beginning of the opening. The bearing sits in the little shelf and is stopped by the next step. To keep it from coming out while in motion there needs to be a large nut that screws in the threads.

The photo below is how I spent my day. Snug the pulley, tap the head of the compression bolt resnug the compression bolt. The whole time praying you don't crack the aluminum wheel.

I have had some horror stories doing old Peugot brake drums but this one is the gold medal winner. What a pain in the a$$

The puller would not do the job without tapping on the long bolt several times than tightening with a wrench to move it 1/32

Its done and I am on my way to get some ice and Dr Dickel.
The bearing numbers to get started on the lower wheel shaft are 87506 and 87505. The bearings on the shaft seem to be in good shape but since I'm in the middle of all this surgery, I might as well put new bearings in the saw.
My big challenge will be finding a retaining nut to hold the shaft in place in the front. I can't believe the person who took it apart forgot to put it back in?? The cost of the part new is unreasonably expensive. Maybe he thought the heck with it and we'll see if this works.
I would like to get the part some way.
Any recommendations are appreciated. I am having a little search frustration trying to find the used parts section of the OWWM site. I'll have to work on that tomorrow.
Here is a photo of the trunnion that hold the shaft that the lower wheel is attached to. On the back of the shaft is the large pulley driven by the motor. Its very hard to see but there is threading at the very beginning of the opening. The bearing sits in the little shelf and is stopped by the next step. To keep it from coming out while in motion there needs to be a large nut that screws in the threads.
The photo below is how I spent my day. Snug the pulley, tap the head of the compression bolt resnug the compression bolt. The whole time praying you don't crack the aluminum wheel.
I have had some horror stories doing old Peugot brake drums but this one is the gold medal winner. What a pain in the a$$
The puller would not do the job without tapping on the long bolt several times than tightening with a wrench to move it 1/32
Its done and I am on my way to get some ice and Dr Dickel.
Last edited:
What's wrong with this nut? You could just call Renovo with the specs for your Delta bandsaw.
Dan,
I'm not sure if you're a member of OWWM, but you must be to access the "Classified Forums BOYD" section of OWWM.
I have tried to register at the OWWM site several times. I have had some friends help and I still can not register??
I tried again today (4th attempt) and I still get can't enter codes.
There is not help button or contact info for assistance with registration that I can find.
Well here's an update as of Saturday afternoon and the mail arrives with my part to button up my bandsaw. As you see in an earlier thread, I ordered a part from Renovoparts.
I called them on the phone and talked. Then I sent along a photo and a description of the retaining nut so there could be no mistake. Ha.
This is the end of the trunnion assembly where the shaft will fit with bearings in place. The shaft requires a large nut to keep the shaft in the cast iron trunnion. Notice the threads? This opening is about 2.5 inches
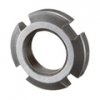
Below is the photo I sent along to verify the size of the nut I needed. Its big folks.

This is what arrived today. Should I be frustrated when the guy on the other end hears me say the nut is 2.5" side to side and this is what comes for 25 dollars and another 10 for shipping?

I mean I know close is good enough with bombs and horse shoes but this is a different situation.
I can not think of what I should have done differently before the order? Yea I know I'm a little frustrated but this seems careless in a business that is built on details and accuracy.
Well I'll just keep searchin' cause I ain't cuttin'
I called them on the phone and talked. Then I sent along a photo and a description of the retaining nut so there could be no mistake. Ha.
This is the end of the trunnion assembly where the shaft will fit with bearings in place. The shaft requires a large nut to keep the shaft in the cast iron trunnion. Notice the threads? This opening is about 2.5 inches
Below is the photo I sent along to verify the size of the nut I needed. Its big folks.
This is what arrived today. Should I be frustrated when the guy on the other end hears me say the nut is 2.5" side to side and this is what comes for 25 dollars and another 10 for shipping?
I mean I know close is good enough with bombs and horse shoes but this is a different situation.
I can not think of what I should have done differently before the order? Yea I know I'm a little frustrated but this seems careless in a business that is built on details and accuracy.
Well I'll just keep searchin' cause I ain't cuttin'
Last set of tires, I installed said to use 160 degree water, not boiling to heat them. Specifically cautioned against boiling them.With Urethane tires, it is best to fit them immediately out of boiling water. They will retain their initial memory once cooled down. If they are stretched cold, the polymer will stretch permanet
Last set of tires, I installed said to use 160 degree water, not boiling to heat them. Specifically cautioned against boiling them.
You do not need to heat them at all. In conversation with a guy who assembles the tires he discouraged me from heating them. As you know from the thread my urethane tires stretched and they were never heated.
The fix for the issue was sending them back to the maker and having them cut down and refit to the wheel. You know they are going to be tight.
https://www.youtube.com/watch?v=93u25HgYjxs
If you make this little jig, it will take you 5 minutes per wheel with some tight tires. I used this but I did cheat a little with a pry bar to move along.
I hope this works. If this urethane stretches, I am going to go back to rubber and glue. Hopefully these will last. At 250/pr they should last a very long time in my view.
Well Bob Vaughan sent the right part down from Roanoke VA. This part is a "hen's tooth" by most accounts. I can not thank him enough for his expertise and direction.
This is the area of concern. A shaft with 2 large bearings goes in this casting(trunnion). It needs a "nut" or threaded ring to hold the shaft, bearings and wheel from coming out of the trunnion. Finding this part for a 1963 model 28-350 is not easy.

In photo 2 you see the shaft and front bearing being tapped gently in place

The shaft is fully seated and ready for the new ring to be screwed in place. Bob pointed out that this is a 20tpi pattern and recommended "freshing out" the thread pattern with a 1/4 -20 tap. Worked like a champ. Remember there had not been a ring in place for over 25 years.
note: that's the wrong nut sitting there before being sent back to Michigan.

Tool to get the ring in and tight enough aganst the bearing.

Ok what's this mess? Once I put the wheel on the shaft its hard to tell if the shaft is shifting or anything with the ring is going on. I can see these position marks looking behind the wheel. Won't be easy but I did it while it was on the bench.

Today, I will pull all the pieces together and tune it up. I will post the test flight results later today time permitting.
till then
This is the area of concern. A shaft with 2 large bearings goes in this casting(trunnion). It needs a "nut" or threaded ring to hold the shaft, bearings and wheel from coming out of the trunnion. Finding this part for a 1963 model 28-350 is not easy.
In photo 2 you see the shaft and front bearing being tapped gently in place
The shaft is fully seated and ready for the new ring to be screwed in place. Bob pointed out that this is a 20tpi pattern and recommended "freshing out" the thread pattern with a 1/4 -20 tap. Worked like a champ. Remember there had not been a ring in place for over 25 years.
note: that's the wrong nut sitting there before being sent back to Michigan.
Tool to get the ring in and tight enough aganst the bearing.
Ok what's this mess? Once I put the wheel on the shaft its hard to tell if the shaft is shifting or anything with the ring is going on. I can see these position marks looking behind the wheel. Won't be easy but I did it while it was on the bench.
Today, I will pull all the pieces together and tune it up. I will post the test flight results later today time permitting.
till then
Last edited:
Well with plenty of adult supervision and logistics support from Bob Vaughan, my old Delta is humming along and cutting nicely. I don't want a "flash in the pan" solution I want this to stay tight and let me get back to cutting wood.
This machine with a 3tpi blade 3/4" wide x .032 thick will generate a boat load of sawdust. I'm reading and trying to get smarter on dust collection tools but where I see my troubles is how I attach the hose to the point with the best draw?
The 2" pipe connection on the original machine is worthless. I'm thinking of designing a tube that will sit under the table and catch the chips right as they are cut from the board.
This one is going to take some experimentation amigos. If I find something that works well, I will post pictures.
later
The 2" pipe connection on the original machine is worthless. I'm thinking of designing a tube that will sit under the table and catch the chips right as they are cut from the board.
This one is going to take some experimentation amigos. If I find something that works well, I will post pictures.
Bruce (Junquecol) posted his solution several years back. I believe it was a "tip of the month" award winner for WOOD magazine. Search the archives for his solution. You could likely adapt it to your machine.
EDIT - I just searched the archives and Bruce can't post it publicly, as it now belongs to WOOD magazine. He has described it. I guess I have seen it in my back issues of WOOD.
Last edited:
EDIT - I just searched the archives and Bruce can't post it publicly, as it now belongs to WOOD magazine. He has described it. I guess I have seen it in my back issues of WOOD.
I seriously doubt that the copyright police will discover it if Bruce posts it in our NCWW archives with pictures and a detailed description. I'm not suggesting a broad distribution on other public forums.
Maybe some kind soul can retrieve it from WOOD magazine and mail it to Dan.
Last edited:
- Status
- Not open for further replies.
Premier Sponsor
Our Sponsors
LATEST FOR SALE LISTINGS
-
-
-
 SOLD -- $75: Gast moa v113 Vacuum Pump Veneer, 60" bag and board
- Started by peterdnight
- Replies: 1
-
GONE: Gladiator 5 cleats, 10 hangers, Paper Towel and Shelf
- Started by peterdnight
- Replies: 3
-
SOLD -- $100 Makita mac700 portable air + grex pin nailer + 2 others + 50' hose
- Started by peterdnight
- Replies: 1