
You are using an out of date browser. It may not display this or other websites correctly.
You should upgrade or use an alternative browser.
You should upgrade or use an alternative browser.
A Finish For Walnut
- Thread starter Rick_B
- Start date
- Status
- Not open for further replies.
Thanks for the thoughts folks - unfortunately I am alsmost done with the waterlox application. I tried the tape but fekt that I would have had too many areas where the tape would have left an exposed (unfinished) area outside of the shoulder of the tenon. In hindsight - it would have been a lot easier to touch up those areas than the method I am using - live and learn
Rick
It's good to learn and experiment along the way too. I'd like to see some pictures of your work in progress with the "mortise" fillers (temporary fake tenons) before and after finishing of the individual pieces. Just curious about that method. You'll probably have pretty good glue joints either way but you chose "the road less traveled".
It's good to learn and experiment along the way too. I'd like to see some pictures of your work in progress with the "mortise" fillers (temporary fake tenons) before and after finishing of the individual pieces. Just curious about that method. You'll probably have pretty good glue joints either way but you chose "the road less traveled".
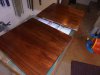
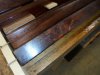
I've been thinking a lot about this today - I currently have 4 coats of foam brushed waterlox on the parts. I decided to wet sand on side of a leg to see where I was at. Some of the legs had some pretty wild grain and I still have a bit of open grain. I also pulled the fake tenons on this leg - pretty sad
") . there is a lot of build up due to, I think, working around the tenon pieces sticking out of the mortice. At this point I think I need to pull out all of the fake tenons, wet sand with 400 grit wet/dry and mineral spirits to get back to something closer to flat. Thenb I'm not sure - I'm wondering if I need to use a grain filler or just wipeon more coats of waterlox. Also - I'm thinking of gluing up the side frames before any more finishing. Oh yeah - at this point Ilm going to try taping the mortices versus "fake tenons".
. there is a lot of build up due to, I think, working around the tenon pieces sticking out of the mortice. At this point I think I need to pull out all of the fake tenons, wet sand with 400 grit wet/dry and mineral spirits to get back to something closer to flat. Thenb I'm not sure - I'm wondering if I need to use a grain filler or just wipeon more coats of waterlox. Also - I'm thinking of gluing up the side frames before any more finishing. Oh yeah - at this point Ilm going to try taping the mortices versus "fake tenons".Any thoughts on where to go from here will be appreciated.
Thanks
Rick
PS: I used a light johnson's paste wax on the one side of the test leg - The wx is what was very visible in the open grain. I believe I need to get a darker paste wax for the final product.
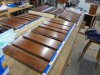
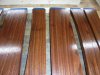
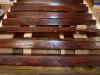
Some pictures of the WIP - generally speaking I think most of the pieces are coming out pretty good - just the legs that may need some help. Sorry - I can't remember how to display the pictures within the post
Attachments
Hi Rick,
I am not an expert (in fact far from it) on finishing, but I have used Waterlox successfully before on many small Bible boxes, jewelry boxes, and a QSWO flower table I made for the church (pictures in gallery). I always used lent free cloth and wiped it on in thin layers with 24+ hours between coats. Are you sure you are not putting too much on with the foam brush? Just my thought - many others on the site are infinitely better at finishing than me, so will have more valid input.
I am not an expert (in fact far from it) on finishing, but I have used Waterlox successfully before on many small Bible boxes, jewelry boxes, and a QSWO flower table I made for the church (pictures in gallery). I always used lent free cloth and wiped it on in thin layers with 24+ hours between coats. Are you sure you are not putting too much on with the foam brush? Just my thought - many others on the site are infinitely better at finishing than me, so will have more valid input.
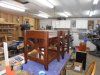
I thought I'd post a picture of the partially finished tables. I modified the schedule a bit
The schedule I used was
1. sand to 150
2. Vacuum
3. Wipe with cotton cloth
4. 2 coats of waterlox (morning and evening)
5. Lightly sand with 320 grit after 24 hours
6. 2 additional coats of waterlox (1 every day)
8. wet sand after coat 4 with 600 wet/dry paper and MS lubricant
9. Paste wax
I still need to complete the tops and drawers
Rick
Attachments
I use Waterlox almost exclusively (shellac and water based poly when i want to do something quickly). When i open a new can I pour it all in small mason jars that are the size of one job. If i end up not using all of it and have some gel up, i haven't lost much.
Gelling is caused by oxygen. You have to use Bloxygen (argon gas) which blankets the unused product in the original container. Only pour out what you need for a finish and don't pour any leftovers back into the original container. I know this from $$ lost experience before I learned about Bloxygen. I usually buy 3 or 4 cans so there are spares on the shelf for next time.
http://www.bloxygen.com
I use the Original Sealer/Finish which is about 50% sheen and the satin is about 25% sheen. The Original can be knocked back with steel wool or ScotchBrite pads if you wish so it approximates the satin. You don't need to thin it and probably shouldn't either.
https://www.waterlox.com/products-item/waterlox-original-penetrating-tung-oil-floor-sealer-finish
- Status
- Not open for further replies.
Premier Sponsor
Our Sponsors
LATEST FOR SALE LISTINGS
-
-
-
 SOLD -- $75: Gast moa v113 Vacuum Pump Veneer, 60" bag and board
- Started by peterdnight
- Replies: 1
-
GONE: Gladiator 5 cleats, 10 hangers, Paper Towel and Shelf
- Started by peterdnight
- Replies: 3
-
SOLD -- $100 Makita mac700 portable air + grex pin nailer + 2 others + 50' hose
- Started by peterdnight
- Replies: 1