
Froglips asked about reworking an ax. I asked my friend in England if I can borrow his extremely well written post on a board over there on the subject. A good friend he is, so here is his post.
There is also one on sharpening I will try to find.
There is also one on sharpening I will try to find.
British Red said:Tidying up an axe
Well I decided to re-dress an axe today (found a cheap one) and I thought it might be useful to publish a step-by-step guide given theres been a few threads on axes that have been "Munzed"
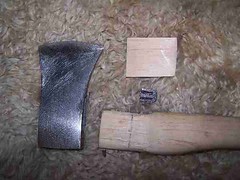
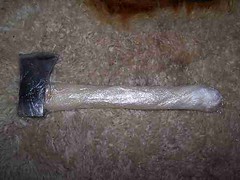
Heres an old hatchet thats a good candidate for some TLC

Whats wrong with it? Well the blade is covered in rust and the blade edge is nicked and doesnt cut evenly.
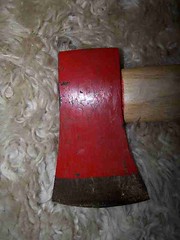
Worse though is the fact that there is some severe haft damage.
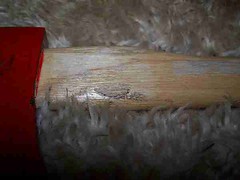
A dent and crack this bad could cause the haft to snap in use and the head to fly off. Not the safest thing.
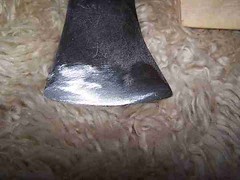
So, first job is to get all that paint and rust off and see what we have. Now on a quality old head, I'd hand rub back. This though is a cheap “user" of a hatchet, so we'll give it a quick clean with an electric sander. I like to do this with the old haft in or to the bare head. Any slips could damage the new haft.
This is what we end up with..a nice 11/4 lb hatchet head.
Now that I can see what we have, I need to re-profile the blade. There are a few nasty dings and the profile is too thick. So I clamp the blade upright in a vice (between a couple of sheets of leather to stop marking the blade). I hold a file haft in my right hand and the top of the file between my middle finger and palm of my left hand. I then file off one side of the blade dropping my left wrist whilst filing to create a slightly convex profile. Turning the axe frequently I sight along the blade edge to make sure its straight and in line with the “eye".
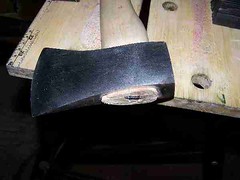
We end up with this
Okay, tricky time. We need to get that old haft out. Not normally a problem, but these days they often fill the eye with some sort of acrylic gunk. The problem with this is that you can see whats underneath it.
So, is the head loose? Yes haha, I'll just tap it out. Nope, not a chance. Its not that loose. So, saw the haft off flush to the head and turn over. Try to tap out from the haft side. You know what the inside of an eye is shaped like right? Its like a funnel with the spout end where the haft comes out (wider at the top than the bottom). So trying to pull a haft out rarely works. The haft is wider below the head so the head can't drop down the haft. Its straight when you put the new haft in, but then you drive wedges in to widen the top of the haft so it fills the funnel shape. So the head can't fly off the top because of the funnel shape or slip down because of the widening haft. However cut off the haft and you can often drive the stump out the wide mouth of the head (the top).
Not in this case though. So, goggles and gloves and I drill through the haft half a dozen times going VERY carefully in case there is a metal wedge. There isn't and the haft drops out.
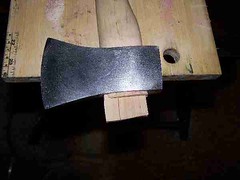
Fantastic. Now we are getting somewhere. Right, next job. Fit the haft. I'm using a store bought hickory haft and its too big to go through the eye at the bottom of the head. This is a good thing. Using a sharp knife I SHAVE sliver of wood off the haft until it will just pass through the narrow eye. I measured the depth of the head before I started and added ½" as I want the haft to project a little. A quick rub of sandpaper (easier now than later) and the haft is ready for the next stage. I'm going to need a wooden wedge next. Out to the woodpile and find a nice bit or dry oak (your wedge must be seasoned or it will split). Now I have measured the length of the eye and reckon for a little head like this a wedge about ¾" wide will do. I make it much longer than I need, you'll see why later. I measure the width of the eye and select and iron hammer wedge the right size (No 2 in this case). Okay, I have all my parts assembled.
Next stage is to saw a slot for the wedge. Clamp the haft vertically and using a tenon saw, cut a slot into the haft for 2/3 of the depth of the head. It should look something like this.
You'll notice the line is just off straight. I find this helps stop splitting later.
Next, fit the head snugly and, using a block of wood flat to the top of the wooden wedge, drive the wedge gently but firmly in place.
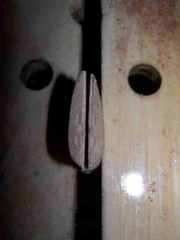
Using your saw, cut the wedge off parallel to the haft. Then take your soft iron wedge and tap it in at 45 degrees to the wooden wedge in the centre of the haft. Make sure your head doesn't move whilst wedging.
Well, we are nearly there now. A final sand of the handle, then an oil soak. Lay a piece of cling film twice the length of the axe down. Cover in a double layer of kitchen towel. Soak the towel in linseed oil (or whatever you use). Put the axe on top, wrap the towel around the haft and cling film round the lot. Leave for 24 hours or better yet longer. The oil will penetrate the wood, swelling the grain for a tight fit and protecting from drying out.
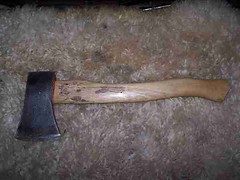
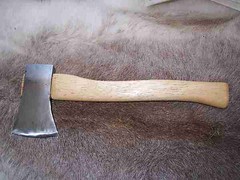
Remove all the cloth, wipe down well and sharpen and that's it, a nice little camp hatchet.
Given that we have left a quarter of an inch of the haft “proud" from the head, next time we need to re-haft it, all that's needed is to hook the metal wedge out with a flat head screwdriver, saw off and tap out the loose haft . no glue, no resin. The nice part of this job is that a haft costs just over a quid and a soft iron wedge a few pence. A rough hatchet can be picked up for 50p in a car boot sale. Buy 2 or 3 hafts and a box of mixed wedges and you'll be out £5. You also can have a few tries at re-hafting and I'm fairly sure by the third go you'll get the knack of it. If you get it sooner, you have some spare hafts!
Hope thats useful -
British Red


