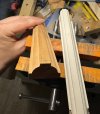
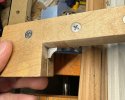
I'm trying to get better at using scratch stocks so I thought I would ask for some advice. The two major uses I am interested in are making small molding pieces and defining/repairing the soles of molding planes.* I built a stock that looks basically like these woodsmith plans and I have made a few cutters out of cut up card scrapers. The cutters I am basically sharpening like you would a standard card scraper, with a square edge and burrs on both sides.
The first problem I tend to have is the profile ends up nearly full depth in the center of the workpiece, along the long axis, but it's shallow on the near and far end, so you sort of get a dished look. I suspect this is mostly a technique thing, about where you start strokes and in what direction and where do you stop etc. -- if anyone wants to share the technique they use that would be very helpful.
The second problem is that the cutter doesn't establish a full depth profile because it stops cutting at some point, usually like at 90% of depth. I don't think it's just from the cutter getting dull; I think this is a cutting geometry thing but I am not sure what the 'right' way to fix it is. I believe the core issue I'm seeing is that, since it's prepared like a card scraper, if the cutter is not pitched at an angle so that the burr engages, it won't cut any deeper. But you have no choice to reach full depth than to have the cutter at 90 degrees to the work at the end, since I'm (currently) making them as exact negatives of the molding profile. It seems to hang up particularly on the "horizontal" parts of circular profiles (like the top of the circle part of a bead.) You could maybe fix this by adjusting the shape of the cutter to an angled projection of the desired profile, like molding irons are, and using it always at a pitch, but there's no way to precisely control the pitch angle on a scratch stock to begin with, so you could end up cutting deeper than intended. I feel like I am missing something fundamental here. Should I be using a different sort of bevel or burr?
If anyone has any thoughts I would appreciate it. I am sure I could spend more time experimenting but I don't have as much time to dedicate to that at the moment as I'd like.
* I am aware that there is a scratch stock jig Bill Anderson recommends for molding plane soles, and I believe @creasman may have built one? I have the plan somewhere, and I'm aware Bill recommends thicker, high hardness cutters, but I feel like step one is getting good looking moldings, before I move on to something more advanced.


