
I’m making a charging station for electronic devices and decided to use sliding dovetails to connect the sides/front/back to small legs. The power brick will sit inside this box while the devices will rest on top.
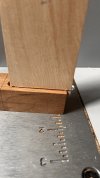
I cut the dados into two 6” pieces, then split them in half to get four legs. No problems thus far. When cutting one of the tails, a piece ~2”, it became apparent that the insert plate around the router bit was not flush with the mounting plate. Besides causing the piece to catch when cutting, it created a pin with the wrong depth. I’ll square the dado or trim the tail later, but first I need to prevent that gap along the entire dovetail.
I am trying to avoid changing the bit depth because I am doubtful I will get it to match the already-cut dados. Is there anything I can do to raise the height of the insert?

")