For this contest post pictures of things you built for improvements to your home. A before and after pic would be nice, but not necessary!
You are using an out of date browser. It may not display this or other websites correctly.
You should upgrade or use an alternative browser.
You should upgrade or use an alternative browser.
NCWW Contest August 2019 - Post Pictures of a Home Improvement Project
- Thread starter Michael Mathews
- Start date
The deck on the end of my house was in bad shape, here it is with the deck boards already removed. The deck measures 12x28, and only had a single post in the middle as a support, with the boards butted up on that one post. Not good.

My brother-in-law and me tore down everything except for the ledger board attached to the house. We added 2 posts instead of the 1 and laid down Trex composite decking with the hidden fasteners.


My brother-in-law and me tore down everything except for the ledger board attached to the house. We added 2 posts instead of the 1 and laid down Trex composite decking with the hidden fasteners.
I used that same Trex at my previous house. It stays good-looking for longer than stained PT and requires only an annual session with the pressure washer. I'm looking at having to do this over again at the new place and will probably use the Trex again.
That looks great with the black railings.
That looks great with the black railings.
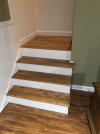
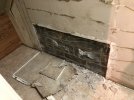
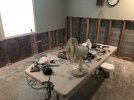
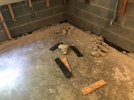
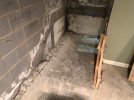
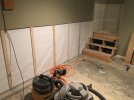
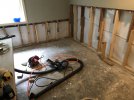
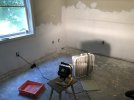
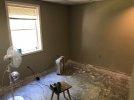
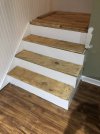
At the new house in Graham, I had to have a contractor come in to put a French drain around our full basement and we have two finished rooms down at the end. This meant pulling up all the carpet, taking down the lower portions of four walls, demolishing the landing and three bottom stairs. The contractors put in a full drain system and membrane around 3/4 of the basement (it's a walk-out) and I've replaced the walls, flooring and am currently working on the staircase.
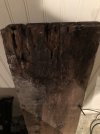
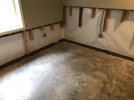
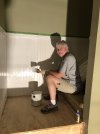
The damage from the water intrusion was definitely noticeable. It was quite mouldy behind the drywall that was glued directly to the block walls (!). With the membrane up, I used furring on the first room (my wife's hobby room). My radio room was fully-framed and was less of a hassle. Not shown here is the rewiring I had to do. The previous owner fancied himself an electrician and had done some pretty scary things: had a sub panel feed with #6AWG wire BEFORE the main breaker and had a 60A breaker going through #10AWG wire to a 35A receptacle near the overhead door for back-feeding a generator (!!!) I needed lineman's gloves to remove the wiring before the main breaker and turned the whole house off prior to very carefully removing each of the three wires. The subpanel now is fed by a 60A breaker from the main buss AFTER the main breaker and has all the basement stuff fed off of it -- including a new 240V 20A circuit for amplifiers in the radio shack.
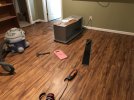
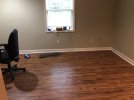
The LVP went down pretty easily. It's fussy about staying straight and I wound up being a bit off at the end after going 20 feet across the finished area. I recommend that anyone thinking of this product in a basement be sure that the product you use be 100% waterproof: you don't want any wood fibre product in this flooring.
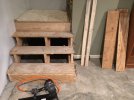
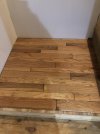
This still a work-in-progress, as I have to trim, stain and finish the bottom treads of the staircase before I can call it finished. I've had a time matching the treads to the landing flooring and the LVP floor. One can't be OCD about this because it's impossible to get a perfect match without going full hardwood (on a basement slab -- I don't think so!) and so I had to settle for "close enough", considering that this is, after all, the basement (or, as we call it, "down cellar"). I had never dealt with staircase skirting before and got it fairly close. The BORGs didn't have any decent 1x10 or 1x12 boards that weren't full of knots, so I used MDF for the skirting and 1x8 SYP for the risers. The MDF cuts pretty easily using an 80T blade on the tablesaw.
Attachments
-
 IMG_0900.JPG2.2 MB · Views: 462
 -
 IMG_0902.JPG2 MB · Views: 443
 -
 IMG_0970.JPG1.5 MB · Views: 520
 -
 IMG_0975.JPG2.4 MB · Views: 443
 -
 IMG_0976.JPG2.2 MB · Views: 499
 -
 IMG_0982.JPG2 MB · Views: 478
 -
 IMG_1022.JPG2 MB · Views: 484
 -
 IMG_1024.JPG2 MB · Views: 456
 -
 IMG_1032.JPG2.2 MB · Views: 495
 -
 IMG_1035.JPG1.3 MB · Views: 491
 -
 IMG_1048.JPG1.7 MB · Views: 462
 -
 IMG_1049.JPG2 MB · Views: 510
 -
 IMG_1051.JPG2.2 MB · Views: 457
 -
 IMG_1056.JPG1.8 MB · Views: 489
 -
 IMG_1079.JPG2.1 MB · Views: 442
 -
 IMG_1094.JPG1.7 MB · Views: 481
New grand baby. Existing balustrade from the 60's had about 6" gaps between the balusters. Easy for a baby to crawl through. Not acceptable. What to do? Rather than tear out the whole thing I decided to cheat. Went to Lowes and got some semi-matching balusters for a little under $70.00. Cut to length so the turning details were about equal height. Bored the square end with a 5/8" hole on the metal lathe. Got some wood dowels cut to length and bored the ends of them. Inserted a spring in the dowels. Bored the landing nosing to accept the dowels and the underside of the handrail to accept the upper part of the baluster. Glue in both holes. Compress the dowel flush with the bottom of the baluster, insert the top in the bottom of the handrail and slide the bottom over the hole. The spring pushes the dowel down into the bored hole. Shot some 18 ga pins to make sure things were stable. Had to make centering boring jigs to keep things looking centered because the spacing seemed to vary a lot. Now the grand baby can't crawl into the stairwell.

Existing spacing. easy for a baby to crawl through.

Existing spacing going down stairs.

Boring the bottoms of the balusters

Spring load bottom pins ready for installation.

Landing nosing bored

finished balustrade

Finished balustrade
Existing spacing. easy for a baby to crawl through.
Existing spacing going down stairs.
Boring the bottoms of the balusters
Spring load bottom pins ready for installation.
Landing nosing bored
finished balustrade
Finished balustrade
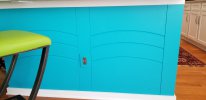
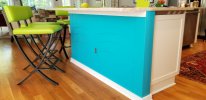
We wanted to replace the drywall surface of our island with painted wood wainscotting. The boss didn't want traditional, so I made a custom panel from paint grade borg ply and 1x clear SYP, routing simple 45 degree V-curves with a compass jig. The 1x was a little thicker than the ply, so I trimmed it down with a planer. To make a shadow line and minimize tear-out at the edge of the curves I eased all edges 45 degrees. Wife wanted bright color and I trimmed with custom millwork. Bright, for sure, it goes well with our modern decor.
Mike
Mike


One of the unexpected things we ended up with in the house we built a few years ago was a full walk-out basement. I never expected to have a lot to support that. Finishing it was not in the construction budget, so I have been chipping away at it one room at a time. We decided to put the laundry in the basement and it sits directly under the master bath. LOML wanted a laundry chute in the closet. No big deal right? Wrong if the intent is to sort on the top and have four chutes (white/light/dark/red). My biggest challenge was finding a way to build the chutes in-place. I wanted a relatively slick surface inside and no exposed fasteners for cloths to catch on. As I was tinkering with a couple ideas, a friend suggested using homemade tubes of vinyl. Got the boss to use her sewing skills and we were in business.

I built the exterior wall panels out of BORG individual beadboard strips, glued together in a 1x pine frame and finished with water-based poly. Nothing fancy and goes well with the yellow color she chose for the walls. Note the lack of baseboards. Did I mention I am chipping away at finishing the basement? V...e..r..y... s...l...o..w...l...y.

This is the upper business end. We (she) haven’t decided on how to finish it off, so it is still rough. Functional though. You can see I used white hardboard panels for the upper chute which go far enough to clear the floor joists and went in from the top.


To catch the dirty stuff, I designed and built a cart to hold two two-bag laundry hampers. It rolls on soft wheels and has bumpers on the corners to preserve the baseboards as it rolls in and out. She did not want a handle, so we just grab the top board. Water-based poly again for the finish.

I expect to have to get into it one day for repairs, so I attached the exterior panels to the interior 2x frame using brass screws set into brass cup washers. The cart uses the same detail to match.
Since BORG lumber is never straight, my 2x frame introduced some fit/finish challenges when the beadboard panels went up. That was an excuse to get a block plane and true up some edges a bit to close some gaps. I also learned some hard lessons on gluing up large panels; like making sure rabbets are sized right for enough glue and fastener surface and how much things slide around to end up out of square before glue sets up. This was a frustrating design conundrum until the vinyl suggestion, but I enjoyed it and we are very satisfied with the function. Now if we can just automate a way to get the clean clothes UP the stairs.
I built the exterior wall panels out of BORG individual beadboard strips, glued together in a 1x pine frame and finished with water-based poly. Nothing fancy and goes well with the yellow color she chose for the walls. Note the lack of baseboards. Did I mention I am chipping away at finishing the basement? V...e..r..y... s...l...o..w...l...y.
This is the upper business end. We (she) haven’t decided on how to finish it off, so it is still rough. Functional though. You can see I used white hardboard panels for the upper chute which go far enough to clear the floor joists and went in from the top.
To catch the dirty stuff, I designed and built a cart to hold two two-bag laundry hampers. It rolls on soft wheels and has bumpers on the corners to preserve the baseboards as it rolls in and out. She did not want a handle, so we just grab the top board. Water-based poly again for the finish.
I expect to have to get into it one day for repairs, so I attached the exterior panels to the interior 2x frame using brass screws set into brass cup washers. The cart uses the same detail to match.
Since BORG lumber is never straight, my 2x frame introduced some fit/finish challenges when the beadboard panels went up. That was an excuse to get a block plane and true up some edges a bit to close some gaps. I also learned some hard lessons on gluing up large panels; like making sure rabbets are sized right for enough glue and fastener surface and how much things slide around to end up out of square before glue sets up. This was a frustrating design conundrum until the vinyl suggestion, but I enjoyed it and we are very satisfied with the function. Now if we can just automate a way to get the clean clothes UP the stairs.
At the new house in Graham, I had to have a contractor come in to put a French drain around our full basement and we have two finished rooms down at the end. This meant pulling up all the carpet, taking down the lower portions of four walls, demolishing the landing and three bottom stairs. The contractors put in a full drain system and membrane around 3/4 of the basement (it's a walk-out) and I've replaced the walls, flooring and am currently working on the staircase.
The damage from the water intrusion was definitely noticeable. It was quite mouldy behind the drywall that was glued directly to the block walls (!). With the membrane up, I used furring on the first room (my wife's hobby room). My radio room was fully-framed and was less of a hassle. Not shown here is the rewiring I had to do. The previous owner fancied himself an electrician and had done some pretty scary things: had a sub panel feed with #6AWG wire BEFORE the main breaker and had a 60A breaker going through #10AWG wire to a 35A receptacle near the overhead door for back-feeding a generator (!!!) I needed lineman's gloves to remove the wiring before the main breaker and turned the whole house off prior to very carefully removing each of the three wires. The subpanel now is fed by a 60A breaker from the main buss AFTER the main breaker and has all the basement stuff fed off of it -- including a new 240V 20A circuit for amplifiers in the radio shack.
The LVP went down pretty easily. It's fussy about staying straight and I wound up being a bit off at the end after going 20 feet across the finished area. I recommend that anyone thinking of this product in a basement be sure that the product you use be 100% waterproof: you don't want any wood fibre product in this flooring.
This still a work-in-progress, as I have to trim, stain and finish the bottom treads of the staircase before I can call it finished. I've had a time matching the treads to the landing flooring and the LVP floor. One can't be OCD about this because it's impossible to get a perfect match without going full hardwood (on a basement slab -- I don't think so!) and so I had to settle for "close enough", considering that this is, after all, the basement (or, as we call it, "down cellar"). I had never dealt with staircase skirting before and got it fairly close. The BORGs didn't have any decent 1x10 or 1x12 boards that weren't full of knots, so I used MDF for the skirting and 1x8 SYP for the risers. The MDF cuts pretty easily using an 80T blade on the tablesaw.
Attachments
Similar threads
- Replies
- 3
- Views
- 486
- Replies
- 4
- Views
- 772
- Replies
- 0
- Views
- 448
- Replies
- 33
- Views
- 1K
LATEST FOR SALE LISTINGS
-
-
For Sale 20” Disc Sander and Harvey Crosscut Slider - Charlotte Area
- Started by JRedding
- Replies: 0
-
-
-

