
When building a harpsichord, there are a few parts that must be fabricated within a couple of thousandths of an inch for them to work properly. The harpsichord's jack, which ultimately holds the plectrum that actually plucks the string, is one of those parts. The actual dimension is less important than the consistency of dimensions in all of the up to 183 jacks per instrument. Achieving this consistency has always been a problem. There are two ways to approach this problem. The first is the use of a hand plane and some shop built jigs. The second is the use of a drum sander. As my skills with a hand plane are not up to the task, I've chosen to go with the drum sander. My drum sander, a Jet 10/20, can do the job but not without a lot of frustration, trial and error, and just plain luck.
A couple of months ago, one of the readers of my book, The Harpsichord Project, suggested I try the Jim Byrnes Model Machines thickness sander. He claimed unparalleled accuracy and repeatability from part to part. So I went to the Model Machines website and, lo and behold, the same claims were made. Despite its cost of $350.00, and despite my wariness of exaggerated manufacturer's claims that we've all been subjected to, I decided to bite the bullet and order one.
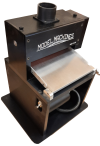
First Impressions: This machine is tiny - 10" x 9" x 13" tall but weighs an impressive 24 lbs. You're not going to sand a dining room table on it, but keep in mind its intended function - to allow model makers to make small, accurately sized parts. It has a 6" drum which accepts 6" wide sandpaper or two separate 3" wide papers which can have different grits. There is a 6" wide, dovetailed groove cut into the aluminum drum. The paper is wrapped around the drum and is held firmly in the groove by a 6" wide aluminum wedge that is fastened to the drum by four socket head screws. You can also use two 3" wide wedges to mount two different grits of paper onto the drum. Wood is fed into the machine manually - there is no motorized conveyor belt. The wood enters the machine on an aluminum plate which is hinged at the front. The rear of the plate moves up or down to achieve the desired thickness (more on that later). Here's the machine.


Testing Procedure: I decided to make a set of 28 jacks, run them through the machine, and measure the thickness and widths of the parts after sanding. The intended specs for the jacks are: 7" long (done on the tablesaw), .150" thick (+- .003"), .500" wide (+- .004"). After cutting the jacks to length on the tablesaw, I used my Jet 10/20 to get the thickness down to about .160". Back on the tablesaw, I ripped the jacks to about .510" in width. I installed a single 6" wide sandpaper onto the Model Machine's drum and I was ready to begin testing. The wood I used for the jacks is Cherry.
First, I tackled the jack thickness. The Jet had left them all with slightly different thicknesses so I set the machine to take off only a small, safe amount. How is this done? Here's a photo of the height adjustment.

On the rear end of the infeed table there is an adjustment wheel with vertical lines on it. Turning the wheel from line to line raises or lowers the table .002". Since the table is hinged at its front end, only the rear end raises or lowers. The higher it's raised, the closer the table is to the sanding drum.
I ran each jack through the machine 3 times - each time raising the table .002". I continued until the first jack of a run measured the desired .150", I ran each jack through the machine at that setting.
Next, I tackled the width of the jacks. Since they were too narrow to run through the planer one at a time, I ganged up four at a time and held them together on edge with my fingers. I then followed the same procedure as I did with the thickness. When a group of jacks measured the desired .500" I ran all of the jacks through the machine at that setting.
The results:
Thickness (.150") - 20 jacks were right on at .150". Five jacks were 1/2 of a thousandth thin at .1495". Two jacks were 1/1000" narrow at .149". One jack was 1 1/000" too thick at .151"
Width - (.500) - 18 jacks were right on at .500". 4 jacks were thin at .499. Five were thin at .4995. One was thick at .501".
I also measured the thickness and width of each jack at both ends. All were within 1/1000" end to end.
Conclusion: BUY IT! Most woodworkers will not have a need for a machine like this, but if you do, you will not be disappointed with the results you get. The only negative I found concerns the method of adjusting the cutting depth. Since each mark on the wheel only moves the table .002", it takes forever to change the depth of cut from .150" to .500". Some method of quickly raising or lowering the table would be really nice. That said, I really have my eye on his 4" tablesaw.
Disclaimer: I have no relationship, financial or otherwise, with Jim Byrnes. I'm just a most satisfied customer.
Ernie
A couple of months ago, one of the readers of my book, The Harpsichord Project, suggested I try the Jim Byrnes Model Machines thickness sander. He claimed unparalleled accuracy and repeatability from part to part. So I went to the Model Machines website and, lo and behold, the same claims were made. Despite its cost of $350.00, and despite my wariness of exaggerated manufacturer's claims that we've all been subjected to, I decided to bite the bullet and order one.
First Impressions: This machine is tiny - 10" x 9" x 13" tall but weighs an impressive 24 lbs. You're not going to sand a dining room table on it, but keep in mind its intended function - to allow model makers to make small, accurately sized parts. It has a 6" drum which accepts 6" wide sandpaper or two separate 3" wide papers which can have different grits. There is a 6" wide, dovetailed groove cut into the aluminum drum. The paper is wrapped around the drum and is held firmly in the groove by a 6" wide aluminum wedge that is fastened to the drum by four socket head screws. You can also use two 3" wide wedges to mount two different grits of paper onto the drum. Wood is fed into the machine manually - there is no motorized conveyor belt. The wood enters the machine on an aluminum plate which is hinged at the front. The rear of the plate moves up or down to achieve the desired thickness (more on that later). Here's the machine.
Testing Procedure: I decided to make a set of 28 jacks, run them through the machine, and measure the thickness and widths of the parts after sanding. The intended specs for the jacks are: 7" long (done on the tablesaw), .150" thick (+- .003"), .500" wide (+- .004"). After cutting the jacks to length on the tablesaw, I used my Jet 10/20 to get the thickness down to about .160". Back on the tablesaw, I ripped the jacks to about .510" in width. I installed a single 6" wide sandpaper onto the Model Machine's drum and I was ready to begin testing. The wood I used for the jacks is Cherry.
First, I tackled the jack thickness. The Jet had left them all with slightly different thicknesses so I set the machine to take off only a small, safe amount. How is this done? Here's a photo of the height adjustment.
On the rear end of the infeed table there is an adjustment wheel with vertical lines on it. Turning the wheel from line to line raises or lowers the table .002". Since the table is hinged at its front end, only the rear end raises or lowers. The higher it's raised, the closer the table is to the sanding drum.
I ran each jack through the machine 3 times - each time raising the table .002". I continued until the first jack of a run measured the desired .150", I ran each jack through the machine at that setting.
Next, I tackled the width of the jacks. Since they were too narrow to run through the planer one at a time, I ganged up four at a time and held them together on edge with my fingers. I then followed the same procedure as I did with the thickness. When a group of jacks measured the desired .500" I ran all of the jacks through the machine at that setting.
The results:
Thickness (.150") - 20 jacks were right on at .150". Five jacks were 1/2 of a thousandth thin at .1495". Two jacks were 1/1000" narrow at .149". One jack was 1 1/000" too thick at .151"
Width - (.500) - 18 jacks were right on at .500". 4 jacks were thin at .499. Five were thin at .4995. One was thick at .501".
I also measured the thickness and width of each jack at both ends. All were within 1/1000" end to end.
Conclusion: BUY IT! Most woodworkers will not have a need for a machine like this, but if you do, you will not be disappointed with the results you get. The only negative I found concerns the method of adjusting the cutting depth. Since each mark on the wheel only moves the table .002", it takes forever to change the depth of cut from .150" to .500". Some method of quickly raising or lowering the table would be really nice. That said, I really have my eye on his 4" tablesaw.
Disclaimer: I have no relationship, financial or otherwise, with Jim Byrnes. I'm just a most satisfied customer.
Ernie
Attachments
Last edited:
