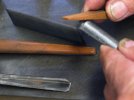
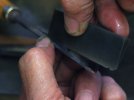
I sharpened a v-tool

Bruce Mack

Bruce
Senior User
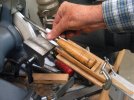
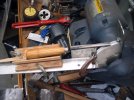
I cannot carve anything representational, but I own 12-15 curved gouges, v-tools, and several straight and hook knives. I've made a few spoons. I have never adequately sharpened a v-tool and based on YouTube sampling I suspect that few who tell us how to have actually done so.
Paul Hamler has done so.
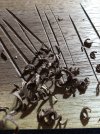
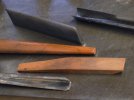
After many hours and an outlay of $150-200 in tooling and supplies, I have done so, too. I have salvaged an Auriou and a Pfeil so far. In previous efforts with stones I mangled the Pfeil 12/4. Mr. Hamler's technique can of course be used on curved gouges.
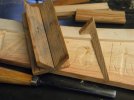
His technique and my dutiful apprenticeship have given me the v-tool of my bucket list. It will be used to apply texture to pine boxes I will make as gifts for a friend's grandchildren. Pine, especially the stuff you buy as dimensional lumber. is resistant to clean cuts.
 

Attachments

  • IMG_6554.JPG
    IMG_6554.JPG
    1.3 MB · Views: 135
  • IMG_6519.JPG
    IMG_6519.JPG
    2.1 MB · Views: 149
  • IMG_6565.JPG
    IMG_6565.JPG
    1.8 MB · Views: 143

Bruce Mack

Bruce
Senior User
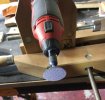
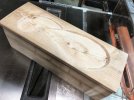
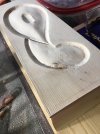
I'm back, still working on a relief carving on a lid for a small box. I used curved gouges of varying sweeps, most usefully a #8 to do the curved border. The v-tool was not the right tool for outlining, The structural pine has fought me all the way. I had difficulty controlling my rotary tool with a Kutzall flame-shaped burr on a flex shaft to rough out the interior and similar problems with a flap wheel on the same tool, leaving moose tracks in my effort to smooth the surface. The photos show the slow progression from before the misadventure with the flap wheel. I don't know if I can salvage it.
 

Attachments

  • IMG_6845.JPG
    IMG_6845.JPG
    3.2 MB · Views: 83
  • IMG_6883.JPG
    IMG_6883.JPG
    1.8 MB · Views: 79

bob vaughan

Bob Vaughan
Senior User
I've been doing them on the bench grinder for years. A few C-clamps on the tool rest and a wooden cradle works. A light touch on a fine wheel keeps the burning down. Abrasive files do the clean-up. A round gouge is shown, but I'll do the V-gouge as easily. This rig is sort of a take-off of the Oneway lathe tool grinding rig.

grndr - 1.jpg grndr - 2.jpg grndr - 3.jpg grndr - 4.jpg grndr - 5.jpg grndr - 6.jpg
 

Henry W

Henry
Corporate Member
I had difficulty controlling my rotary tool with a Kutzall flame-shaped burr on a flex shaft to rough out the interior and similar problems with a flap wheel on the same tool, ....
Unrelated to sharpening carving tools, the original topic here, is roughing out with a burr tool a 'normal' process?
As the proud owner (not really a user yet) of a flex shaft tool, but NO carving gouges, I am wondering how to get started. Hints or resources?
 

Bruce Mack

Bruce
Senior User
Unrelated to sharpening carving tools, the original topic here, is roughing out with a burr tool a 'normal' process?
As the proud owner (not really a user yet) of a flex shaft tool, but NO carving gouges, I am wondering how to get started. Hints or resources?
A YouTube channel from the UK, "Matt Carves" inspired me to try Kutzall burrs. Matt's control of rapidly spinning burrs is akin to hitting a baseball thrown from right to left across home plate and sending it deep to center field. It is awesome. I just acquired an extra-coarse Kutzall extreme rotor saw burr. Though I thought I was braced, one cut of several took me out of the intended path and again left moose tracks. Clearly, it can be done.
Again, I was able to modify and rescue the carving using a conventional gouge. Carvings are imprecise. They are hard to ruin.
If you try these (and I recommend trying for the fun of it), I suggest the coarse burrs, a flame shape and a rotor saw like mine. A light touch leaves no deep grooves. You will chortle at the speed of wood removal. Wear light work gloves to protect your fingers if the hand holding the flex shaft or the workpiece slips. Practice a lot with cut-offs of any wood species.
I have no carving expertise but I love using gouges from 3 to 8 sweep. Try a 7 or 8 to start and for smaller carvings keep the width to 3/8" or less. I like Ashley Iles from Tools for Working Wood. Joel has a great chart to show you what he has in stock. Soon you will want to try other sweeps. You can use a small brass mallet, tapping gently to cut through gnarly pine but usually unassisted hand power is sufficient. There is more control and less tear-out with cross grain cuts and you can remove a lot of wood quickly. Grind the bevel to ~20 degrees. You can do this with a 3 x 18 belt sander sitting upside down in your bench vise. It's quick at 80 grit. The tool won't overheat and you can adjust the angle of approach without a tool rest.
After grinding, smooth the gouge with side-to-side movement on a medium to coarse small diamond plate and follow this with a fine plate until you feel a burr on the inner surface of the gouge. A small round or oval-edge slip stone removes the burr. Mary May's videos are a resource.
Finally, use a buffer (inexpensive Harbor Freight type) with 6" extra thick buffing wheel (Amazon). A little Autosol or your favorite abrasive will give you the best edge you have ever achieved on anything. Hold the gouge at about a 45 - 60 degree downward angle to the downward rotating wheel. You don't want or need a tool rest. Wear eye protection. Take your time. It's all fun.
 
Last edited:

Henry W

Henry
Corporate Member
Again, I was able to modify and rescue the carving using a conventional gouge. Carvings are imprecise. They are hard to ruin.
Well you underestimate my abilities to ruin .... but I am interested to learn.

Thanks Bruce, I appreciate the mini-tutorial and the link. Always great to have a jumping off point recommended.
 

Bruce Mack

Bruce
Senior User
Well you underestimate my abilities to ruin .... but I am interested to learn.

Thanks Bruce, I appreciate the mini-tutorial and the link. Always great to have a jumping off point recommended.
Henry - After the latest misadventure (but before I realized I could correct it) I ordered a small can of Bondo :eek: to restore whatever I removed in error. The lid will be painted.
 

Premier Sponsor

Our Sponsors

LATEST FOR SALE LISTINGS

Top