Re: Gun Cab WIP Pics...Weekend Update with Pics
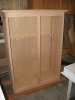
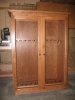
Finally got all the frame pieces milled, cut, dry fit and sanded. Stained the RP edges and glued up the panels Friday night.
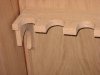
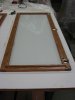
Got back in ths shop Sat. afternoon ready to glue the rear panel and front frame...that's when I noticed that between sanding and final assy/glue-up I had sawpped a few of the legs (stiles) around. The rear panel has a dado all around for the rear ply panel...I put both dadoed legs on a single RP...:eusa_doh: I'd like to say I laughed out loud but I was not happy. :BangHead: :BangHead:
The problem was more comlpicated because the rear legs were 1.75 x 1.25, while the front legs were 1.75 x 1.375. My original design called for 1.75 x 1.375 but after I milled and ripped the rear legs they bowed ever so slightly so I carefully jointed and ripped to 1.25 inches and just made the rear upper and lower rails 1/4 inch longer. I didn't want to cut the front stiles to match because the lower cab stiles are 1.375 inch wide in the front and I wanted them to match. Well, throw that one out!!
Thought about it for a while then set up and practiced running the glued panel through the tablesaw (on edge) then cut the thicker leg down to match the other. I also had a 52 inch dado to fill. It came out fine. Then I had to resize the rear rails to match the front rails, resize the ply panel. Then rout a dado for the rear panel.
Basically lost 5-6 hours from a bone-headed screwup. :cry:
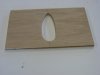
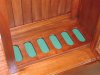
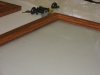
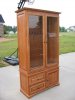
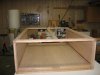
I glued up the carcass in three stages this afternoon, then cut the floor and top and called it a day. I read Dave-O's post...looks like I had a Dave-O day, too. :lol: :lol:
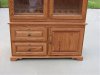
Pics below. Looks like finished dimension will be 41W x 17D x 58H, assuming I don't botch up anything else. :lol:
Chuck
Finally got all the frame pieces milled, cut, dry fit and sanded. Stained the RP edges and glued up the panels Friday night.
Got back in ths shop Sat. afternoon ready to glue the rear panel and front frame...that's when I noticed that between sanding and final assy/glue-up I had sawpped a few of the legs (stiles) around. The rear panel has a dado all around for the rear ply panel...I put both dadoed legs on a single RP...:eusa_doh: I'd like to say I laughed out loud but I was not happy. :BangHead: :BangHead:
The problem was more comlpicated because the rear legs were 1.75 x 1.25, while the front legs were 1.75 x 1.375. My original design called for 1.75 x 1.375 but after I milled and ripped the rear legs they bowed ever so slightly so I carefully jointed and ripped to 1.25 inches and just made the rear upper and lower rails 1/4 inch longer. I didn't want to cut the front stiles to match because the lower cab stiles are 1.375 inch wide in the front and I wanted them to match. Well, throw that one out!!
Thought about it for a while then set up and practiced running the glued panel through the tablesaw (on edge) then cut the thicker leg down to match the other. I also had a 52 inch dado to fill. It came out fine. Then I had to resize the rear rails to match the front rails, resize the ply panel. Then rout a dado for the rear panel.
Basically lost 5-6 hours from a bone-headed screwup. :cry:
I glued up the carcass in three stages this afternoon, then cut the floor and top and called it a day. I read Dave-O's post...looks like I had a Dave-O day, too. :lol: :lol:
Pics below. Looks like finished dimension will be 41W x 17D x 58H, assuming I don't botch up anything else. :lol:
Chuck
")