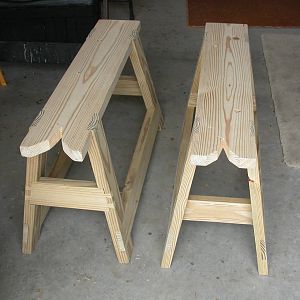
Compound Miter Sawhorse Legs

charlessenf

(;harles
Senior User
I need another pair. It seems that everytime I build a pair, I've difficulty cutting the legs.
Sawhorse (2).jpg
Sawhorse (3).JPG

I want to splay them 15 (or so) degrees width and depth. I want to leave five inches (or so/more) at either end. I liked Sellers (How to Make Sawhorses Introduction | Paul Sellers) approach of notching the cross piece/top to secure each leg in place and I thought a two by eight top section/piece wood be useful if I have enough in the scrap pile for both horses.
Sawhorse SawStop.jpg
OK, so enough with the setup. I am looking for instruction on how to fabricate the four splayed legs needed for a sawhorse similar to the one shown here. I have a couple of Compound Miter saws and can set the blade to 15 degrees horizontally and vertically and cut both ends of a two-by so as to wind up with a parallelogram of whatever length necessary.

Problem is, If I cut four boards without an adjustment, I wind up with legs that only fit the left front and right rear. Now, obviously, I've been able to figure out how to cut the other two legs and (less obviously - but true) have done it many times over the years without, apparently, committing the process/procedure to memory or paper or finding a video that steps one through it.

So, If the procedure is Dick Soup to you and you've reasonable success it explaining it to old guys who should know it before getting to Joe Biden's age, I would appreciate your sharing the approach, trick, technique or magic spell one more time.

Charles
 

Graywolf

Board of Directors, President
Richard
Staff member
Corporate Member
Charles, if you know your angles and how to turn the saw for the other pair of legs I’m having a hard time seeing the problem
 

Mike Davis

Mike
Corporate Member
What ever you do on the right side for one set of legs you will have to do the same on the left side for the other ones.
 

pop-pop

Man with many vises
Corporate Member
Try looking at the correct joint in a mirror to get the angle orientation.

When that sort of confusion happens, putting the project down and resuming tomorrow is often quite helpful.
 

Gotcha6

Dennis
Staff member
Corporate Member
The opposite legs should cut the same. So the left front leg should cut the same as the right rear and vice versa. Try on some scraps first and leave the bevel as is and flip the cut to the opposite side of the leg and reverse the miter. HTH
 

charlessenf

(;harles
Senior User
if you know your angles and how to turn the saw for the other pair of legs
1707012630410.png

I don't 'know' how to do it. I have done it. I can figure it out, but there must be a sequence - series of discrete steps that I do not have at hand/in mind.

So, I know to set the bevel and miter to 15 degrees and lay the 2x4 on the saw and cut the left end. Then slide the board to the left x inches and cut the right end. If I do that twice, I get two legs.

One will fit nicely on the left front Lf of the sawhorse and the 'catty corner' on the right rear Rr.

Lr..............Rr
---\--------------/
--------------------
--------------------

---/--------------\
Lf..............Rf


Now, to cut the next two legs, I am not able to describe the steps I need to take. I can work it out - I have worked it out using trial and error, mocking up 'legs' from scrap and 'experimenting.'

"Whatever you do on the right side for one set of legs you will have to do the same on the left side for the other ones."

Actually, the legs Rf & Rr are cut differently - and KNOWING what that different cut sequence is escapes me. I cut two identical pieces first (as above). Then, when I figure out how to flip the two by and the bevel or miter or both and cut the second pair, I'm done.

"... leave the bevel as is and flip the cut to the opposite side of the leg and reverse the miter"

So, if I understand Gotcha6 / Dennis, for the next two legs, lI should eave the bevel setting as is and turn the miter to to the opposite 15 degrees and lay the 2x4 on the saw and cut the right end. Then slide the board to the right x inches and cut the left end.

NOTE: I think I may have a double bevel saw - I bought one a year or more back from a member here - thanks to Pony Express & reservist training. But I've yet to get it installed on my bench. So, in the example I wrote, above, I had the Bevel laying 15 degrees to the (my) right and the Miter turned 15 degrees to the right. To be honest the pieces cut with that setup might fit the
Rf and Lr
all I know for certain is they fit opposite (catty) corners!

It's tough putting it into words that make it simple to put it into action! For once, I'd like to go in, cut the four legs to length like a human CNC machine!
 
Last edited:

Gofor

Mark
Corporate Member
When I built mine, I cut them with a hand saw. Found it easier and quicker than trying to get the miter saw set right.
 

Mike Davis

Mike
Corporate Member
Turn the angle and bevel 15 degrees to the right, cut the top end, move the board 34? Inches to the right, cut the bottom end. Repeat.

Then turn the angle and bevel 15 degrees to the left, cut the top end, move the board 34? Inches to the left, cut the bottom end. Repeat.

4 legs.
 

charlessenf

(;harles
Senior User
" I cut them with a hand saw. "

Right.
However, it's not the tools I am asking about - rather the process regardless the implement(s) employed.
 

charlessenf

(;harles
Senior User
"use whatever 3D modeling application you prefer"

I can't afford what I might prefer and resort to pencil, rule and plain or ruled handy paper.
 

charlessenf

(;harles
Senior User
Turn the angle and bevel 15 degrees to the right, cut the top end, move the board 34? Inches to the right, cut the bottom end.
___________board________ /
Repeat 1x
Then turn the angle and bevel 15 degrees to the left, cut the top end, move the board 34? Inches to the left, cut the bottom end.
\ ___________board________
Repeat 1x

Where / is Right bevel and \ is Left bevel saw blade and
blade is 15 degrees Right and 15 degrees Left, respectively.
By jove, that sounds like an easily verifiable plan! I'll get right on it! Thanks.
 

charlessenf

(;harles
Senior User
View attachment 225893

"Whatever you do on the right side for one set of legs you will have to do the same on the left side for the other ones."

Actually, the legs Rf & Rr are cut differently - and KNOWING what that different cut sequence is escapes me. I cut two identical pieces first (as above). Then, when I figure out how to flip the two by and the bevel or miter or both and cut the second pair, I'm done.

"... leave the bevel as is and flip the cut to the opposite side of the leg and reverse the miter"
You meant END, not side, right?

I would think that each 2 x 4 leg has a top/upper END, a bottom END, a Front (3.25"w) FACE, a Rear FACE, a left (1.25"w) SIDE and a right SIDE.
 
Last edited:

charlessenf

(;harles
Senior User
OK, I made a test run. Turns out I only have a Single Bevel Miter Saw! So, handicap me!
A) I set Bevel Right 15 Degrees (can't set it left!)
B) I sent the miter right 15 Degrees - had to pick one!
C) I laid the material to the right of the blade - extending to my right.
D) I cut the end off the material;
E) moved it X inches Left
F) Made a second cut
One Down!
G) Move material x inches Left
H) Make another cut
I) Repeat steps G, H & I Until you have four pieces cut.
J) Then I laid the pieces out on the miter saw so I could see how best to label the pieces that I might figure out how best to cut the material should I want/need to 'feature' one face or the other; find a more efficient approach; learn how to predict the result and explain the process.


I thought I needed to identify the faces of the material (and resulting sections) if only to keep track of what I was doing. It helped me!
DSC00841-B.jpg

What I 'discovered' is that cutting two-bys for (not!) furniture projects is as simple as can be. Set the single bevel miter saw as above, Lay the material on the saw to the right of the blade and cut the board into four equal lengths for each sawhorse.
DSC00838.JPG

Set of four legs.
DSC00839.JPG

Here, laid out flat (above) and standing (below)
DSC00844 B.jpg

E1 & E2 are the ends of each leg (you might say "top & bottom" - but that doesn't work out). One needs to 'flip' two (of the) legs end for end when cut this way. Note E1 and E2 are 'catty corner' and rotate two along their length
DSC00845 B.jpg

For my next experiment, I sought to learn how I might cut teh four legs such that all four outward faces were from one side of the material.

I began as above and cut the first leg.
Then, I 'flipped' the material (rotated on the long axis) over and cut a fresh end - resulting in a small scrap of waste.
Then, sliding the material to the left X inches, I cut the second leg to size.
Flip the material and repeat 2x and you wind up with four legs - all with 'the good side' out.
DSC00851.JPG

DSC00848.JPG

DSC00849.JPG
DSC00850.JPG

Now, to work out how best to describe this process for a blind man - e.g. w/o a need for pictures or diagrams!
 

Gofor

Mark
Corporate Member
Thank You. They were fun! However, simple and quick like your design is sometimes better and still gets the job done.

A look at the parts: Sawhorse Parts
 

charlessenf

(;harles
Senior User
Right - I did look at the parts and assembled (and finished) sawhorses. First ever with a dog hole! Nice one! I've built several different styles over the years. Presently I need a set for Wednesday to put up some drywall while the wife's away. May not make it! I've two sets down in SC I can't justify the time and expense to bring to NC for this job. I'm having fun and will try to make an Instructable out of my efforts to get a process down so" a blind man might build a set."

I'm following SELLERS video and hoping to incorporate his joinery
 

Premier Sponsor

Our Sponsors

LATEST FOR SALE LISTINGS

Top