Tool tote box

Jeff

New User
Jeff
I'm struggling with the concept and the design. Graywolf and Danmart have built the boxes with compound angled dovetails. I don't really need a tool box so it's more of an interesting exercise. The tool tote that Roy Underhill made is simply nailed together.


An end and a side cut at 15 degrees.
P1010003.png
 

Graywolf

Board of Directors, President
Richard
Staff member
Corporate Member
So Jeff, could you be more specific in your question
 

Jeff

New User
Jeff
So Jeff, could you be more specific in your question

The picture is a crosscut at 15 degrees on each board. Then I set the bevel gauge at 15 degrees and marked 3 pins and 2 tails on each board. Ok, that's not a compound angle cut. If I just cut them out it seems that they won't fit together at the splay angle without 15 degree angle cuts on the end of each board too. I'm missing some specifics about doing this and laying out the dovetails properly.

I've looked at your pictures and the ones from Dan but I'm still scratching my head.

Thanks.
 

Graywolf

Board of Directors, President
Richard
Staff member
Corporate Member
I'm sure what you found is even without the dove tails that if you put the two boards together that it's not even a true right angle. And yes you are right what you are doing presently is not a compound angle or at least not the joint you are trying do. Now I want to help you, but I've been busier than alone armed paper hanger. So, I'm going to walk you, not run you through the process that I know.
So to keep it simple if you want the sides to splay at 15 degrees then you would cut or plane the top and bottom edges to 15 degrees. Now I will go into my shop tomorrow and I'll set up a few photos and explain a few more steps. Exactly what time I'll be able to post I'm uncertain but it will happen. All I ask s that you be patient and I'll explain the process that I know.
 

Gotcha6

Dennis
Staff member
Corporate Member
I'm curious about this process too, but I know that the ox is slow and the earth is patient.......
;)
 

Jeff

New User
Jeff
Thanks, I appreciate your help whenever you have the time to show me. I hope that I didn't convey the idea that I was being impatient.


I'm sure what you found is even without the dove tails that if you put the two boards together that it's not even a true right angle. And yes you are right what you are doing presently is not a compound angle or at least not the joint you are trying do. Now I want to help you, but I've been busier than alone armed paper hanger. So, I'm going to walk you, not run you through the process that I know.
So to keep it simple if you want the sides to splay at 15 degrees then you would cut or plane the top and bottom edges to 15 degrees. Now I will go into my shop tomorrow and I'll set up a few photos and explain a few more steps. Exactly what time I'll be able to post I'm uncertain but it will happen. All I ask s that you be patient and I'll explain the process that I know.
 

Graywolf

Board of Directors, President
Richard
Staff member
Corporate Member
No, I'm just going to break it down into bite sized pieces
 

KenOfCary

Ken
Staff member
Corporate Member
A few years ago we had a workshop at Bill's shop and everyone built a tote with dovetail sides and a floating dovetail that the middle / handle piece slide into. The bottom was held in place by the middle piece and the 15 degree bevel. A search should find some threads about the process. I still have mine.
 

Graywolf

Board of Directors, President
Richard
Staff member
Corporate Member
187548

I start with a board prepped flat and square. I mark on the end at the edges approximately a 15 degree angle and then with a marking gauge mark down the edge. Once done I vise it up and plane to the line.
187549

187550

187551

Now I know most will do this on a table saw and that is fine, I'm just showing you my process, to make it easier to handle I cut two blocks, if it were four pieces then I would cut four. At 15 degrees and spot glue them to the out sides of the boards so they can stand at the 15 degree splay.
187552

187553

187554

187555

187556

I also for clarity I cut the ends of the boards to 15 degrees and slid them together holding a square to the sides and you can see the pieces do not come together square.
So, Jeff if you would get you materials up to glueing on the blocks but keep the ends square, I'll post the next step durning the week.
I used CA glue for the blocks and just a couple dots to try not get a lot of tear out, or least nothing that couldn't be planed away.
Yes, I was on this mornings chat and doing this at the same time.
More later.
 
Last edited:

Jeff

New User
Jeff
So, Jeff if you would get you materials up to glueing on the blocks but keep the ends square, I'll post the next step durning the week.

Ok, I'll do it this week and let you know.

In the meantime, yesterday I played around with the 2 boards that I'd already cut before your kind offer to lead me through your process. I nailed them together and they are splayed at 15 degrees. It doesn't look too bad but the corners don't fit well.
 

Attachments

  • P1010004.png
    P1010004.png
    895.3 KB · Views: 140
  • P1010005.png
    P1010005.png
    837.5 KB · Views: 130
  • P1010006.png
    P1010006.png
    850.6 KB · Views: 150
  • P1010007.png
    P1010007.png
    716.5 KB · Views: 137
Last edited:

Graywolf

Board of Directors, President
Richard
Staff member
Corporate Member
You're right they don't fit that well and I bet the boards aren't square in that relationship. We will cover how to compensate for square in a compound angle as we cut the joint.
 

Graywolf

Board of Directors, President
Richard
Staff member
Corporate Member
Ok as you can see I have two boards with the edges planed to fifteen degrees with a couple of block glued on for support and the ends are square sitting at a right angle to one another. I used a framing square as reference here.
187637

187638

So now we need something to transfer the angle to one of the boards. I chose a card scraper.
187639

187640

So taking care that everything dose not move, lay the card scraper across the board and scribe a line with a pencil. Knowing that we are using the same splay on both sides of the joint we only have to do this once. Now we have the angle of the ends for the boards we can take sliding bevel and adjust it to this angle and lock it down. You can use this to set up your miter box to the correct angle and make your cuts.
187641

187642

187643

As you can see the boards set at the same angle but they aren't square in relationship with the joint. We could scribe and plane that away but I have a better way. In the next step.
I'll post more as soon as possible.
On a side note, I removed the glue blocks to make the cuts on the saw, you really don't need them anymore, however, I did reuse these to set up last two shots.
 
Last edited:

Graywolf

Board of Directors, President
Richard
Staff member
Corporate Member
I'm waiting on a delivery today so I have time to write this up. Now is where we set up the pieces to compensate for the compound angle.
187648

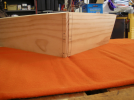
Starting on the inside of the pieces, set up a marking gauge to a depth that will give the assembled joint some overhang to be planed off after assembly.
187649

With inside of the pieces marked we can now use a square and marking knife to transfer the the baseline to the outside of the boards.
187650

187651

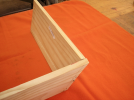
As you can see the ends are square in relationship with the surface of the board, and the base line is square in relationship with the bevel angle of the board.
187652

Now you adjust the marking gauge to meet the knife lines and scribe a line on the outside.
187653

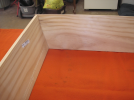
We are now to the point that we can set up for the dovetails. We can't use a typical dovetail marker, we could just layout what we think looks good, and that would be fine, however, if you have an angle in mind the process I used is as follows.
187655

187656

You start by setting up a bevel gauge to the angle of the end of the board and use it to mark a line parallel to the top and bottom.
187657

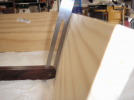
Take a pair of dividers and set them to approximately an inch.
IMG_1260.JPG

Set the dividers on the center line and mark on the edge on both sides of the line.
187659

For this example I chose to use a one and five ratio for these dovetails. Take the dividers and step off five times on the center line and mark you finishing point. Now take and connect the points you marked with the dividers.
187660

That's all I have time for this morning I'll post more this evening.
Later!
 

Graywolf

Board of Directors, President
Richard
Staff member
Corporate Member
So last evening my better half came in and ask what I was buying her for dinner. I said what ever your heart desires. So out to dinner we go and it was nice evening and we sat outside. Afterward she asked to go for a walk and so we went. It was a very present evening and we needed it. However, I didn't get the chance to post last evening, and I'll have to catch up this evening. Thank you for your patience.
 

Jeff

New User
Jeff
Graywolf is kindly helping me through his process of making a rectangular box with splayed sides.I've never cut a dovetail, let alone a tapered one. So far I'm at this point. The box is 3/4"t pine and it's about 24" l x 17" w x 5" tall. The blocks are holding the splayed sides in place at 15 degrees. The corners don't yet have the compound angle to make them fit correctly before the dovetails are cut.

P1010013.png
P1010014.png
 

Hmerkle

Board of Directors, Development Director
Hank
Staff member
Corporate Member
why don't you make a couple of "test corners" so you can mark and cut the dovetails a couple of times before you try it on the final version or make two, one for you and one for a friend?!
 

Premier Sponsor

Our Sponsors

LATEST FOR SALE LISTINGS

Top