As my journey into woodworking progresses, I'll share some of my experiences even though they are trivial or elementary to most of you. Maybe some of the newbies will get some benefit. In that connection, I am hyper-sensitive about safety with my SawStop. For two reasons. One, I don't want to get injured, and two, I don't want to fire the brake. While I haven't done a lot of cutting on the SawStop yet, I have been able to make every cut with the blade guard in position. Using the blade guard is a challenge for thin rips. Plus, I'm not yet used to the idea of having a 1/2" cutoff between the blade and the fence.
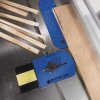
While looking through the Rockler catalog online, I watched the video for their Thin Rip Table Saw Jig. It made a lot of sense to me, so I ordered it. I've used it three times so far, and it has worked flawlessly. Not only are the cutoffs on the left side of the blade, but they are EXACTLY the same width. If I were gluing them up on their non-cut sides, almost no sanding would be required. I do use it a little differently than the instructions recommend. Instead of calibrating the jig to the blade, I set up the board against the fence with the proper cutting width as usual. Then I push the jig up to the left side of the board to set its position and lock it into the miter slot. Cut the board, position the stock for the next cut, move the fence to push the board against the jig, lock the fence, and go.

The main two aspects about this jig that I like are its solid locking into the miter track, and the point that contacts the board to be cut is a ball bearing. If you decide to make one of these for your shop, consider adding a ball bearing to the end point. It really makes a difference.
After playing with this jig and liking it, I happened to find this video of Gregory Paolini doing it the easy way. I still like the jig. But then, I'm a jig kind of person. It's as much fun making the jig as it is making the project. Some of the time.
[video=youtube;0YpuAZOIj88]https://www.youtube.com/watch?v=0YpuAZOIj88[/video]
While looking through the Rockler catalog online, I watched the video for their Thin Rip Table Saw Jig. It made a lot of sense to me, so I ordered it. I've used it three times so far, and it has worked flawlessly. Not only are the cutoffs on the left side of the blade, but they are EXACTLY the same width. If I were gluing them up on their non-cut sides, almost no sanding would be required. I do use it a little differently than the instructions recommend. Instead of calibrating the jig to the blade, I set up the board against the fence with the proper cutting width as usual. Then I push the jig up to the left side of the board to set its position and lock it into the miter slot. Cut the board, position the stock for the next cut, move the fence to push the board against the jig, lock the fence, and go.
The main two aspects about this jig that I like are its solid locking into the miter track, and the point that contacts the board to be cut is a ball bearing. If you decide to make one of these for your shop, consider adding a ball bearing to the end point. It really makes a difference.
After playing with this jig and liking it, I happened to find this video of Gregory Paolini doing it the easy way. I still like the jig. But then, I'm a jig kind of person. It's as much fun making the jig as it is making the project. Some of the time.
[video=youtube;0YpuAZOIj88]https://www.youtube.com/watch?v=0YpuAZOIj88[/video]