Small shop ... big hopes

Status
Not open for further replies.

Pop

New User
Pop Ryan
After she bought me the two Model A trucks six years ago, my wife then said I should get a building to do the work and store the truck in when it's done. Not being one to go against my wife when she has such a great idea, I went and looked at pre-made buildings. I came up with a 14 x 20 building made here in Amish country that I though would do the trick. She thought it was too small and I should have gone bigger (sorry men...I"M KEEPING HER!) Anyway the truck fit and so did the small amount of power tools I had at the time.

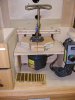
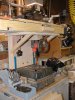
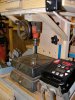
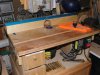
After working on the truck and acquiring a bunch of new tools to make the job easier...the truck no longer fit and went into the back of the garage on the house, putting my regular driver outside. Now that I have just about every tool I would need to attack any wood working project I might try (on a small scale), portability bacame the key so I made roll around stands for the planer, bandsaw, router setup and combination saw. Here's the one I made for the router.

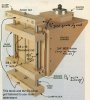
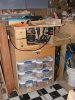
What's really neat is all the bits are stored in the drawer below the table. It has a router speed control and a 'panic' safety switch too. The router is an old Craftsman 1/2' / 1/4' collet setup and I removed the handle setup so I could put it into a lift system I made from wood. I really couldn't justify buying one of the commercial grade lift systems mnade so I designed and built one of my own. All you see is a large acorn nut recessed into the table top that you turn clockwise to raise the bit and counter-clockwise to lower the bit. Anyone who might want to know more just let me know and I'll share the design with everyone. Underneath is storage for tubs containing project parts for wooden locks, mail truck banks, nut crackers, etc.
 

Attachments

  • router table.jpg
    router table.jpg
    81.4 KB · Views: 222
  • P7220004.jpg
    P7220004.jpg
    72.2 KB · Views: 227
M

McRabbet

I'm still looking for the adjustment mechanism in your pictures, but can't seem to figure out how your lift works -- can you share some more insight?
 

MikeL

Michael
Corporate Member
Mike (yeah another one of the good guys), I know this is a wood site, but you have to post a larger photo of that Model A! I love those things. My dad has a 1930 coupe. Nice looking router setup and a better looking horseless carriage. :icon_thum
 

Bas

Recovering tool addict
Bas
Corporate Member
Great looking router table, I really like the storage. I'm running out of space to put stuff , I need to build something like that....it's luxury problem :)

BTW, nice floor, polyvinyl tiles from Sam's Club?
 

Pop

New User
Pop Ryan
I'm still looking for the adjustment mechanism in your pictures, but can't seem to figure out how your lift works -- can you share some more insight?

The picture you see of the table was taken before I added the lift mechanism. Didn't realize that until I had already uploaded it.

The lift amounts to a frame made of furniture grade plywood with a moving insert that holds the router in place with a wood clamping setup. The moving assembly has brass bearings inserts and a center threaded rod that slide the moving piece up and down on steel rods mounted in the frame assembly as you turn the threaded rod with the top acorn nut. I know it sounds confusing so I'll get some pictures of the whole assembly tomorrow and post them here. All the threaded rod, bearings and other hardware was purchased at a local hardware store so it's readily available stuff (ACE Hardware). I had seen a similar setup or project years ago in an old wood working magazine and just elaborated on the old idea. I do that a lot. My wife says I should have been an efficiency expert because I'm never satisfied with how things work.
 

Pop

New User
Pop Ryan
Great looking router table, I really like the storage. I'm running out of space to put stuff , I need to build something like that....it's luxury problem :)

BTW, nice floor, polyvinyl tiles from Sam's Club?

Flooring is actually seconds of roll good from a local carpet house. That section of the shop is where the Model A USED TO FIT. Made it easy to wipe up spills and leaks. The rest of the shop floor is the interlocking high density foam 18" tiles from Sam's. The ones you would put into a child's room to soften the blow when they fall. Great for the knee and ankle joints.
 

Pop

New User
Pop Ryan
OK... here's the pictures of the router lift assembly I promised. I even dug around in my archives and found the article I used to start the project. Since my router table was a good bit smaller than what was in the article, my looks a little more compact but works just as great.

If I had to do it over again, I would have turned the lift assembly around 180 deg. so the acorn nut was inthe front of the table and not under my fence assembly. I had also thought of using a right angle drill adapter on the bottom of the threaded rod and having a hand wheel on the side of the router table assembly and eliminate the acorn nut all together.

I used a right angle drill adapter on my Dad's old drill press to raise and lower the table I added... and it works just great. The old table on his drill press was a hand operated locking nut that you hade to tap with a hammer then slide the work table up and down manually. Whatta pain... But that's another story/project.

If you know anyone who subscribes to "The American Woodworker" magazine and has back issues, this is in the March 2004 (#106) issue.
 

Attachments

  • Lift assembly drawing.jpg
    Lift assembly drawing.jpg
    109 KB · Views: 179
  • Top up - view lift assembly.jpg
    Top up - view lift assembly.jpg
    91.5 KB · Views: 178
M

McRabbet

Now I remember that article -- in your earlier pictures, one couldn't see enough detail. I have a Milwaukee 5625 Variable Speed 3-1/2HP router with built-in "through-the-table" adjustment, but this would simplify the bit changing if it could be arranged so the collet is above the table. I like the idea of adding a right-angle drill adapter to facilitate raising and lowering faster -- might even consider a dedicated motor with a reversing switch to automate it. Cool...and thanks for posting.
 

Trent Mason

New User
Trent Mason
Pop,

That is very impressive! :eusa_clap:eusa_clap:eusa_clap:eusa_clap:eusa_clap I hope that one day I can be that innovative. :roll: :lol:

Trent
 

scsmith42

New User
Scott Smith
Mike, ditto the request on my pix of your Model A's! From what I can see of the bed, it looks pretty cool!

Thanks.

Scott
 

Pop

New User
Pop Ryan
Here's the lift system I mentioned I made for my dad's old drill press. It's a 1950's vintage Craftsman that didn't have the gearing on the main column like a lot of the newer styles. All it had was a wedge nut that you cranked in by a hand lever. When it was tight it would wedge against the main column and hold the work table in. After 50+ years, it began to stick and it needed a tap or two , or three or a wack at times to get it loose. Then you had to wiggle the table side to side to free it up so you could slide it to the height you wanted. All-in-all a pain inthe butt.

I decided to use more 'T' track and make a height adjusting setup of my own and new work table. I have the blue 'T' track you can get from Rockler everywhere ... I mean everywhere. Anyway...I made the work table shown from a plan in the ShopNotes magazine and then set about making the lowering/raising system. I got a cheap right angle adapter from Harbor Freight and attached it to the bottom of the new work table with a 'u' strap. Tapped a steel block with a 1/4 x 20 thread to accept the threaded rod. Spot welded it to a strap so I could fasten it to the old table I had locked in place at the bottom of the drill press stand. Added the threaded rod and viola! Drill press easy lift! Got an old drill press that needs updated... this is a piece of cake to make. You just turn the 't' bolts to loosen and tighten the table in the 't' track before you use the hand crank to raise and lower it.

P.S. The little control box you see to the right of the drill press is a variable speed control for the drill press. I have a buddy that designs motor controls for printing presses and I got it from him. It converts 110 VAC (single phase) to 220 VAC (3 phase) cool! By replacing the 110 volt motor on the drill press with a 1 hp 220 volt/3 phase motor, this unit allows me to not only vary the speed of the drill but allows me to go down to a threading speed withoput loosing any torque!! By pushing a button, it will slow down to a stop and automaticallt revers itself too. I was initially going to put it on my metal lathe but it wound up here on the drill press instead.:eusa_danc
 

Attachments

  • vertical shot - whole table.jpg
    vertical shot - whole table.jpg
    94.3 KB · Views: 173
  • right side - right angle set up and control.jpg
    right side - right angle set up and control.jpg
    91.3 KB · Views: 183
Status
Not open for further replies.

Premier Sponsor

Our Sponsors

LATEST FOR SALE LISTINGS

Top