Sharpening support for diamond plates

creasman

Jim
Staff member
Corporate Member
I recently purchased the four diamond plates from DMT that I mentioned in a previous thread. One of the challenges is to keep these in place while in use. The underside is smooth. After applying lubricant they can easily slide about as you push against them. There are various stands you can purchase. However, I decided to see what I had lying around the shop that I might use to make a base.

I'm constantly saving things that might otherwise be trash. Sometimes it becomes clutter and other times it pays off. This is one of those very satisfying times when I was able to take "trash" and turn it into something I can really use. Feels like double coupon day when that happens.

IMG_3778.JPG
IMG_3783.JPG


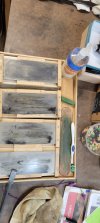
The base is made from an old sink cutout of solid surface material. The installers left us this from our kitchen countertops as a cutting board, but we've never used it as such. I cut two pieces of aluminum angle, then drilled and tapped holes to screw these in place. They are 8" apart -- the length of the sharpening plates. I did rip one side of the aluminum on my table saw so it is below the plates' surface. To keep the base in place as I work I added some rubber feet that I had in my parts cabinet.

A project complete, and no trip to the hardware store! BTW, the pictures show it on my workbench, but I don't sharpen tools there. I don't want to get the bench top wet, nor do I want filings where I do most of my woodwork. I have a separate space I use when sharpening.
 

drw

Donn
Corporate Member
Well done, Jim! Turning trash into treasure is great when it happens...I have an assortment of "stuff" that I have been holding onto, but with the up coming shop crawl I am going to have to do some serious culling!
 

J_Graham

Graham
Corporate Member
Well done, Jim! Turning trash into treasure is great when it happens...I have an assortment of "stuff" that I have been holding onto, but with the up coming shop crawl I am going to have to do some serious culling!

Sounds like you have some party favors to give out at the shop crawl! Hahaha
 

Westpacx3

Jim
Corporate Member
Nice use of what's available in the shop. I took a class from Mike on sharpening and bought the 4 pieces set as well.

I used a shelf from my work truck that I just could never throw away over the last 15 years. It's the tray portion. Lined it with maple scraps to hide the metal. Used some drawer cushion non slip stuff under it. Mounted the the plates to 3/4 bb scraps after attaching the little stick on feet to the plates. Made some hold downs to secure the plates but I did have to buy the screws. I spent days sharpening and maybe 2 trips to the chiropractor from all the pushing. I went through my dad's worn out chisels, about 6 old planes and a few old wood planes that I had no need to purchase. They do look nice on the shelf. Lol

Highly recommend Mike for sharpening. Great teacher and good eye for detail and design.
 

Attachments

  • 20230521_205654.jpg
    20230521_205654.jpg
    914.4 KB · Views: 101

Wilsoncb

Williemakeit
Corporate Member
Looks great, I love it when you can do these little projects with old stuff that’s been stashed away just waiting for its day.

I thought I had a similar moment today when I needed to make a 6 ft. 220v extension cord. I found a cord with a molded plug on one end, great start. Then I found another loose plug and I’m thinking winner, winner chicken dinner. I put it all together and plugged in one end. Then I went to plug in the other end (see pic). Doooh!
 

Attachments

  • IMG_3556.jpeg
    IMG_3556.jpeg
    2 MB · Views: 115

Westpacx3

Jim
Corporate Member
Looks great, I love it when you can do these little projects with old stuff that’s been stashed away just waiting for its day.

I thought I had a similar moment today when I needed to make a 6 ft. 220v extension cord. I found a cord with a molded plug on one end, great start. Then I found another loose plug and I’m thinking winner, winner chicken dinner. I put it all together and plugged in one end. Then I went to plug in the other end (see pic). Doooh!
I almost did the same last week...
 

Michael Mathews

Michael
Corporate Member
I did something similar but I used a piece of UHMW (Ultra High Molecular Weight) plastic and with my Shaper Origin I routed out the exact sizes of my diamond plates to nearly the depth of the thickness of the plates as you can see in the second pic. The only downfall to this plan is I can only use the far left and right stones to flatten the backs! Oh, I also added finger holes so I could easily remove the plates as needed. Added bonus, the plastic doesn't mind any water, lubricant, etc when sharpening!


20220915_181045.jpg
20220915_181117.jpg
 

JNCarr

Joe
Corporate Member
I did something similar but I used a piece of UHMW (Ultra High Molecular Weight) plastic and with my Shaper Origin I routed out the exact sizes of my diamond plates to nearly the depth of the thickness of the plates as you can see in the second pic. The only downfall to this plan is I can only use the far left and right stones to flatten the backs! Oh, I also added finger holes so I could easily remove the plates as needed. Added bonus, the plastic doesn't mind any water, lubricant, etc when sharpening!


View attachment 219997View attachment 219998
Thats a great idea.
 

shanghaipete

Pete
User
I did something similar but I used a piece of UHMW (Ultra High Molecular Weight) plastic and with my Shaper Origin I routed out the exact sizes of my diamond plates to nearly the depth of the thickness of the plates as you can see in the second pic. The only downfall to this plan is I can only use the far left and right stones to flatten the backs! Oh, I also added finger holes so I could easily remove the plates as needed. Added bonus, the plastic doesn't mind any water, lubricant, etc when sharpening!


View attachment 219997View attachment 219998
Can you tell us more about the chisel honing guide? Did you make that or was it purchased? I’ve never seen one like that before.
 

Michael Mathews

Michael
Corporate Member
I made it myself. I used my shaper origin to route out the holes exactly to the size of the diamond stones along with the finger holes to get the diamond stones out. I was given a large chunk of the UHMW plastic material some time ago so I cleaned that up and use that which is great stuff for this type of application.
 

pop-pop

Man with many vises
Corporate Member
I started with Paul Seller’s design and added two features; 1) a rim to help contain sharpening fluid, and 2) knockout holes in case the stone needs replacing someday.
IMG_1020.jpeg

IMG_1021.jpeg
 

Michael Mathews

Michael
Corporate Member
Oh sorry my bad, I assumed he was talking about the diamond plate holder. Yes, I did not make it, I purchased it. I have information at home but I am not at home until later this evening. I will get information about it and post it in the thread. It is a very neat design that's minimalistic but works really well! Supports the chisel on both sides!
 

Michael Mathews

Michael
Corporate Member
Can you tell us more about the chisel honing guide? Did you make that or was it purchased? I’ve never seen one like that before.
Pete, Now that I'm back home I checked and the honing guide is a Richard Kell Honing Guide. Here's a link to his tools ->


I have two of them. One for narrow chisels and one for wide plane blades. I really like the outside wheels for stability when honing.
 

shanghaipete

Pete
User
Pete, Now that I'm back home I checked and the honing guide is a Richard Kell Honing Guide. Here's a link to his tools ->


I have two of them. One for narrow chisels and one for wide plane blades. I really like the outside wheels for stability when honing.
Sorry for the late response, thank you for the link! Very interesting design.
 

Premier Sponsor

Our Sponsors

Top