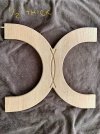
Seems like everything I do is a one of a kind, one shot deal. This time I’m making 5 chairs so I’m using the first one to work out the kinks and help make decisions. There were plenty of kinks that were worked out but there was one feature I wasn’t sure how to make. It was the back board. I knew what I wanted it to look like but I wasn’t sure how to make it.
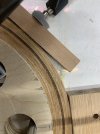
First I made it with the grain running vertical because right or wrong I thought it would look better. I also thought it should be 1/2” thick, for the look I wanted. I knew running the grain vertical was not the best, but figured I could deal with it. Well, being only 1/2” thick it was pretty weak and the grain direction wasn’t as big of a deal (from a “looks” standpoint) as I expected. As long as this attempt was going to be a looser I figured I would try to route a design into it with a “V” bit. Wasn’t crazy about the results.
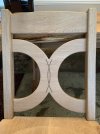
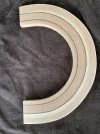
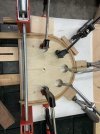
After discussing the whole thing with some very wise woodworkers at the Triad area monthly lunch, I decided to try laminating. The curve is pretty tight, so I could only make the strips 0.1” thick (note, this is white oak). At that thickness I would need 25 on each half. I thought as I built it up I could start making thicker strips about halfway through which would reduce the number of strips I would need. Wrong! First I could only laminate 7 strips at time. It was just too hard to pull and clamp down any more than that. This meant it would take 4 glue-ups to complete each half circle. Note, I also planned to use a walnut strip about 1/2” from each edge. So after the second glue-up, I started with the thicker strips. They were more difficult to get wrapped around the curve and right about when I got it where I wanted they began to snap. In a panic I stuck in the only thinner strip I had left which was walnut…not where I planned to use it. While that set was drying I re-cut some thinner strips. Unfortunately I had to use another board and you can see in the picture it was lighter than the previous pieces. In the end, the whole thing came out pretty good other than the color scheme was not what I wanted. I really like how this would potentially look, but I just don’t think it’s feasible for 5 chairs. Cutting the 250 strips and 40 glue-ups doesn’t seem like the best solution in this case. I think I’ll try this laminating technique on another project.
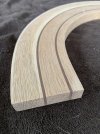
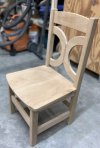
On to attempt number 3. Run the grain horizontal and use 3/4 thick material. This method was a piece of cake after the whole laminating attempt. I decided to use a 1/8” bit to cut a little design and fill it with epoxy. Winner, winner chicken dinner.
First I made it with the grain running vertical because right or wrong I thought it would look better. I also thought it should be 1/2” thick, for the look I wanted. I knew running the grain vertical was not the best, but figured I could deal with it. Well, being only 1/2” thick it was pretty weak and the grain direction wasn’t as big of a deal (from a “looks” standpoint) as I expected. As long as this attempt was going to be a looser I figured I would try to route a design into it with a “V” bit. Wasn’t crazy about the results.
After discussing the whole thing with some very wise woodworkers at the Triad area monthly lunch, I decided to try laminating. The curve is pretty tight, so I could only make the strips 0.1” thick (note, this is white oak). At that thickness I would need 25 on each half. I thought as I built it up I could start making thicker strips about halfway through which would reduce the number of strips I would need. Wrong! First I could only laminate 7 strips at time. It was just too hard to pull and clamp down any more than that. This meant it would take 4 glue-ups to complete each half circle. Note, I also planned to use a walnut strip about 1/2” from each edge. So after the second glue-up, I started with the thicker strips. They were more difficult to get wrapped around the curve and right about when I got it where I wanted they began to snap. In a panic I stuck in the only thinner strip I had left which was walnut…not where I planned to use it. While that set was drying I re-cut some thinner strips. Unfortunately I had to use another board and you can see in the picture it was lighter than the previous pieces. In the end, the whole thing came out pretty good other than the color scheme was not what I wanted. I really like how this would potentially look, but I just don’t think it’s feasible for 5 chairs. Cutting the 250 strips and 40 glue-ups doesn’t seem like the best solution in this case. I think I’ll try this laminating technique on another project.
On to attempt number 3. Run the grain horizontal and use 3/4 thick material. This method was a piece of cake after the whole laminating attempt. I decided to use a 1/8” bit to cut a little design and fill it with epoxy. Winner, winner chicken dinner.