
This is a continuation of Part 1 of this posting.
Refurbishing
These are some tools you'll need for this part:
Disassemble the plane. Remove any dust with a cloth and assess the plane. The sole should be straight front to back without bow or concavity. A 12" straight ruler is good to use for this inspection. Check is the curvature of the sole. This is where you use the circle template. For example, a plane with a 3/4" wide iron should have a sole whose arc exactly matches the curve of a 1-1/2" diameter circle. Edges wear away over time and need restoration.
A slight detour is taken here if the iron is wider than desired. Don't remove more than 1/16" or you risk being unable to thin the body to fit the new iron. Use a grinder to reduce the iron to the correct width. Don't worry about the edge at this time. You'll reshape this later. Go slow and avoid overheating at the grinder. Once you have size, reassemble the plane and see how much to take off the thickness of the body. Use the jack plane to remove material from the side of the plane's body that has the opening for the iron -- not the closed side. These are called "side escapement planes" because they have this opening where shavings are ejected. Plane until the iron is flush with the body at this opening
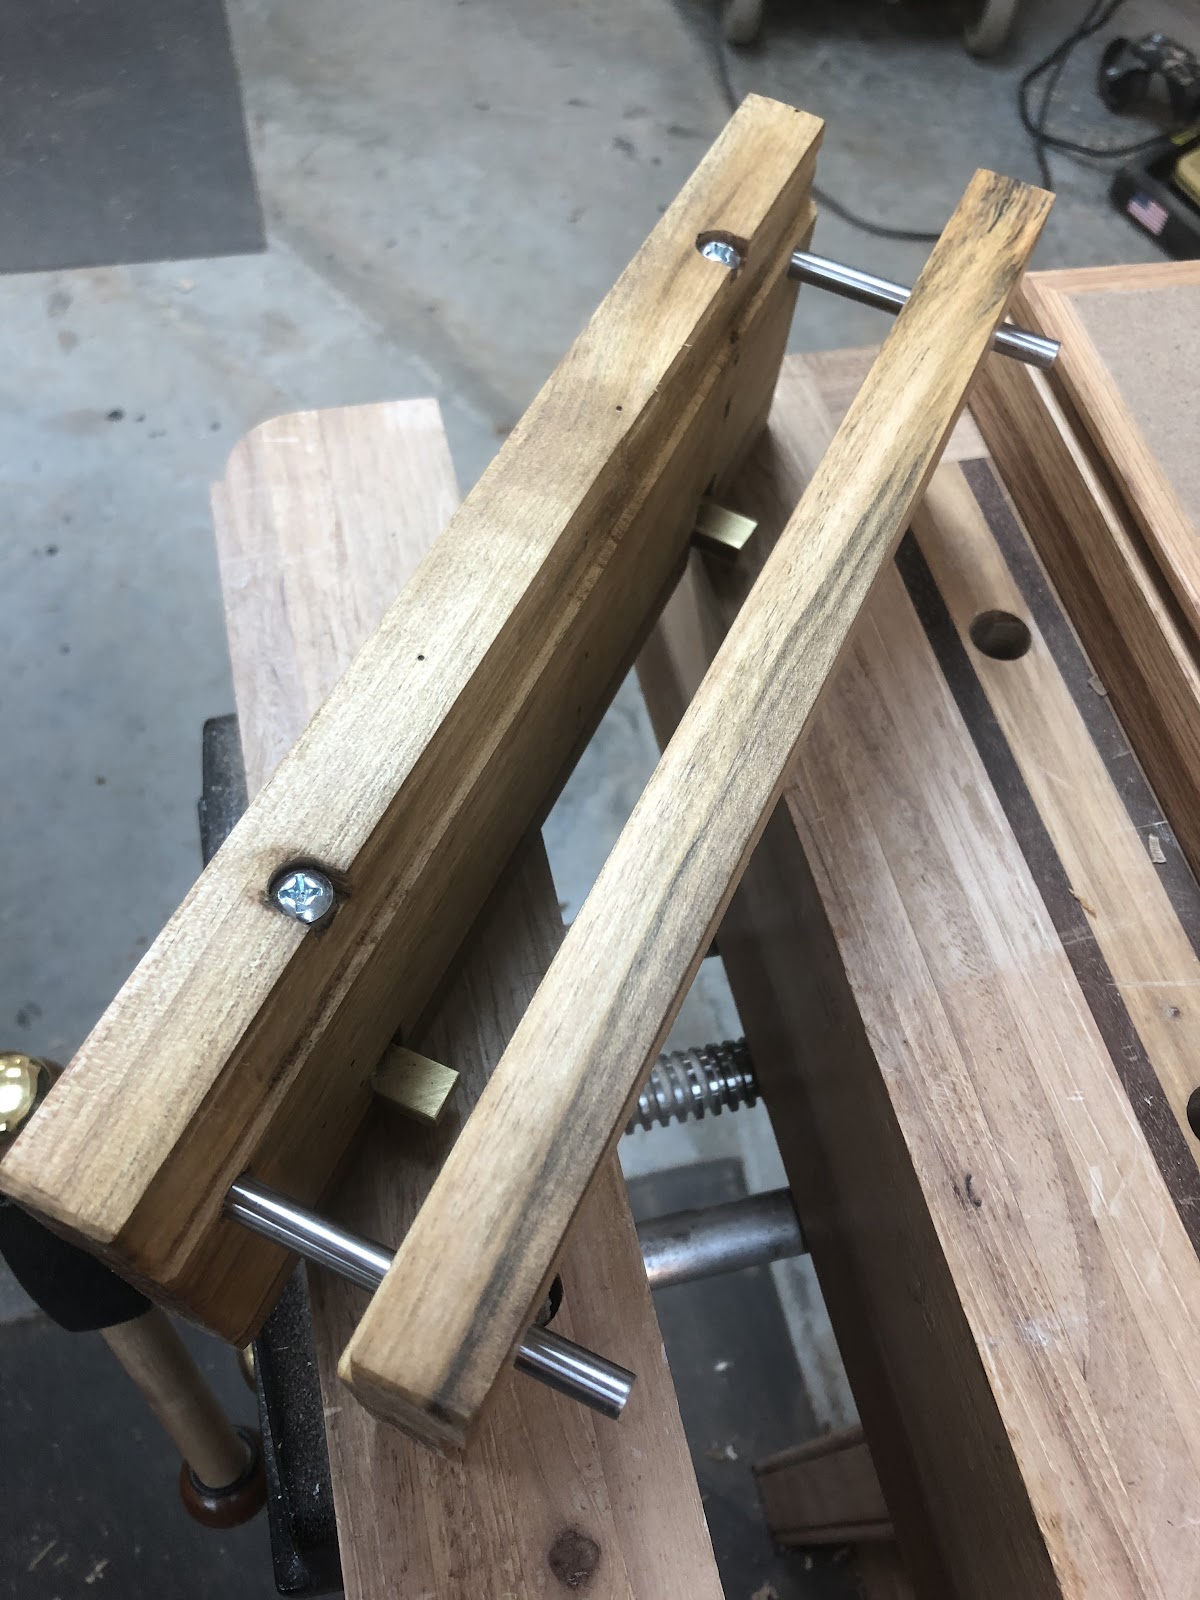
Bill Andreson's video shows a jig he uses in his plane making classes, and in resurfacing the sole of moulding planes. It holds the plane body while using a scratch stock to reshape the sole. Here is my version of the jig.
Note the screws run through to the "feet" at the bottom. These support the plane body from below and are used to adjust the depth of cut. The jig top provides a runner on which the scratch stock slides. Turning the screws raises or lowers the body. Start with a lower setting and gradually raise the body to remove material. The goal is to only remove enough to restore a flat, crisp sole. Rabbets cut onto each face of the sides. The outside rabbets create a lip to hold the jig in the face vice of the bench and the inside rabbets give room for the scratch stock to work.
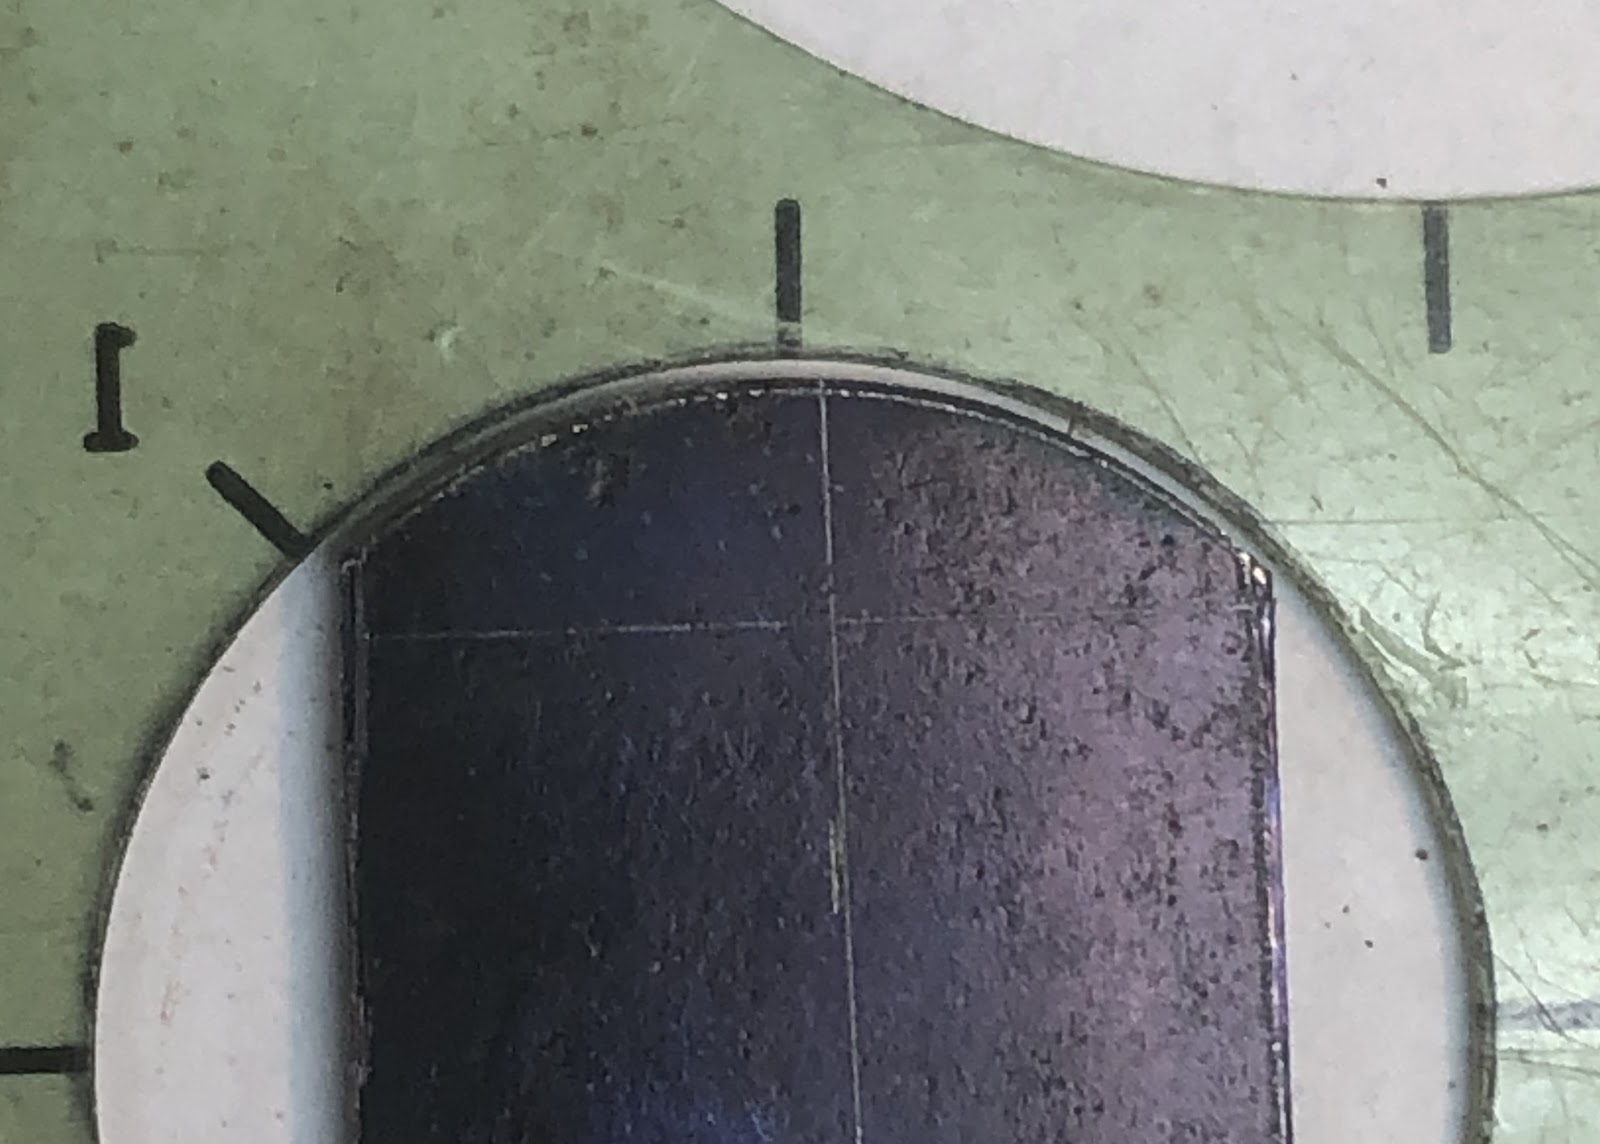
The next task is to make the correct sized cutter for the scratch stock. Snap off a section of the saw blade slightly wider than the sole of the plane. Mark and shape this to the correct curvature. The photo shows a cutter used to shape the sole of a #8 (1/2" radius) hollow. Scribe the curve using the circle template. Grind to a rough fit and file right up to the line. Lastly, flatten both sides of the cutter on a flat stone before using a hand stone to file the edge perpendicular, leaving the burr.
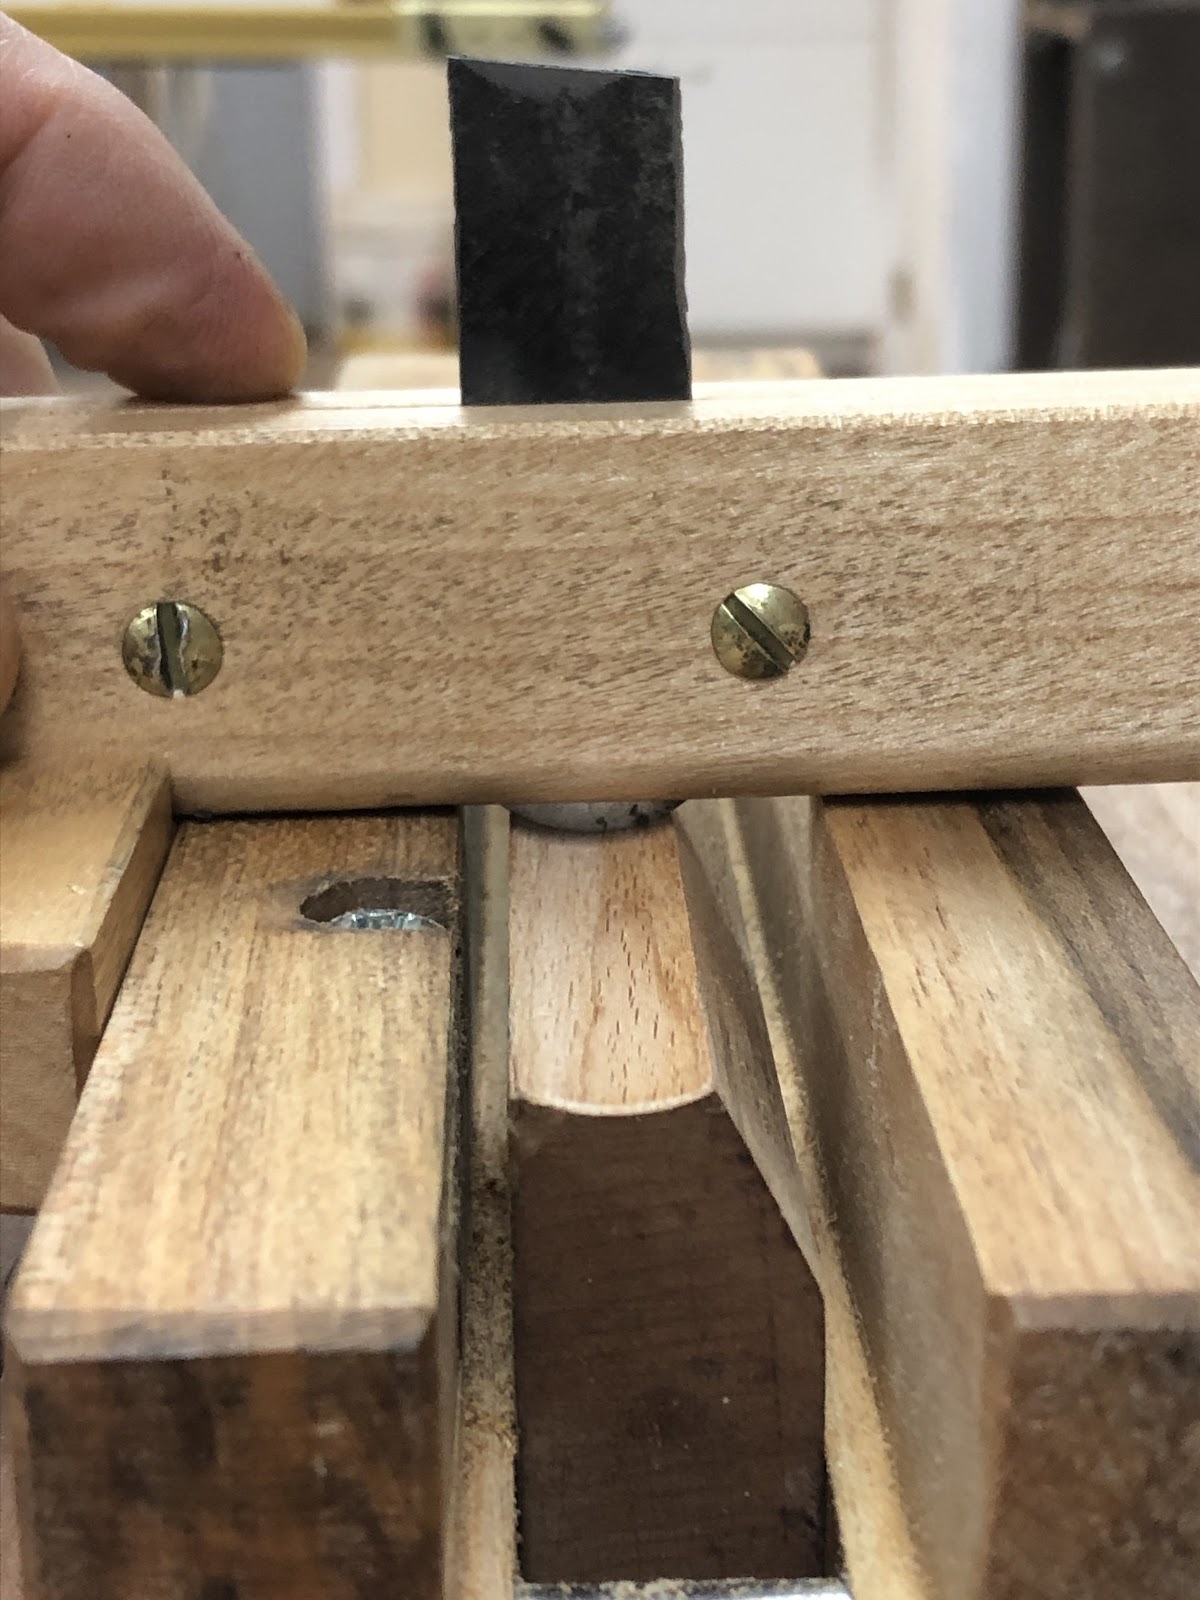
Fit the cutter into the scratch stock so that it is slightly protruding. With the plane secured in the jig, and the jig clamped in the vise, adjust the scratch stock fence so the center of the curvature is centered on the sole of the plane. Begin removing material, making sure to keep the fence of the scratch stock against the edge of the jig. The first few passes may only remove material from sections and not the entire length. The goal is to take just enough off until you are removing material on the full pass. In most cases you'll remove no more than 1/32" total. This process takes out any bow, leaving a straight, crisp sole.
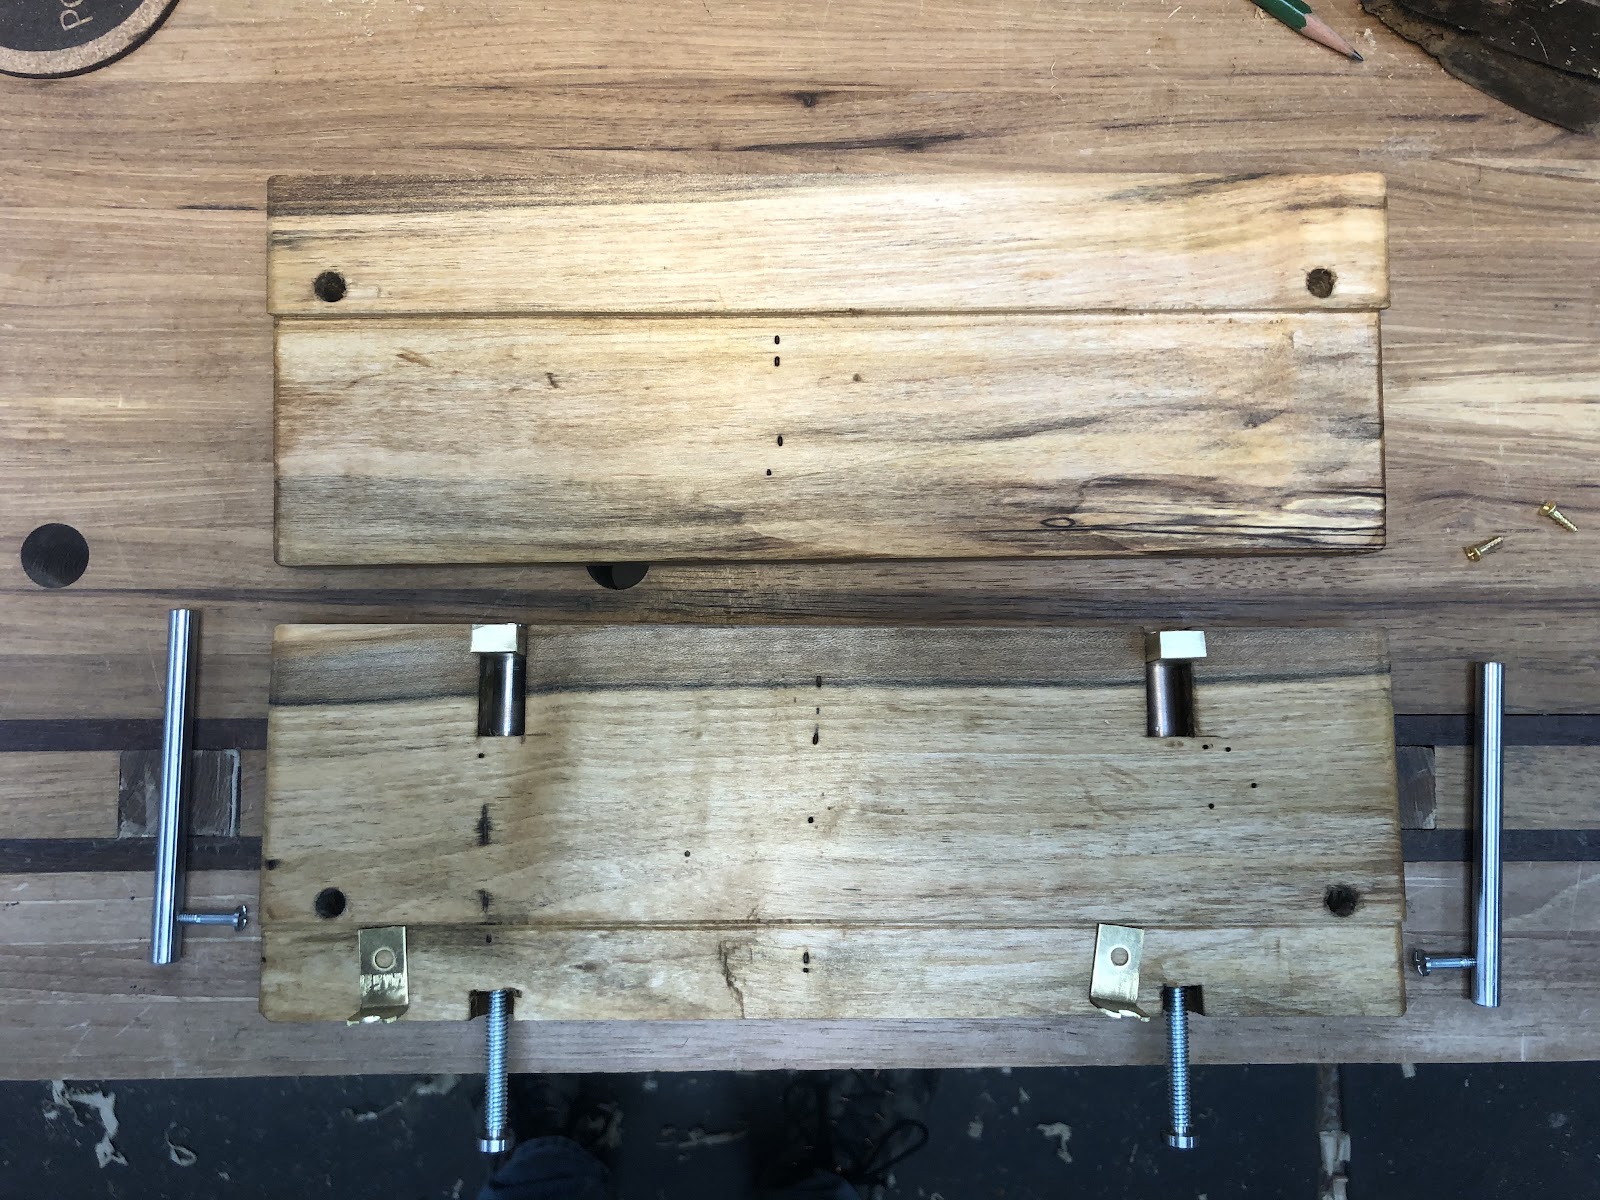
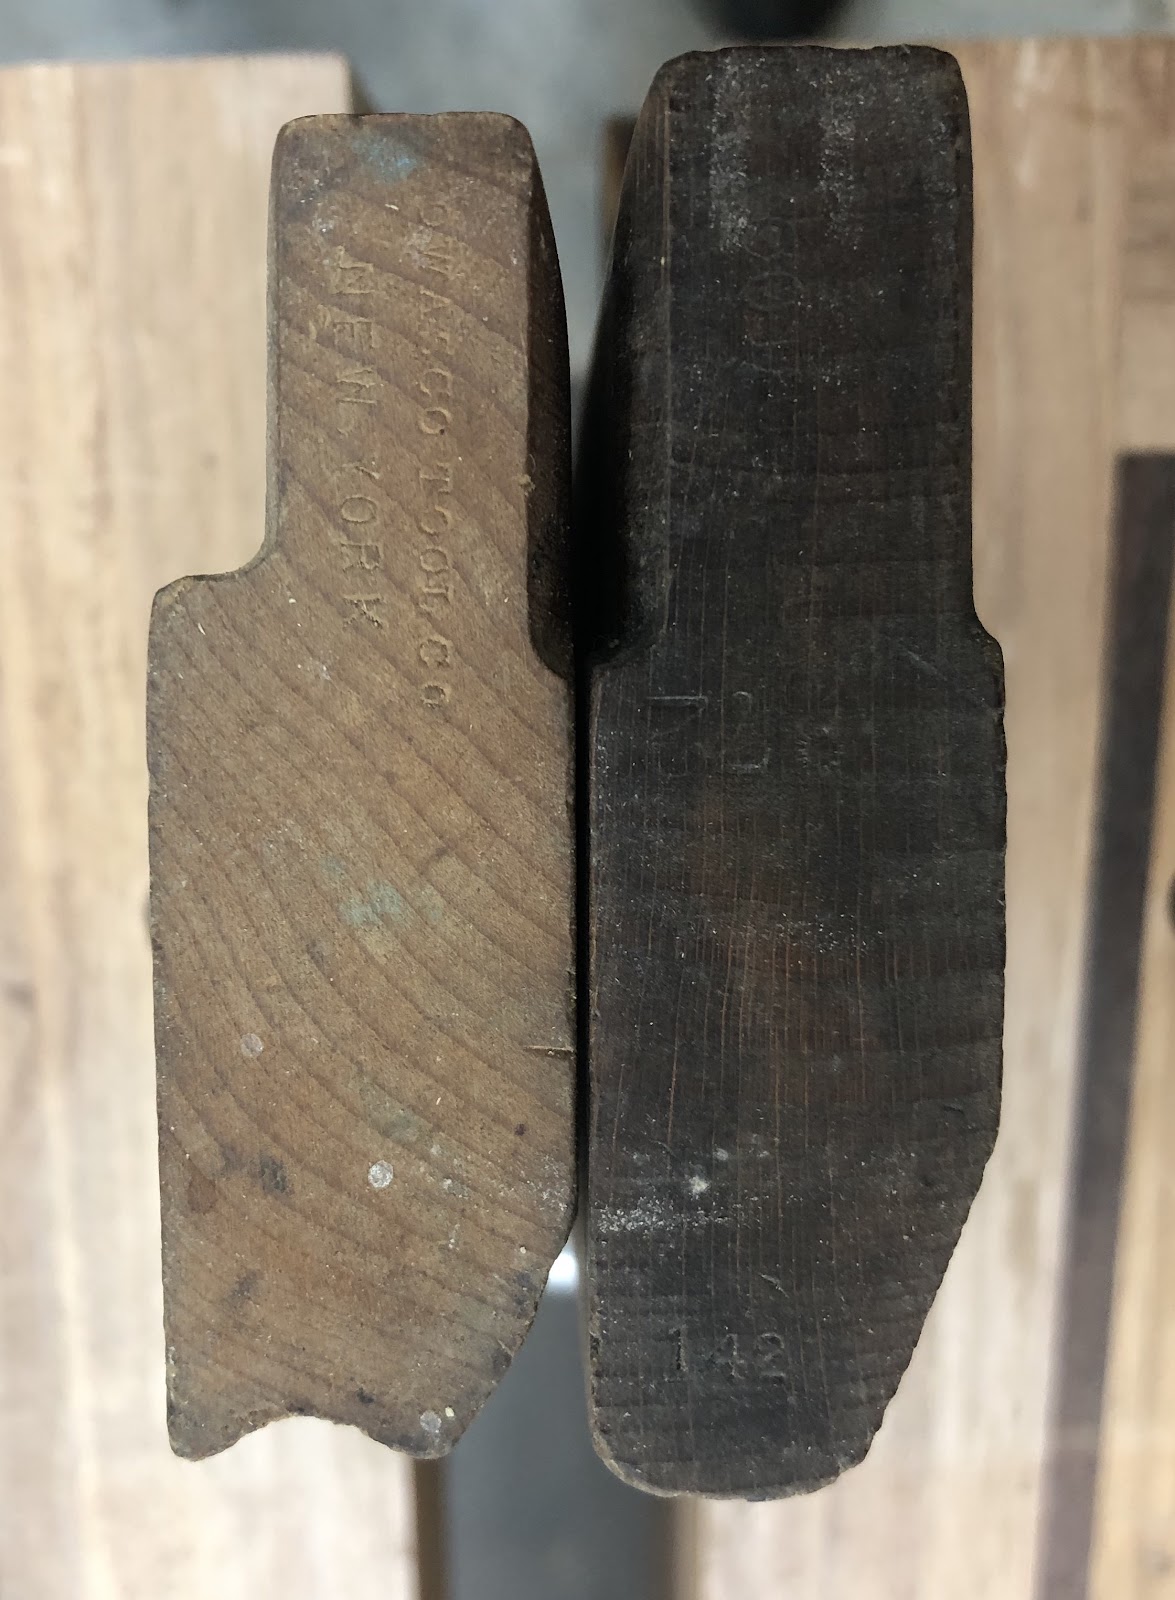
Here is a before and after picture. The soles in the first show age and use. Afterwards, the restored soles are nice and crisp again. I stamped a "10" into the end, indicating these are the 10/16" (5/8" radius) set. They shape a curve from a 1-1/4" diameter circle. The other markings on the hollow are "No. 180" which was the original tool catalog number of the plane and a "8" which is likely their definition of the size of this plane.

The body work is done except for the final rub down in oil. Now is the time to straighten and fit the iron. Usually this involves straightening the tang in both planes of direction. Occasionally, the cutting end (called the flag) will be slightly twisted. Lock the tang and/or flag in a vise and tap as needed. Don’t use too much force and break the iron. You can also tap it on a wooden block to remove a bow.
With the iron straightened, flatten the back side. I use a #400 diamond stone for this step. Depending on the condition and previous sharpening this will be easy or may take a while. Keep going until it's flat with a mirror shine. Paint the back of the iron with marking fluid and reassemble the plane. Allow the iron to protrude slightly and use an awl to mark the curvature of the sole onto the back side of the iron. You will remove material, staying parallel to this line.
Another detour here may involve the wedge. If the wedge doesn't fit correctly now is the time to correct this. Sellers often replace a wedge, heedless of the fit. A good fitting wedge is essential to the proper working of the plane. It should secure the iron solidly to the bedding angle, offer enough room for shavings to escape, and fit the angle formed by the plane and iron perfectly. No room for slop here. Use a jack plane mounted upside down in the bench vise as a jointer. Joint the wedge across the jack's iron until you have a good fit. Worse case is you have to make a new wedge. The original material is probably beech (like the body) but most any hardwood will work. Maple is a good choice.
Back to the iron. Shape the iron using the corner edge of a grinder wheel. I have the typical 3/4" thick wheels so this works well enough. A thin grinding wheel is probably better. First grind perpendicular to the back of the iron. Once you have the curve carefully regrind the bevel. This takes some care and a light touch on a grinding wheel. Cool the steel frequently and check often. I want the narrowest of dull showing across the full width of the edge. The final step is to use curved stones (for hollow irons) or a flat stone (for round irons). For rounds you'll need to rock the iron as you take a pass across the flat surface.
Reshaping and sharpening the iron is probably the most time consuming step. It requires patience and some practice. However, it's not beyond the ability of any woodworker and it's a very important skill to have. A sharp moulding plane is pure joy to use. Those who experience a ribbon-thin shaving coming from a plane that leaves a surface as slick as glass know what I mean. Mouldings created with these planes need little or no sanding and are much smoother than can be achieved with a router. The goal is for the sharpened edge of the iron to take the same thickness of shaving across the entire width of the sole. Have a scrap piece of wood to check as you sharpen, fit and adjust the iron.
Finishing Up
Congratulations! You have a plane that will last another 100 years. Apply a good coat of boiled linseed oil (BLO) as needed. Once the BLO dries, reassemble and adjust. Wax the sole with paraffin.
One task remains. Add your owner's mark to the plane. You are now one of a long line of craftsmen who have held and used this plane. You've also ensured it will be passed along to some future craftsman, perhaps a son or daughter. I have a few planes that are stamped with the same last name of different owners. Likely a father passed his tools along to his son to continue in the business.
Refurbishing
These are some tools you'll need for this part:
- 12" straight edge for checking sole and body.
- Grinder for shaping the iron and scratch stock scrapers.
- Calipers for checking width.
- Flat stone or other sanding surface to flatten the back of the iron.
- Miscellaneous sandpaper and/or shaped stones for getting the final edge.
- Jack plane, scraper, rasps, etc., for addressing minor issues.
- Jig for holding the plane body while reshaping the sole (I'll describe this more in detail, later).
- Scratch stock and material for making scratch scrapers. I broke off sections from an old hand saw for these.
- Plastic circle template with a variety of sizes for checking curvatures.
Disassemble the plane. Remove any dust with a cloth and assess the plane. The sole should be straight front to back without bow or concavity. A 12" straight ruler is good to use for this inspection. Check is the curvature of the sole. This is where you use the circle template. For example, a plane with a 3/4" wide iron should have a sole whose arc exactly matches the curve of a 1-1/2" diameter circle. Edges wear away over time and need restoration.
A slight detour is taken here if the iron is wider than desired. Don't remove more than 1/16" or you risk being unable to thin the body to fit the new iron. Use a grinder to reduce the iron to the correct width. Don't worry about the edge at this time. You'll reshape this later. Go slow and avoid overheating at the grinder. Once you have size, reassemble the plane and see how much to take off the thickness of the body. Use the jack plane to remove material from the side of the plane's body that has the opening for the iron -- not the closed side. These are called "side escapement planes" because they have this opening where shavings are ejected. Plane until the iron is flush with the body at this opening
Bill Andreson's video shows a jig he uses in his plane making classes, and in resurfacing the sole of moulding planes. It holds the plane body while using a scratch stock to reshape the sole. Here is my version of the jig.
Note the screws run through to the "feet" at the bottom. These support the plane body from below and are used to adjust the depth of cut. The jig top provides a runner on which the scratch stock slides. Turning the screws raises or lowers the body. Start with a lower setting and gradually raise the body to remove material. The goal is to only remove enough to restore a flat, crisp sole. Rabbets cut onto each face of the sides. The outside rabbets create a lip to hold the jig in the face vice of the bench and the inside rabbets give room for the scratch stock to work.
The next task is to make the correct sized cutter for the scratch stock. Snap off a section of the saw blade slightly wider than the sole of the plane. Mark and shape this to the correct curvature. The photo shows a cutter used to shape the sole of a #8 (1/2" radius) hollow. Scribe the curve using the circle template. Grind to a rough fit and file right up to the line. Lastly, flatten both sides of the cutter on a flat stone before using a hand stone to file the edge perpendicular, leaving the burr.
Fit the cutter into the scratch stock so that it is slightly protruding. With the plane secured in the jig, and the jig clamped in the vise, adjust the scratch stock fence so the center of the curvature is centered on the sole of the plane. Begin removing material, making sure to keep the fence of the scratch stock against the edge of the jig. The first few passes may only remove material from sections and not the entire length. The goal is to take just enough off until you are removing material on the full pass. In most cases you'll remove no more than 1/32" total. This process takes out any bow, leaving a straight, crisp sole.
Here is a before and after picture. The soles in the first show age and use. Afterwards, the restored soles are nice and crisp again. I stamped a "10" into the end, indicating these are the 10/16" (5/8" radius) set. They shape a curve from a 1-1/4" diameter circle. The other markings on the hollow are "No. 180" which was the original tool catalog number of the plane and a "8" which is likely their definition of the size of this plane.
The body work is done except for the final rub down in oil. Now is the time to straighten and fit the iron. Usually this involves straightening the tang in both planes of direction. Occasionally, the cutting end (called the flag) will be slightly twisted. Lock the tang and/or flag in a vise and tap as needed. Don’t use too much force and break the iron. You can also tap it on a wooden block to remove a bow.
With the iron straightened, flatten the back side. I use a #400 diamond stone for this step. Depending on the condition and previous sharpening this will be easy or may take a while. Keep going until it's flat with a mirror shine. Paint the back of the iron with marking fluid and reassemble the plane. Allow the iron to protrude slightly and use an awl to mark the curvature of the sole onto the back side of the iron. You will remove material, staying parallel to this line.
Another detour here may involve the wedge. If the wedge doesn't fit correctly now is the time to correct this. Sellers often replace a wedge, heedless of the fit. A good fitting wedge is essential to the proper working of the plane. It should secure the iron solidly to the bedding angle, offer enough room for shavings to escape, and fit the angle formed by the plane and iron perfectly. No room for slop here. Use a jack plane mounted upside down in the bench vise as a jointer. Joint the wedge across the jack's iron until you have a good fit. Worse case is you have to make a new wedge. The original material is probably beech (like the body) but most any hardwood will work. Maple is a good choice.
Back to the iron. Shape the iron using the corner edge of a grinder wheel. I have the typical 3/4" thick wheels so this works well enough. A thin grinding wheel is probably better. First grind perpendicular to the back of the iron. Once you have the curve carefully regrind the bevel. This takes some care and a light touch on a grinding wheel. Cool the steel frequently and check often. I want the narrowest of dull showing across the full width of the edge. The final step is to use curved stones (for hollow irons) or a flat stone (for round irons). For rounds you'll need to rock the iron as you take a pass across the flat surface.
Reshaping and sharpening the iron is probably the most time consuming step. It requires patience and some practice. However, it's not beyond the ability of any woodworker and it's a very important skill to have. A sharp moulding plane is pure joy to use. Those who experience a ribbon-thin shaving coming from a plane that leaves a surface as slick as glass know what I mean. Mouldings created with these planes need little or no sanding and are much smoother than can be achieved with a router. The goal is for the sharpened edge of the iron to take the same thickness of shaving across the entire width of the sole. Have a scrap piece of wood to check as you sharpen, fit and adjust the iron.
Finishing Up
Congratulations! You have a plane that will last another 100 years. Apply a good coat of boiled linseed oil (BLO) as needed. Once the BLO dries, reassemble and adjust. Wax the sole with paraffin.
One task remains. Add your owner's mark to the plane. You are now one of a long line of craftsmen who have held and used this plane. You've also ensured it will be passed along to some future craftsman, perhaps a son or daughter. I have a few planes that are stamped with the same last name of different owners. Likely a father passed his tools along to his son to continue in the business.