
One of my New Year's resolutions was to get serious on table saw safety. :saw:
(This post is also a stealth gloat)
I must admit I removed the stock splitter from my saw after just one attempt at using it, since it was very difficult to line it up properly with the blade. I have never experienced kickback, but I knew it'd be a matter of time. Also, I always had difficulty with ripping thin strips of stock, it either felt unsafe or totally inaccurate.
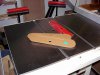
So, the first thing I did was buy the MJ splitter kit. Twelve plastic splitters (6 thin kerf, six full kerf), two drill jigs and two dill bits, for $35. It doesn't look like much, but those little splitters really work! Plus, you can install and remove them in oh, ONE SECOND. I put a small block of wood on the end of the fence where I can stash it when I crosscut, so no more excuses!
Of course, you need Zero Clearance Inserts for this kind of splitter. Some half inch MDF, a bandsaw, and router bit and I was in business. (I wanted to get one of those fancy [strike]phonetic[/strike] [strike]phlegmonic[/strike] [strike]UNLV[/strike] [strike]YMMV[/strike] plastic inserts, but it turns out, they don't make those for the Jet ProShop! I almost bought the one that fits their contractor saw, but fortunately checked with Jet first. Apparantly ZCI means Zero Common Intelligence. It's a different size!!!!! Why would you do that :eusa_doh:? Reminds me of the round/ square filter thing on Apollo 13. Never mind...) The drilling jig MJ supplies makes it really easy lining up the holes for the splitter.
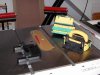
I bought a pair of featherboards from Rockler, they were on sale for cheap. Absolutely terrific design, easy to adjust, and they work on the bandsaw and router table too. Also got two Grr-rippers, probably the best accessory I've bought for the shop so far. First class construction, very flexible, and I've never felt safer ripping thin stock. I must admit I was a little hesitant to spend so much money on what is essentially a glorified push stick, now I wish I had bought them earlier.
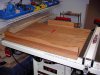
Finally, I built a crosscut sled, something large enough for crosscutting 2' panels. Since I don't have a large extension table, the sled really helps with minor safety concerns - like preventing work pieces from falling off the table. :eyeslam:You know, minor stuff.
(Now, if only _hand tools_ came with more safety features. So far, my shop injuries have come from chisels, box cutters, hand saws and tape measures.....)
(This post is also a stealth gloat)
I must admit I removed the stock splitter from my saw after just one attempt at using it, since it was very difficult to line it up properly with the blade. I have never experienced kickback, but I knew it'd be a matter of time. Also, I always had difficulty with ripping thin strips of stock, it either felt unsafe or totally inaccurate.
So, the first thing I did was buy the MJ splitter kit. Twelve plastic splitters (6 thin kerf, six full kerf), two drill jigs and two dill bits, for $35. It doesn't look like much, but those little splitters really work! Plus, you can install and remove them in oh, ONE SECOND. I put a small block of wood on the end of the fence where I can stash it when I crosscut, so no more excuses!
Of course, you need Zero Clearance Inserts for this kind of splitter. Some half inch MDF, a bandsaw, and router bit and I was in business. (I wanted to get one of those fancy [strike]phonetic[/strike] [strike]phlegmonic[/strike] [strike]UNLV[/strike] [strike]YMMV[/strike] plastic inserts, but it turns out, they don't make those for the Jet ProShop! I almost bought the one that fits their contractor saw, but fortunately checked with Jet first. Apparantly ZCI means Zero Common Intelligence. It's a different size!!!!! Why would you do that :eusa_doh:? Reminds me of the round/ square filter thing on Apollo 13. Never mind...) The drilling jig MJ supplies makes it really easy lining up the holes for the splitter.
I bought a pair of featherboards from Rockler, they were on sale for cheap. Absolutely terrific design, easy to adjust, and they work on the bandsaw and router table too. Also got two Grr-rippers, probably the best accessory I've bought for the shop so far. First class construction, very flexible, and I've never felt safer ripping thin stock. I must admit I was a little hesitant to spend so much money on what is essentially a glorified push stick, now I wish I had bought them earlier.
Finally, I built a crosscut sled, something large enough for crosscutting 2' panels. Since I don't have a large extension table, the sled really helps with minor safety concerns - like preventing work pieces from falling off the table. :eyeslam:You know, minor stuff.
(Now, if only _hand tools_ came with more safety features. So far, my shop injuries have come from chisels, box cutters, hand saws and tape measures.....)
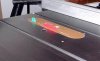
") The pads are 1/4", 1/2" and 1" wide, the center 1" pad is adjustable. Basically, you create a tunnel between two pads through which the saw blade can pass. You then use the gripper to hold both parts of the workpiece to the table. That's the real innovative part. You don't even need a splitter, since there is no danger of the kerf binding.
The pads are 1/4", 1/2" and 1" wide, the center 1" pad is adjustable. Basically, you create a tunnel between two pads through which the saw blade can pass. You then use the gripper to hold both parts of the workpiece to the table. That's the real innovative part. You don't even need a splitter, since there is no danger of the kerf binding.