Murphy bed is finally complete

Status
Not open for further replies.

njohnston924

New User
Nate
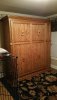
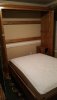
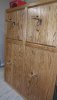
It's been a long time in the making, but only because I got to work on it an hour here and there, but the Murphy bed is finally complete. It's my biggest project yet and got to learn some new techniques. Also my attempt at larger scale raised panel work.

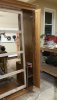
The outer frame used to be an entertainment center that was custom built for the old (huge and heavy) big screen TV's. I basically gutted it and reused some of the wood. It's all solid oak and oak plywood. But now there's so much more room in the [STRIKE]garage[/STRIKE] workshop. I even have a few people wanting some help to put one in their house.
attachment.php
attachment.php
attachment.php
attachment.php
 

Attachments

  • 20180314_201630.jpg
    20180314_201630.jpg
    245.8 KB · Views: 319
  • 20180314_201727.jpg
    20180314_201727.jpg
    187.1 KB · Views: 315
  • 20171029_222845.jpg
    20171029_222845.jpg
    283 KB · Views: 304
  • 20180210_204858.jpg
    20180210_204858.jpg
    347.3 KB · Views: 312

njohnston924

New User
Nate
Thanks!

Not really any special hardware. I've seen the kits that you can buy, but I'm a cheapo and didn't want to spend that much. So I found a video on youtube where someone used boat seat swivels as the pivot point and I used 150 lb gas struts - all ordered off amazon. The struts that come with the kits make it so you can put it up/down with minimal efforts, but they have the physics worked out. Mine gets a little heavy towards the bottom, but as long as my wife can do it by herself, it works for me. I might use stronger ones if I ever make another or have to replace these.
 

zdorsch

Zach
Corporate Member
Looks good Nate!

I like how you disguised the legs when put away and might have to borrow that idea if I ever build a Murphy bed.
 

njohnston924

New User
Nate

NOTW

Notw
Senior User
This came out fantastic, I am very interested in the hardware you used, if you wouldn't mind would you post some pictures of the hardware?
 

njohnston924

New User
Nate
I lied. I didn't post any the other night, but I'm making up for it by posting them now
attachment.php
attachment.php
attachment.php


the first one shows how the feet hinges are attached - basically just attach a piece with a few pocket holes and make it flush with the opening of the face. The last one shows the gas strut and swivel hardware. The swivel is attached with a few carriage bolts. The last pic also shows that i need to dust it off better and get some 1/4" ply to put under the bed to hide the slats, etc.
 

Attachments

  • 20180211_150019.jpg
    20180211_150019.jpg
    295.9 KB · Views: 198
  • 20180322_221446.jpg
    20180322_221446.jpg
    171.8 KB · Views: 202
  • 20180322_221601.jpg
    20180322_221601.jpg
    257.7 KB · Views: 212

NOTW

Notw
Senior User
Thanks for the pictures! I was way over complicating this in my head. This system looks a lot simpler than others I have seen and I like it
 

njohnston924

New User
Nate
No problem. It may not be as clean or fancy as some other builds, but all that stuff is hidden anyway. I've been learning that sometimes simple is the best way to go, especially for my skill level and budget. since I already had the outer cabinet frame and mattress, I only have ~$400 in it. Of course it would be much more if I was starting from scratch or purchased the kit. Also, it would probably be easier/cheaper if you used plywood for the face and dressed it up a bit, but I wanted to challenge myself a little with the edge gluing and making raised panels.
 

NOTW

Notw
Senior User
I think it came out great! unfortunately I made the mistake of showing the wife :BangHead:
 
Status
Not open for further replies.

Premier Sponsor

Our Sponsors

LATEST FOR SALE LISTINGS

Top