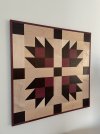
Thought I’d share my latest wall hanging (or w/e it's called). It’s simple, but attention to detail during the build really helps.
Started by drawing it in Fusion. I’m trying to learn that, plus the drawing helped me figure out how much stock I’d need. Could’ve used Sketchup, but found it easier to do certain things (lines with a specific length at angles) in Fusion.


On past projects like this I’ve had problems with block alignment and tried to be more consistent dimensionally (if that makes sense). Before, I had small gaps between blocks, or block edges that didn’t line up.
Some things that helped me;
- Made sure tools were aligned to 90 degrees (miter saw, jointer, and TS).
- Rip ALL stock that’s supposed to be the same width on the TS without ever moving the fence. I have a good (but not great) TS, and setting the cut width back to what it was before after moving the fence is difficult at best. Also, when ripping each piece of stock, I ran one edge of it across the jointer to get a perfect edge first, then used that edge on the TS fence during the rip. And finally, a featherboard on the TS really helped me keep each rip straight.
- When cutting all the interior blocks, I used stop blocks on the miter saw to ensure the cut block lengths were consistent.
- Build from the center out. When assembling, there were a couple of things I did to help keep things tight. First, once a block section was assembled, I ran the almost-straight block section across the jointer to get a perfect straight edge before mating it to the other sections. Second, I deliberately cut the blocks on the outer edges long, then creeped up with repeated cuts to get a good fit.
A few "in progress" pictures. All blocks we crosscut with my miter saw. Starting with the wenge blocks;

My high-tech clamping rig;

Ready for sanding;

The final product turned out OK. At least, my QA department (aka wife) is happy with it.")

Started by drawing it in Fusion. I’m trying to learn that, plus the drawing helped me figure out how much stock I’d need. Could’ve used Sketchup, but found it easier to do certain things (lines with a specific length at angles) in Fusion.
On past projects like this I’ve had problems with block alignment and tried to be more consistent dimensionally (if that makes sense). Before, I had small gaps between blocks, or block edges that didn’t line up.
Some things that helped me;
- Made sure tools were aligned to 90 degrees (miter saw, jointer, and TS).
- Rip ALL stock that’s supposed to be the same width on the TS without ever moving the fence. I have a good (but not great) TS, and setting the cut width back to what it was before after moving the fence is difficult at best. Also, when ripping each piece of stock, I ran one edge of it across the jointer to get a perfect edge first, then used that edge on the TS fence during the rip. And finally, a featherboard on the TS really helped me keep each rip straight.
- When cutting all the interior blocks, I used stop blocks on the miter saw to ensure the cut block lengths were consistent.
- Build from the center out. When assembling, there were a couple of things I did to help keep things tight. First, once a block section was assembled, I ran the almost-straight block section across the jointer to get a perfect straight edge before mating it to the other sections. Second, I deliberately cut the blocks on the outer edges long, then creeped up with repeated cuts to get a good fit.
A few "in progress" pictures. All blocks we crosscut with my miter saw. Starting with the wenge blocks;
My high-tech clamping rig;
Ready for sanding;
The final product turned out OK. At least, my QA department (aka wife) is happy with it.