
You are using an out of date browser. It may not display this or other websites correctly.
You should upgrade or use an alternative browser.
You should upgrade or use an alternative browser.
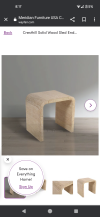
How do I make this
- Thread starter Westpacx3
- Start date
Check out kerf bending. You basically make small cuts on the under side in the area you need to bend. You will need to build a form the shape of the final project. Then glue is applied to a thin substrate underneath, and clamp it over the form. The biggest downside is the need to cover the edges with a veneer or solid wood.
Research the method for nuances.
Research the method for nuances.
looks like 4 glue joints.
Looks like the corner pieces were either lathe turned and quartered or made on a shaper.
I tried to make a kerf bend once when I was making a dust shroud for a planer I had for which no commercial one was available. It took three attempts before I got it to where it wouldn't split even though it needed very little structural strength. I can't see that table above being anything more than an occasional table.
I thought about this for a while. I would make this more of a square with a bottom that could serve like a shelf to put magazines on or books. That should add some strength.
Similar to this but a bit more square.

Similar to this but a bit more square.
You could glue up some long sides and place some wider stock as the top between the sides like this:
I

Except I would orient the grain perpendicular to the sides, not with it as shown in the picture.
Then cut the radii in red with a band saw or maybe the inside with a Forstner bit. Leave a little room outside your lines. Make each one about an 1/8th oversize from your planned final dimensions. Make an even number of these.
Now make some like this where the wider top goes all the way across the sides:

I would orient the grain of the sides perpendicular to the top, not as shown above.
Make an odd number of these which will go on the outside and then alternate the two when you laminate them all together which will create a box joint effect where every lamination will have a cross-grain glue joint. Again, make each one about an 1/8th oversize from your planned final dimensions.
Take one of your "odds" and plane and sand it to your absolute final dimensions. This will be your template to rout the rest of the pieces with a flush-trim bit. That should save you a lot of sanding.
Stack, glue and clamp your pieces alternating odds and evens. You'll have to devise some system of cauls or such to keep everything in line.
You might even want to make a few more of these pieces than you need in case a couple decide to move beyond the tolerances you allowed for.
I
Except I would orient the grain perpendicular to the sides, not with it as shown in the picture.
Then cut the radii in red with a band saw or maybe the inside with a Forstner bit. Leave a little room outside your lines. Make each one about an 1/8th oversize from your planned final dimensions. Make an even number of these.
Now make some like this where the wider top goes all the way across the sides:
I would orient the grain of the sides perpendicular to the top, not as shown above.
Make an odd number of these which will go on the outside and then alternate the two when you laminate them all together which will create a box joint effect where every lamination will have a cross-grain glue joint. Again, make each one about an 1/8th oversize from your planned final dimensions.
Take one of your "odds" and plane and sand it to your absolute final dimensions. This will be your template to rout the rest of the pieces with a flush-trim bit. That should save you a lot of sanding.
Stack, glue and clamp your pieces alternating odds and evens. You'll have to devise some system of cauls or such to keep everything in line.
You might even want to make a few more of these pieces than you need in case a couple decide to move beyond the tolerances you allowed for.
Last edited:
If you zoom up on that photo you can clearly see that the sides are horizontal sticks glued like a cutting board. The corners are one piece also horizontal and shaped into a quarter cylinder. The front is covered with veneer to hide the end grain.
Soem great ideas to get me started. Thanks, I have plenty of practice wood to use up. First I think I need to find out from my some what he plans to to use fir for. I can see the joints. At first if figured to make an oak 3x3 and cove out the underside and round over the top. My thoughts finished there.
I'll follow up with photos if this gets off the ground.
Thanks
I'll follow up with photos if this gets off the ground.
Thanks
@Kelly that pierce is beautiful, I can see how kerf bending works we for that. In this case with the smaller radius it seems like you would have to do it more like a segmented bowl where you cut completely through, unless the cuts were really thin at the bending point (essentially wedge shaped)? Or were you thinking about doing a hollow design, like inside and outside pieces of plywood (kerf cut) with end caps?
I don’t have a great answer, rather an idea that might partially work. Perhaps you could make it similar to what @Martin Roper shows in his post. Use 1-1/2” to 4” segments (from front to back). Run the grain vertical on the sides and horizontal on the top. Then, make the corners like a box joint, so curved corners would be built in the top of the first segment, sides on the second…and so on. That would allow you to sculpt curves in shorter segments. The trick would be getting the inside curves sanded flus from segment to segment (unless you can make and assemble them perfectly…something I could not do). Maybe you could use dowels between segments to help keep them aligned. Anyway, this would be a strong interlocking design that would allow you to use a soft wood that would be easier to work with.
Good luck, keep us posted.
Thanks, I think this is what they call a conundrum, at least at my skill level. I appreciate all the thoughts. Good thing is my son is not in a hurry for this. Lol@Kelly that pierce is beautiful, I can see how kerf bending works we for that. In this case with the smaller radius it seems like you would have to do it more like a segmented bowl where you cut completely through, unless the cuts were really thin at the bending point (essentially wedge shaped)? Or were you thinking about doing a hollow design, like inside and outside pieces of plywood (kerf cut) with end caps?
I don’t have a great answer, rather an idea that might partially work. Perhaps you could make it similar to what @Martin Roper shows in his post. Use 1-1/2” to 4” segments (from front to back). Run the grain vertical on the sides and horizontal on the top. Then, make the corners like a box joint, so curved corners would be built in the top of the first segment, sides on the second…and so on. That would allow you to sculpt curves in shorter segments. The trick would be getting the inside curves sanded flus from segment to segment (unless you can make and assemble them perfectly…something I could not do). Maybe you could use dowels between segments to help keep them aligned. Anyway, this would be a strong interlocking design that would allow you to use a soft wood that would be easier to work with.
Good luck, keep us posted.
Here's how they suggested to build a vaguely similar design from the 1940s.

Wow, you guys are awesome. I appreciate the time spent by all if you on this. Maybe I can be a hero to son, one more time? LOL..
Thanks
I had not thought of the lathe since I don't do that but I know peps that do. Thanks
Premier Sponsor
Our Sponsors
LATEST FOR SALE LISTINGS
-
-
-
-
 SOLD -- $75: Gast moa v113 Vacuum Pump Veneer, 60" bag and board
- Started by peterdnight
- Replies: 1
-
GONE: Gladiator 5 cleats, 10 hangers, Paper Towel and Shelf
- Started by peterdnight
- Replies: 3