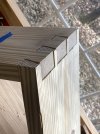
Usually the cause of ill-fitting dovetail joints is inaccurate placement of your saw cuts and chisel points. Make these changes in your technique.
- Stop using pencils to mark your saw cuts.
- Use a wheel marking gauge to mark the bottoms of your cuts. Run it several times to make a deeper cut. This lets you sink your chisel into the cut and gives you precise placement of your chop down.
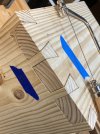
- Use a compass to mark the placement of your saw cuts on the end grain of the tails board. Sink the point of the compass a little deeper.
- Use a marking knife to lay out the saw cut lines. Sink the knife point into the compass hole, then slide a pocket square up against the knife. Mark the cuts a little deeper than you need just to see them, then deepen them with a chisel. Use several light taps instead of one heavy mallet blow to avoid splitting the board along the grain. With a sharp chisel come in from the waste side of the lines and cut a shallow bevel. This gives your saw blade a pocket to sit in.
- When you lay your pins board on the cut dovetails, follow the same procedure above. Don't lay your pins board on the tails board; clamp it so it can't move.
- When you cut your dovetail sides angle the board in your vise so you are cutting straight down rather than trying to cut on an unfamiliar angle.
- When you start your saw cuts, angle your saw on one face to start a notch and then rock it flat to complete the cut. Pick which face so you are cutting into the board; this minimizes tear out.
- When you chisel out the waste use a chisel slightly narrower than the bottom of the pins. Your corners will be cleaner when you make two passes rather than trying to clear everything out with one full width pass.
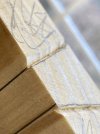
- Any joints that are too tight, pare them with a chisel rather than filing or sanding.
- This is personal preference; I make cleaner saw cuts with a Japanese style thin blade pull saw rather than a conventional push style backsaw. The thinner blade will fit better into the saw guide lines and may let you skip the bevel-with-a-chisel step.
Whatever extra time it takes to follow these steps will be less than the time you will have to spend to make sloppy look good and fit right.

")