Gap between cabinet and wall

wbarnes

Will
Corporate Member
I am in the final stages of a kitchen remodel that has taken the better part of 3 years off and on. I left the original (60 year old) upper and lower cabinet frames, but built new doors, drawers, and drawer faces as well as added additional cabinets where there was a small, awkward placed window.

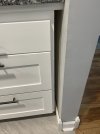
My question: as you can see in the picture, there is a 1.5 inch gap between one of the original lower cabinets and the wall. Not sure why this was left when the cabinets were installed, but it’s too late to go back and change it now. How would you go about covering/filling this gap?

I considered a thin (1/4” thick?) strip of painted wood to match the cabinets that sat flush against the wall and was attached to the front of the face frame, but I’m not sure how to secure the strip in place. I don’t think brad or pin nails alone into the face frame would be enough to hold it securely.

Thoughts?
 

Attachments

  • D2E8E362-9E73-44AE-91CA-8AD0BF4CEDFC.jpeg
    D2E8E362-9E73-44AE-91CA-8AD0BF4CEDFC.jpeg
    1.8 MB · Views: 124

wbarnes

Will
Corporate Member
Just make a filler and attach thru the faceframe
Thanks, Jack. I’ll get something together for it tomorrow and post a pic of how it goes. I had a feeling I was overthinking it, but always nice to have someone with more experience verify.
 

Craptastic

Matt
Corporate Member
The hardest bit with something like you have pictured is matching in the toe kick and horizontal return just above that. The filler piece for the cabinet can be attached with cabinet screws through the face frame usually making it look seamless, but the underbelly stuff I usually do first and use CA glue. Cut and match things up to where you like them and put the glue on them and put in place. You have a few seconds to make it all properly align, and then spritz with the activator to make it all set. Once the kick and return are in place then the filler piece is a breeze usually.

I also usually remove the trim that will get hidden by the finish work at the point the toe kick meets the wall using a vibra saw and then caulk that (and the other visible wall lines) afterwards to give it a nice clean look before painting.
 

Craptastic

Matt
Corporate Member
Oh, and it can also be helpful when installing the filler piece to put a couple of finishing nails slightly into the wood face to be able to help position the piece properly before attaching it. Easily removed and the small holes left filled with spackle or DAP before painting.
 

cyclopentadiene

Update your profile with your name
User
If you cut a piece of 8/4 stock or glue up two 4/4 pieces the width of the gap you could glue it place and secure with some screws from the inside. I am assuming the counter tops are already secured
 

wbarnes

Will
Corporate Member
The hardest bit with something like you have pictured is matching in the toe kick and horizontal return just above that. The filler piece for the cabinet can be attached with cabinet screws through the face frame usually making it look seamless, but the underbelly stuff I usually do first and use CA glue. Cut and match things up to where you like them and put the glue on them and put in place. You have a few seconds to make it all properly align, and then spritz with the activator to make it all set. Once the kick and return are in place then the filler piece is a breeze usually.

I also usually remove the trim that will get hidden by the finish work at the point the toe kick meets the wall using a vibra saw and then caulk that (and the other visible wall lines) afterwards to give it a nice clean look before painting.
Thanks for the in-depth detail. I was planning on removing the baseboard first like you suggested. I wasn’t sure if CA glue would be durable enough to stay long term, but I can always give it a shot. It is easy enough to redo in a couple years if it happens to fail.

Yes, the countertops are already installed and were a bear to get lined up correctly in the corner, thus moving the whole cabinet over isn’t an option at this point. Wish I would have thought about it before installing the countertops. Hindsight is 20/20 as they say.
 

Skymaster

New User
Jack
Thanks, Jack. I’ll get something together for it tomorrow and post a pic of how it goes. I had a feeling I was overthinking it, but always nice to have someone with more experience verify.
also pull the baseboard out, measure the gap at the TOP, add 3/4", rip a straight pc, remove the drawers, clamp the pc to the existing stile, perfectly EVEN and against the wall, Now take a small block of 3/4 against the wall and with a pencil draw a line full down to the bottom, leave a heavy 1/16, cut off the marked side, slide it back against the wall and check that it is even with the stile, if it is than remove the rest but LEAVE the line,again try the fit if all is good,than BACK CUT the filler so it angles to the line,erase line and you should be able to tap the filler in place with a tight fit.
 

ralitaco

Jim
Senior User
Will, I am no expert but this is what I did on the uppers in our laundry room. I did not get the cut as tight or clean as Skymaster described, but you should get the idea.
I was fortunate that the gap here was a bit wider than yours but we cut a filler and screwed in through the face frame as others have described. I just thought some pics might help.

54CDAE1B-5C4C-4A87-B4FA-F2BE6A38D2C8.jpeg DE0DE5EA-9E8E-45D9-AFB1-5BF5FDD695BF.jpeg
 

Premier Sponsor

Our Sponsors

LATEST FOR SALE LISTINGS

Top