Fireplace surround Completed - 1. Materials choice? 2. Mantle mounting method?

Henry W

Henry
Corporate Member
Her's the requested project

1674321932393.jpeg


EDIT: Updates to 'progress' are below - completed pics is here - more commentary below (at the end) of this post.
1700408812503.png


Original message with my questions
:
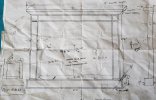
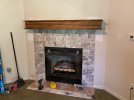
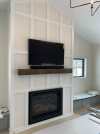
Fireplace surround - there is brick in the field, and the opening where the fireplace itself USED TO be (no more) will be closed in with insulation and plywood. The project is meant to dress up the space and hide the now messy brick-to-wall transition.

SO the project is 4 'boxes' and a mantle, with crown molding between them. Everything to be painted. Sketch is above.

The 4 boxes (base, 2 columns, and top) will have 4 sides of 4/4 poplar, an open back, and a dado-ed in flat front panel - inset 1/4 - 1/2" from the front face of boxes.

1. Which material would you use to make the front panel of the 4 major elements (boxes)? I have a full sheet of 1/2 birch plywood that may be more expensive than other choices, but I have it already and, while I could return it, I am inclined to use it. Any reason to substitute another type of plywood?

2. How deep would you groove the panel into the sides of the box; 3-16 - 1/4" is my inclination. More? Less?

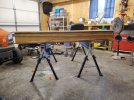
3. How would you mount the mantle? I know that I can buy a kit with pins or rods or whatever, but I don't have to make this hidden; I can make brackets underneath the mantle that are hidden in the structure below. My inclination is a long 2x4 furring strip and a larger "corbel" on each end to support the front edge. Reasons not to do this? Cost of a kit seems unnecessary in this case.

With an open back, each of the boxes will have a 2x4 or 2x2 furring strip on the wall; each box to be screwed to the others, and attached to the furring strip.

Am I missing something to simplify this - or to make it better? Overall look is fixed by the 'client' - a family member. I will visit often and see it, so I don't want to regret my choices.

Thanks
 

Attachments

  • K&B FP surround.jpg
    K&B FP surround.jpg
    252.4 KB · Views: 59
Last edited:

Echd

C
User
Not exactly the same, but I recently did one for my mother. I used a simple french cleat arrangement. The cleat is inset into the back of the box and sits atop some "stretchers" so it remains flush. This also allows for easy removal, and the interior cavity is used to store Christmas decorations that go on the mantle.

Black limba with a danish oil finish.

The wall and tile were still in the process of being finished when we did the test fit. She had to have a hideous shiplap wall behind it too... ugh.
 

Attachments

  • 683232722.jpg
    683232722.jpg
    457.2 KB · Views: 102
  • IMG_2403.jpg
    IMG_2403.jpg
    629.3 KB · Views: 106
  • 20220814_185828.jpg
    20220814_185828.jpg
    2.9 MB · Views: 103

Henry W

Henry
Corporate Member
Not exactly the same, but I recently did one for my mother. I used a simple french cleat arrangement. The cleat is inset into the back of the box and sits atop some "stretchers" so it remains flush. This also allows for easy removal, and the interior cavity is used to store Christmas decorations that go on the mantle.
Nice work - and no shiplap required on this project.

So your mantle has much more height - which when against the wall that height helps provide support & stability for the front of the mantle (the portion 'cantilevered out' so to speak). Mine is like a 2x8 solid wood piece that has the 2" edge against the wall. I doubt a french cleat arrangement would provide the support needed in my case.

Presuming your piece is all solid wood, with no plywood involved - right?
 

smallboat

smallboat
Corporate Member
The top box could contain a french cleat and the 2x8 mantle could either be built as the top of that box or rest on top of the box as a separate element. If separate, the connection could be hidden behind the crown molding. The side box columns will support some of the load so it’s not all hanging from the cleat.
 

Echd

C
User
Nice work - and no shiplap required on this project.

So your mantle has much more height - which when against the wall that height helps provide support & stability for the front of the mantle (the portion 'cantilevered out' so to speak). Mine is like a 2x8 solid wood piece that has the 2" edge against the wall. I doubt a french cleat arrangement would provide the support needed in my case.

Presuming your piece is all solid wood, with no plywood involved - right?

Hmm, I was having some trouble visualizing it but I'd probably try to adopt something along the lines of floating shelf brackets. Sounds like that was your initial idea, so I think it is a good one.

My cleat and the interior "stretchers" were cut from ply (it's a 5 sided rectangular box of limba), but the stretchers only exist to give the mating cleat a surface to attach to. Having a mantle that also has storage space for seasonal decorations just turned out to be a cool side effect of making it easily uninstalled and reinstalled for mine.
 

Henry W

Henry
Corporate Member
The top box could contain a french cleat and the 2x8 mantle could either be built as the top of that box or rest on top of the box as a separate element. If separate, the connection could be hidden behind the crown molding. The side box columns will support some of the load so it’s not all hanging from the cleat.
Ahhh, I did not think of the columns as part of the support - bingo! Thank you!
 

Henry W

Henry
Corporate Member
Did this project work out?
Good question. As with most of my ww-ing lately, it is on a slow roll. I have the material, and have been (slowly, gradually) engaging on a shop and storage area cleanup and minor reorganization. Once that gets all spaces back to usable, i will tackle this surround.
Thanks for the query.
 

Chiefifd32

Ed
User
Here's a mantle that I built for my son's new house. It's hung with French cleats, and covers outlets for electrical and HDMI cables. It's pretty easy to remove if needed to access the outlets.
 

Attachments

  • tempImagecHti0y.png
    tempImagecHti0y.png
    6.5 MB · Views: 75
  • tempImagelHhq1F.png
    tempImagelHhq1F.png
    5.9 MB · Views: 71

Henry W

Henry
Corporate Member
Update - I have been doing some ww-ing! The 4 boxes of this project (base, 2 columns, and top) are done. Hoping to get these parts to mesh into a whole today. i will post pictures later. Will be some time until I can get these all fitted together, primed, painted, delivered and installed. But hope springs eternal that 2023 will mark its closure with this project done.!

The boxes are 3 sided, open at the back - made of solid poplar (cheap and easiest for me). Joinery is dominoes for alignment (creating the offsets in the front). As stated, the next task is integrating the parts into a whole, but I need more floor space than my shop has - to the basement!
 

Henry W

Henry
Corporate Member
So project completion, within the year! Long overdue.

1700407745845.png

THis is a fireplace surround, drawn up conceptually by my Daughter in law, to dress up / cover a brick non-functional fireplace. The company that had flipped this house came up with an innovative (but ugly) concept - they had covered the exposed brick with flooring - the same stuff as the floor. Just ran it up the wall! Looked odd (understatement!).

I couldn't quite wrap my head around how to support the mantel, until Smallboat suggested that the columns were the key; once I got over needing to mount the mantel to the wall separately, but to consider this whole thing as one piece, I was clear.

1700408572508.png


Construction is 4/4 poplar; 3 sided 'boxes' assembled with dominoes; open face of the box to the wall. 2x4 blocks screwed to the walls serve as anchor points in the 4 corners. The pre-finished unit was assembled of the onsite (5 pieces), slid into place, and fastened to the wall blocks. Top crown moulding hides most of the fasteners. Mantel is an 8/4 piece.

Still have to cut out the insert for the 'hole', but that will be relatively easy. "Clients" were thrilled.
 

FredP

Fred
Corporate Member
Looks good Henry. I would have gone in a different direction. I would have gotten some fake brick panels and built a box inside the fireplace. Insulate and cap the chimney. Add a fireplace grate and a set of fireplace tools with some fake logs. It would look like a fireplace but not be one. You could even get a fireplace screen to add to the effect. But I like the charm a fireplace adds to the room. Just my opinion for what it's worth
👍
 

Henry W

Henry
Corporate Member
Looks good Henry. I would have gone in a different direction. I would have gotten some fake brick panels and built a box inside the fireplace. Insulate and cap the chimney. Add a fireplace grate and a set of fireplace tools with some fake logs. It would look like a fireplace but not be one. You could even get a fireplace screen to add to the effect. But I like the charm a fireplace adds to the room. Just my opinion for what it's worth
👍
@FredP - I did not tell you the whole story. What used to be a fireplace with chimney is now just a brick facade inside, no chimney, and an opening on the inside wall. The outside area was redone with a whole new wall of siding, so that looks seamless (clearly completed before the newbies who flipped this house got their hands on it). So there is only a 2x4 of depth to this wall and the opening in it, and no room for a brick paneled box.
 

FredP

Fred
Corporate Member
@FredP - I did not tell you the whole story. What used to be a fireplace with chimney is now just a brick facade inside, no chimney, and an opening on the inside wall. The outside area was redone with a whole new wall of siding, so that looks seamless (clearly completed before the newbies who flipped this house got their hands on it). So there is only a 2x4 of depth to this wall and the opening in it, and no room for a brick paneled box.
That splains it. You didn't get much choice. Flippers are butchers in my book. My wife watches the shows on TV. I just roll my eyes. :rolleyes: some of the things they do just begs the question WHY??
 

Henry W

Henry
Corporate Member
That splains it. You didn't get much choice. Flippers are butchers in my book. My wife watches the shows on TV. I just roll my eyes. :rolleyes: some of the things they do just begs the question WHY??

I can't speak for all flippers - but these folks were GREEN (and pretty clueless).
They connected the sink drain to the wall pipe alright - using a piece of FLEX drain and no P trap; to quote Fred "WHY?". There would have been no difficulties doing it right with a P trap, they just didn't know what to do - wandered around a Lowe's or HD and said to themselves "Hmm this piece looks like it might connect the two pieces, let's do it!" Not sure they even went so far as to watch You-tube 'cuz this is pretty hard to screw up, but they did (screw it up) Home inspectors had a few things on the list!
Stove vent into the attic, but never connected to outside.
And my favorite - "let's cover that brick on the wall with flooring. Looks great, and hey, it even matches the floor" At least wasn't wrong or not to code, just plain weird.
 

Premier Sponsor

Our Sponsors

Top