
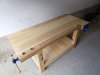
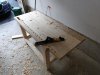
I finished my workbench this weekend! I learned a lot about large-scale joinery and had fun making it, but I'm glad it's done. Everything except the milling and rough dimensioning was done by hand. It also taught me a lot about the speed of projects when you have a baby in the house 
-72" x 28" ash top, 3" thick.
-4" square yellow pine legs with SPF stretchers and shelf.
-9" Yost quick release vise and a wagon vise built around a 18" Yost vise screw.
-Beeswax and BLO mixture finish.
-Lefty orientation and 32" tall.

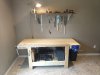
My workbench will never be this clean again...

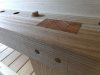
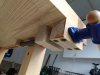
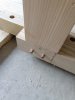
The legs are joined with drawbored through tenons. They came out serviceably tight if not perfect.

Wagon vise from the top...

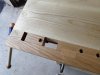
From the bottom. You can see I routed a slot for a sliding deadman if I ever want one. I used a very simple wagon vise design that is very effective. Most examples I saw really overcomplicated things.

Build pics:
I went with ash for the top because it's very cheap here in Ontario with ash borer, and it's sturdy. Pine for the legs for economy. Stretchers are glued up 2x6es.

Drilled a dog strip with 3" between centers, then glued up the top.

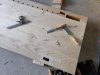
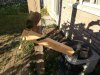
I went with through tenons because I was worried about stub tenons not being long enough. This worry was likely unwarranted. I wasted most of the mortises with an auger bit, then finished with a chisel.

You don't need a bench to build a bench! My AC unit and the 6x6 from my deck were my sawhorse for cutting the tenons.

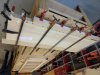
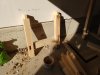
Stretchers and legs coming together nicely...

Drawbored all the joints...


After glue-up I flattened the top with my #7.

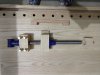
Then I mounted the vises.... View of the wagon vise parts before installation... main attachment block, follower block with the nut attached and with a notch cut in it, guide for the notch to ride in (to combat the inherent slop in the machining), and a block with a screw in the end to act as an axle for the screw (there's a divot in the end of the screw.) Not shown is the dog hole block, which I glued into place after installing everything.

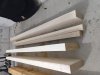
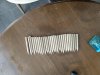
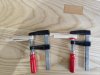
Made some sprung bench dogs...

I put on a 1:1:1 mix of beeswax, BLO and turpentine as a finish, buffed it, and called it good.
Thanks for looking!
-72" x 28" ash top, 3" thick.
-4" square yellow pine legs with SPF stretchers and shelf.
-9" Yost quick release vise and a wagon vise built around a 18" Yost vise screw.
-Beeswax and BLO mixture finish.
-Lefty orientation and 32" tall.
My workbench will never be this clean again...
The legs are joined with drawbored through tenons. They came out serviceably tight if not perfect.
Wagon vise from the top...
From the bottom. You can see I routed a slot for a sliding deadman if I ever want one. I used a very simple wagon vise design that is very effective. Most examples I saw really overcomplicated things.
Build pics:
I went with ash for the top because it's very cheap here in Ontario with ash borer, and it's sturdy. Pine for the legs for economy. Stretchers are glued up 2x6es.
Drilled a dog strip with 3" between centers, then glued up the top.
I went with through tenons because I was worried about stub tenons not being long enough. This worry was likely unwarranted. I wasted most of the mortises with an auger bit, then finished with a chisel.
You don't need a bench to build a bench! My AC unit and the 6x6 from my deck were my sawhorse for cutting the tenons.
Stretchers and legs coming together nicely...
Drawbored all the joints...
After glue-up I flattened the top with my #7.
Then I mounted the vises.... View of the wagon vise parts before installation... main attachment block, follower block with the nut attached and with a notch cut in it, guide for the notch to ride in (to combat the inherent slop in the machining), and a block with a screw in the end to act as an axle for the screw (there's a divot in the end of the screw.) Not shown is the dog hole block, which I glued into place after installing everything.
Made some sprung bench dogs...
I put on a 1:1:1 mix of beeswax, BLO and turpentine as a finish, buffed it, and called it good.
Thanks for looking!
Attachments
-
 IMG_20181006_173428906.jpg275.6 KB · Views: 343
 -
 IMG_20181007_131553752.jpg134.3 KB · Views: 341
 -
 IMG_20181006_173246361.jpg250.4 KB · Views: 334
 -
 IMG_20181006_173234385.jpg370.6 KB · Views: 337
 -
 IMG_20181006_173322946.jpg248.1 KB · Views: 330
 -
 IMG_20180616_152029264.jpg219.4 KB · Views: 336
 -
 IMG_20180623_125957217.jpg339.4 KB · Views: 328
 -
 IMG_20180706_082626771.jpg359.8 KB · Views: 331
 -
 IMG_20180720_074926769.jpg616.8 KB · Views: 320
 -
 IMG_20180729_181422760.jpg309.7 KB · Views: 325
 -
 IMG_20180819_113658624.jpg375.9 KB · Views: 322
 -
 IMG_20180819_162927410.jpg388 KB · Views: 335
 -
 IMG_20181005_204201348.jpg270.6 KB · Views: 444
 -
 IMG_20181006_150618344.jpg284.1 KB · Views: 885
 -
 IMG_20180821_192306936.jpg405.8 KB · Views: 321
Last edited:


