
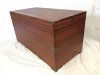
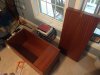
Trunk in sapele and brass. 38"x18"x19"
Exterior

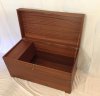
Interior

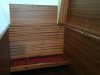
Secret drawer (revealed by opening magnetic latch and sliding till front up.)

Build photos:
The first part of the build photos are here, but the thread was closed so I can't post them there.
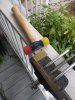
After sawing off the lid, most of what I had left to do was making the hardware and cutting out the appropriate recesses.
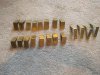
I didn't want to spend $200 for all the brass straps from Londonderry or Horton, so I made them out of .032" brass flat stock for $20. I cut the metal with an oscillating tool. filed and burnished the edges, and then bent it as shown above. Then I made a jig for the drill press to make the hole positioning and countersink depth easily repeatable. It took half a day and was well worth it IMO. Best purchase of the project was a zero-flute countersink bit from KEO cutters, works 10x better than any other countersink I've ever used, can highly recommend.

Finished straps.

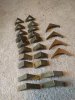
I then fumed all the brass pieces with 10% ammonia in a plastic tub to give them an antique patina and help the color match better (the hardware was from 3 different suppliers and so the alloys were all a little different, but once they were aged you couldn't tell them apart.) The ammonia was very unpleasant on the eyes and lungs, MUCH more potent than Windex, and I would avoid this in the future.

Straps after fuming...

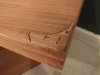
Then I just had to chop 3 hinge mortises, 3 lock mortises, and 24 strap recesses. Lordy this took forever. Then I drilled 146 pilot holes to install all the hardware. I also built some feet along the way.

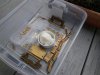
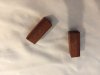
I put the magnetic keys for opening the magnetic latches (see here) into two blocks of wood so that they wouldn't shatter when they knock together. Chopped two magnet-sized mortises in a big piece of wood, put the magnets in and glued a thin veneer on top, then cut the individual keys out of the board.

Sanded to 220 (interior already sanded) then sprayed two coats of 1.5# garnet shellac followed by four coats of satin pre-cat lacquer. This was my first time spray finishing and MAN I wish I had started sooner. So easy and excellent results.

Then a mere three hours of driving screws and I was done!
Exterior
Interior
Secret drawer (revealed by opening magnetic latch and sliding till front up.)
Build photos:
The first part of the build photos are here, but the thread was closed so I can't post them there.
After sawing off the lid, most of what I had left to do was making the hardware and cutting out the appropriate recesses.
I didn't want to spend $200 for all the brass straps from Londonderry or Horton, so I made them out of .032" brass flat stock for $20. I cut the metal with an oscillating tool. filed and burnished the edges, and then bent it as shown above. Then I made a jig for the drill press to make the hole positioning and countersink depth easily repeatable. It took half a day and was well worth it IMO. Best purchase of the project was a zero-flute countersink bit from KEO cutters, works 10x better than any other countersink I've ever used, can highly recommend.
Finished straps.
I then fumed all the brass pieces with 10% ammonia in a plastic tub to give them an antique patina and help the color match better (the hardware was from 3 different suppliers and so the alloys were all a little different, but once they were aged you couldn't tell them apart.) The ammonia was very unpleasant on the eyes and lungs, MUCH more potent than Windex, and I would avoid this in the future.
Straps after fuming...
Then I just had to chop 3 hinge mortises, 3 lock mortises, and 24 strap recesses. Lordy this took forever. Then I drilled 146 pilot holes to install all the hardware. I also built some feet along the way.
I put the magnetic keys for opening the magnetic latches (see here) into two blocks of wood so that they wouldn't shatter when they knock together. Chopped two magnet-sized mortises in a big piece of wood, put the magnets in and glued a thin veneer on top, then cut the individual keys out of the board.
Sanded to 220 (interior already sanded) then sprayed two coats of 1.5# garnet shellac followed by four coats of satin pre-cat lacquer. This was my first time spray finishing and MAN I wish I had started sooner. So easy and excellent results.
Then a mere three hours of driving screws and I was done!
Attachments
-
 trunk4.jpg165.1 KB · Views: 219
 -
 trunk2.jpg250.4 KB · Views: 210
 -
 trunk3.jpg237.6 KB · Views: 210
 -
 IMG_20170513_160934.jpg347 KB · Views: 210
 -
 IMG_20170605_091111.jpg450.3 KB · Views: 215
 -
 IMG_20170613_101232.jpg305.3 KB · Views: 218
 -
 IMG_20170613_105841.jpg451.5 KB · Views: 217
 -
 IMG_20170510_202745.jpg148.1 KB · Views: 217
 -
 IMG_20170613_173901.jpg319.5 KB · Views: 209
 -
 IMG_3722.jpg231.5 KB · Views: 209
Last edited: