Breadboard Ends - how to?

HITCH-

Hitch
Corporate Member
Good day all!
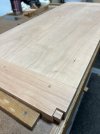
I salvaged this Walnut island and I am going to repurpose it as a counter top. We have a pass thru between the kitchen and family rooms that has 3 bar height stools and this will look great there.
The length is just shy of what is needed. If I cut the piece where the 2 blue lines are the thinner piece on the left will yield enough wood to create breadboard ends for the larger piece on the right.
What do you think would be the best way to attach these?
They will be about 2" wide and 22" long.
My first thought is a glued dowel in the center and 2 floating dowels to each side of the glued dowel.
Thanks in advance for your input.
20230604_111704.jpg
20230604_112351.jpg
 

HITCH-

Hitch
Corporate Member
I was actually thinking of 5 dowels about 3/8" dia. spaced out across the 22" width with glue only on the middle one.
I don't have enough extra width to cut a tounge.

The stopped spline above may be my best option. What is the advantage of having the placement offset as in the picture above as opposed to it being in the center of the pieces?
 

Mike Davis

Mike
Corporate Member
If you are just joining pieces of countertop with all the grain going in the same direction then you don’t have to worry about expansion. Go ahead and dowel and glue it together.
 

mlzettl

Matt
Corporate Member
I have made many breadboard ends over the years on Greene and Greene style pieces including dining tables, benches, sideboards, etc., so I have a lot of experience with this construction. All of the above noted methods, multiple dowels, stopped spline, dominoes, deep tongue and groove, et al., will work, gluing only in the middle 3-4 inches. Are the breadboard ends going to be supported from underneath, or will they overhang the underlying cabinet? If they overhang, then they will need to be attached with longer tenons or dowels to provide resistance to any bending force, like a person leaning on them. Also, in accommodating for the wood movement that will occur, the breadboard end should be just a bit longer than the width of the top, especially if you make it during the winter when the moisture content will be the lowest. If you make it the exact width of the counter, when the counter expands during the summer, there will be a step off because the counter will be wider than the end, and that doesn't look very good. The reverse situation, with the breadboard end being longer, the look is more pleasing, and becomes a subtle part of the design. The movement is not going to be much, as it looks like many of the pieces in the top are quartered or rift sawn, and these won't move much at all. Making the breadboard overhang on each side 1/16"-1/8" would be quite sufficient.

Whatever method you ultimately decide upon, it is critical that you have a reliable means of registering all of your dadoes, holes, mortises, etc. on both sides of the joint. If you are going to use dowels, I think a doweling jig is an absolute must. Measuring, marking, and drilling holes for multiple dowels, and getting them all lined up accurately without a doweling jig is nearly impossible in my experience. Finally, the joint along the width of the counter where the two pieces meet tends to move very slightly across the thickness of the pieces. If you make it absolutely level by planing, scraping, or sanding so that it is absolutely flat, eventually you will feel, or perhaps even see, a very slight step off along the joint. There are a couple of solutions to this problem that I have used. You can make the breadboard slightly thicker, so that it's upper surface is slightly above the main counter, putting a 45 degree chamfer on the upper edge. If you don't want the end to be thicker, then you can make a slight chamfer on both the breadboard and the top, resulting in a shallow V groove running along the width of the top. This has the effect of accentuating the joint, creating a visual and tactile line that becomes part of the design.

I hope some of this helps. Good luck with whatever method you choose, and keep us informed of your progress and the final result.

Matt
 

JohnnyR

John
Corporate Member
IMHO there's so much wood in the "breadboard" that it'll just look like you cobbled pieces together. I'd join it all lengthwise, then add a "decorative" strip of a contrasting wood like ebony in the seam and then add more at regular intervals.
 

HITCH-

Hitch
Corporate Member
IMHO there's so much wood in the "breadboard" that it'll just look like you cobbled pieces together. I'd join it all lengthwise, then add a "decorative" strip of a contrasting wood like ebony in the seam and then add more at regular intervals.

I am not sure what you mean?
The breadboard ends will only be 2" wide each.
The width of the top is fine. I just need to add about 3.5"-4" to the length to make it long enough for the existing opening.
Hopefully the picture below is a better illustration of what I need to do.


Screenshot_20230924_143534_Photo Editor.jpg
 

JohnnyR

John
Corporate Member
Sorry, from your diagram it looked more like a square section - as Gilda Earned says " never mind"
 

Gofor

Mark
Corporate Member
If the width of the end piece is just barely enough to get your desired overall length, you could install a spline to attach it. Glue the spline fully into the end piece, but just in the middle (*or at one end) for the main table section.

(The purpose of the spline is so you don't have to sacrifice any length making a "tongue" on the main table top. It can be of any strong wood species.)

(*) Referencing the "at one end": If one edge is the "show" edge, and the other is toward a wall or otherwise hidden, you can glue flush on the show side, and just elongate the fastener holes a bit more on the back side. The wood will still move, but the show edge and breadboard end will remain flush.

As an example of walnut shrinkage, I made a 40" wide table top from air dried walnut (about 12-14% mc) in my garage during the summer months. It was than moved into the air conditioned house. It shrank 3/16" on each side (3/8" total over the 40 inch span). As the wood you are using is not straight from the tree, it may not move as much due to a lower mc. (moisture content).
 

Rwe2156

DrBob
Senior User
Some will disagree, but BB's need to be draw bored. With that in mind I can't see dowels working. You need some kind of wide tenon. You also need a tongue and groove running the length to keep the BB aligned with the top.

The traditional (and best way) is a tongue and groove with interrupted tenons, drawbored. But it is very labor intensive, the risk of error fairly high. May not be for a beginner.

If you have a router, you could do floating tenons. This would simulate the Domino. The issue is finding a bit that can go deep enough. You want mortises at least 1 1/2" deep.

The other option would be drilling out the mortise using a drill guide/drill press, clean up the walls with a chisel and guide block. Gllue only the center tenons. Draw bored.

IMG_0790.JPG
 

Premier Sponsor

Our Sponsors

Top