Bed Design

Status
Not open for further replies.

Plunkett

Lee
Senior User
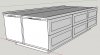
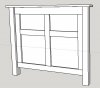
Good afternoon all...I'm seeking some advice on design and joinery for these headboards and footboards I'm building for my daughters. The mattress will sit on a platform/case that will have drawers based on the design in FWW #240. Below is a draft of the design my wife likes. It is all poplar and plywood since she wants it painted.

attachment.php


I will be milling some trim to go under the cap and around the open panel areas, but that is not in this sketchup model yet. I was going to mill the posts to 2.5 x 2.5, then attach a 3/4" plywood panel. Over the panel I was going to apply the 3/4" "rails" and "stiles", and then trim those out.

Questions:

1. Should the rails and stiles be installed similar to a door, or how they are in the design be okay?

2. How would you join the plywood panel to the posts? My initial thought is to use glue and pocket holes that would be hidden under the stiles on the sides. I'm a rookie, but I'd be willing to try something else!

3.Should I just glue and brad nail the rails and stiles onto the plywood panel since I'm painting and could fill the holes?

Thanks all!
 

Attachments

  • Capture.JPG
    Capture.JPG
    42.1 KB · Views: 304

JimD

Jim
Senior User
Lee,

A lot depends on what tools you have available to you. With a table saw, I would probably plow a groove at least 3/4 inch deep for the plywood. It can stop before the plywood will and the plywood be cut to fit. Glued up that will be strong but you will need clamps. Without those, dowels plus pocket screws will also work. But the issue with the dowels will be the 3/4 thick plywood. Bigger ones would be stronger.

Have you thought of using 1.5 thick dimensional lumber for the frame and have it hold the panel - perhaps in a dado? That would be more traditional construction. I've purchased 1x12s for the home center for simple furniture. It's a good idea to get a coat of stain blocking primer on them but they will take paint fine. Moisture can be a little high, 12% is typical for dimensional pieces, but it hasn't caused me issues. Mortise and tenons are great for this but you need a plunge router. Without that dowels work fine.

I followed a plan from the "woodworking for engineers" website loosely to make a queen sized bed of 1x12s cut up and joined with large dowels. It holds up fine and I think it looks nice.

I think pocket screws will also work. You can fill the holes with bondo or low density spackle before painting. It avoids the need for clamps. I would still glue the joint.
 

Bill Clemmons

Bill
Corporate Member
Question: Are the rails and stiles applied to both sides of the plywood, or just one side? What about the foot board. If you use 3/4 ply and 3/4 rails/stiles on both sides, that's 2 7/32" thick. Your post are only 2 1/2" square, which leaves very little separation from the edge. Am I missing something?

As for attaching the ply to the post, pocket holes will suffice if you don't have the equipment to do the more traditional frame and panel joinery. If you go w/ the pocket hole approach w/ 3/4" plywood, I would suggest using 1/4" rails and stiles. It will give a decent shadow line without looking too bulky.
 

Dave Richards

Dave
Senior User
1. Should the rails and stiles be installed similar to a door, or how they are in the design be okay?

I would make the "stiles" run past the rails as is typical in frame and panel construction.

2. How would you join the plywood panel to the posts? My initial thought is to use glue and pocket holes that would be hidden under the stiles on the sides. I'm a rookie, but I'd be willing to try something else!

If you are going to make false stiles, I would put stopped grooves in the posts and glue the plywood into them If the panel fits into the grooves properly, there'll be no need for pocket screws. You might consider cutting a 1/2-in.-thick tongue on the panel to fit a 1/2 in. groove. Let the panel run slightly higher than the tops of the posts and put a groove in the underside of the top rail, too.

I had a bit of a doodle. What about something like this? The false rails and stiles are 1/4 in. thick. I might make the center stile 3/16 in. thick so there'd be a little shadow from the top false rail. The false top sub-rail is 1/2 in. thick. It could be replaced with a solid wood rail instead of making false ones. In either case, it would add a shadow line and a little more interest. I added a rail at the bottom for the same reason and to cap the plywood edge. (I changed the top part of the panel and I omitted the intermediate false rails for clarity or laziness, take your pick. :D)


The top part of the assemnbly with false rails, stiles and top sub-rail. You can see the tongue on the panel extending into the cap rail.


And the bottom detail.


And an exploded view.


With construction like this, glue will be sufficient. No screws needed.

Just ideas.
 
Last edited:

Roy G

Roy
Senior User
Lee, i think Dave's drawing is good because it allows you to use the same joinery on the headboard and the footboard. Your original thinking would lead to a footboard that would not have a good face.

Roy G
 

Plunkett

Lee
Senior User
Thanks for the great advice. I was trying to think through the top cap attachment as well, so Dave's idea seems ideal. I was trying to keep the footboard flat on the back side to attach the bed platform/drawer combo. See the sketchup below. I have those built finally. Maybe using some type of nailer on the back side of the footboard to screw the cases into would work??

attachment.php
 

Attachments

  • Capture2.JPG
    Capture2.JPG
    75.1 KB · Views: 208

Dave Richards

Dave
Senior User
You could keep the back flat. I guess I didn't understand exactly how it is to go together. You could just make the vertical false frame pieces shorter so the bottom rail ends at the top of the cases. That would make it look better and you wouldn't need the nailer.
 

Plunkett

Lee
Senior User
I think Roy is correct. The sizing of the posts and where the panels and false stiles and rails would line up with not be very attractive in my original design. Dave's design is much cleaner and better proportioned. I'm glad I posted. I'll try to post some finished pics (if I ever get there).
 
Status
Not open for further replies.

Premier Sponsor

Our Sponsors

Top