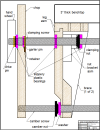
Basic face vise

pop-pop

Man with many vises
Corporate Member
This thread is a follow-on to

This project of mine is to develop a wooden face vise design for workbenches that only costs a few tens of dollars. Primary target audience is for woodworkers without a vise and those maybe without a lot of money for a vise.

The first prototype exposed a few problems. This thread picks up at the point of making a revised nut block. The nut block position is adjustable to set the screw perpendicularity and my next post will show how I milled the nut block.
 
Last edited:

pop-pop

Man with many vises
Corporate Member
The primary improvement from the first prototype is an improved nut block that supports the screw that the chop hangs from. First, the SYP that the first nut block was made from may have been abused in the kiln since it was quite brittle. Despite pre-drilling, it broke when screwed into. I replaced that portion with a maple piece.
IMG_3795.jpeg


Next was to make a recess for the spinner nut. Started by drilling the through hole for the screw and hogging out the bulk of the waste.
IMG_3796.JPG


After tracing the outline of the nut, two holes for nut lobes.
IMG_3797.JPG


A little more drilling and chiseling gave a recess for the nut and its thrust washer. Note that the nut is a sloppy fit in its recess so that it can self-align with the screw.
IMG_3799.jpeg


The nut fits on its recess like this slightly below the surface of the nut block.
IMG_3800.jpeg


Lastly, the rear plastic bearing plate gets screwed on. The hole in the bearing plate has a 1/16" roundover on both sides for smoothness.
IMG_3801.jpeg
 

pop-pop

Man with many vises
Corporate Member
The back of this basic face vise looks like this showing the nut block and the adjustable lower bearing block.
IMG_3808.jpeg


One other change in this second prototype is the lower screw joint in the chop is rigid. It was floppy in the first prototype.
IMG_3819.jpeg


The mechanics of this design is what makes this inexpensive vise work. As mentioned, the plastic bearing plate in front of the leg and the one in the back of the nut block shown above support the screw and allow it to rotate smoothly. There is no vertical force on the nut save for its own weight.
IMG_3809.jpeg


The chop hangs from the screw riding on a plastic bearing plate behind the handwheel. The chop is kept from tipping by the adjustable bearing plate at the lower back of the leg assembly (see first photo).

The plastic plate at the front bottom of the leg assembly (see above) has a clearance hole for the lower screw and only serves as a stop for the lower nut that sets the camber for various thickness work pieces.

This view shows the brass garter pin that pulls the chop along when the screw is opened.
IMG_3811.jpeg
 

pop-pop

Man with many vises
Corporate Member
Time to mount this vise to the end my workbench looking from underneath. I used hanger bolts but lags would work also. Note that the nut block has to be removed temporarily for access to the nuts.
IMG_3812.jpeg


Here is the leg assembly mounted.
IMG_3814.jpeg


After reinstalling the nut block, it needs to be adjusted vertically until the upper screw is perpendicular to the face of the leg.
IMG_3803.JPG


Next is to adjust the lower bearing plate (if needed) so the the vise opens and closes smoothly.

Here is the vise holding work between dogs.
IMG_3815.jpeg


And holding work in the jaws for edge planing.
IMG_3817.jpeg


I believe I am ready for the next phase which is to draw up some "cartoons" some that y'all can make your own basic face vise.
IMG_3818.jpeg
 

pop-pop

Man with many vises
Corporate Member
Another check is will this vise hold my tall vise securely and it does.

BTW, holding my tall vise in another vise at the end of my bench is my preference over using clamps.
2C7C043E-6D60-45BE-A075-E93234616151.jpeg
 
Last edited:

Rwe2156

DrBob
Senior User
Interesting. This is actually a leg vice, not a face vise that was a bit confusing. So the bottom screw doesn’t turn, right? If so why not use a smooth rod? The link you posted doesn’t work.

Leg vises are usually used in conjunction with a sliding dead man to support a long board when addressing the edge. But I keep thinking the screw limits the width clamped full across thenfence, so a wide board is clamped in half the vise, which means racking. Maybe I‘ve got something wrong there?
 

Dee2

Board of Directors, Vice President
Gene
Staff member
Corporate Member
To me, it looks like the nut on the bottom screw controls racking. Am I missing something?
 

pop-pop

Man with many vises
Corporate Member
]To me, it looks like the nut on the bottom screw controls racking. Am I missing something?
The bottom nut is to control racking as Gene said

I have built vises using a smooth rod for racking control and they are a lot more expensive than this design. Also, they have to be built pretty precisely to avoid binding during opening.
IMG_3705.jpeg


Fixed the link. Thanks for pointing it out.

I did not call this a leg vise since a bench leg is not involved. My research indicated that face vise was not perfect but most appropriate.
 
Last edited:

pop-pop

Man with many vises
Corporate Member
Bits of slippery plastic are integral to this design. I buy a cutting board at Walmart and look for one that is at least 3/8” thick. The slippery plastic cutting boards are clad with a non-slip coating which needs to be removed. A jack plane makes rapid work of removing. I don’t worry about the scallops from the cambered blade.
751840D3-8501-4BE5-A78B-3A9B3CB52E4A.jpeg
p

I have a straight blade DeWalt lunchbox planer and it is ill suited for this task. A planer with a segmented head might work?
 

pop-pop

Man with many vises
Corporate Member
Progress on this project has been slowed by some necessary yard work.

The drawings are nearing completion and I am checking the drawings (and making small changes) by building a vise as I go along. Next, a member will build a vise from the drawings as a final check before I post them to the Resources section.

I do plan on bringing this vise to the picnic for y’all to have some hands on.
 

pop-pop

Man with many vises
Corporate Member
In the two tall vise workshops, we used a 14" CAP barbell screw which was powder coated. Seems like these are only available on eBay now. On Amazon, I did find a nicer chrome plated set for not too much more money.
The 14" were out of stock until late June so I got these 15.75" long ones for about $5 more. Wherever you purchase them, the thread needs to be continuous under the rubber grip.
IMG_4061.jpeg


Here is these chrome plated screws installed in a basic face vise that I just made.
IMG_4078.jpeg
IMG_4076.jpeg
 
Last edited:

pop-pop

Man with many vises
Corporate Member
The vise that I just made with the chrome plated screws is the smoothest working one to date. I decided it was time for an Alpha tester. I asked Joe Carr (@JNCarr) if he would be willing to test this vise and he accepted. He has been making his wondrous wooden clocks sans a vise. Here is the place that he has for a vise in his shop. Placing a conventional vise there is problematic since the left cabinet is mobile.
IMG_4101.jpeg


After some head scratching, I decided to reuse the pseudo-benchtop that I made for the picnic. It is placed atop the space between the cabinet tops and secured with carriage bolts and wing nuts through two dog holes into clamping bars below. No wood molecules in the cabinets were harmed.
IMG_4103.jpeg
 

pop-pop

Man with many vises
Corporate Member
I have proven without any doubt that I do not understand squat about the barbell supply chain. The CAP barbells are now back in stock at Walmart. However, I recently bought these two 14" chrome-plated barbells at my local Walmart for $11.97 each. They are the same price online. Athletic Works 14 Inch Spinlock Dumbbell Handle, Fit 1" Standard Weight Bar, 3lb Weight - Walmart.com and these are superior to the black powder-coated ones that flake fairly easily.
IMG_4130.jpeg


These definitely operate more smoothly than the black powder-coated ones and won't flake. I retrofitted the vise from the picnic with the newly purchased screws .
IMG_4158.jpeg
 

Premier Sponsor

Our Sponsors

Top