A Nod to Hand Tools and Router Help

Status
Not open for further replies.

David Justice

David
Corporate Member
I am building a new workbench and finally received my vises to install. I had a pretty large cavity to excavate for the wagon vise, and I spent what seems like forever getting the router set up. I don't use the router a lot, but I thought I was doing things right, it just seemed to be taking a very long time to get it done and the router really seemed to be struggling. It'sa Dewalt 618 2 1/4HP and I was only taking 1/4" deep passes at a time.

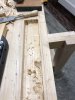
I finally got sick of how long it was taking and the huge mess, and got out my biggest chisel and mallet and in less time that it took me to set up the router I had the wood gone. I cleaned up with the router in one pass. The picture is before cleaning it up with the router.

This is a lesson I have learned a few times. Machine setup sometimes just is not worth it. Hand tools can sometimes be much faster.

With that said, anyone know why my router was struggling so badly? This is just construction 2x6's. I'd hate to see how it would have been with hard Maple! Is the router not powerful enough? Is 1/4 deep passes too much? I was using a 3/4" straight bit, would another bit have been better?

Thanks.

attachment.php
 

Attachments

  • IMG_2850.jpg
    IMG_2850.jpg
    295.7 KB · Views: 267

Mike Davis

Mike
Corporate Member
Are you sure you router bit is made for end cutting? Some are great for cutting on the side but not down in the bottom of a hole. They make special plunge cut bits that do a much better job of it.
 

ehpoole

Moderator
Ethan
Are you sure you router bit is made for end cutting? Some are great for cutting on the side but not down in the bottom of a hole. They make special plunge cut bits that do a much better job of it.

What Mike said. Most straight flute bits are not plunging bits. To be a plunge capable bit there must be a full coverage cutting edge at the tip of the bit, often achieved on straight flute bits through the use of two extra deep flutes such that when spinning the two cutting edges will effectively overlap the full face profile of the bit. More typical straight flute bits do not cut in the central portion of the bit, leaving an island of wood that you are effectively tying to compress rather than cut when you plunge in. With non-plunge bits you must slowly draw the bit across the wood as it is lowered such that you are effectively firming a ramp cut until the bit is fully plunged, then you can route normally because the remainder of the cutting will be side cutting. My favorite bit for hogging out mortises and plunging is the upcut spiral bit as they also draw the waste out of the hole and if you have a dust collection system for your router then most of the waste will be captured by your vacuum, greatly reducing cleanup afterwards.

If you were using a suitable plunge bit and still had issues then either the cutting edges have chipped or otherwise been damaged or the edges are very dull and no longer suitable for routing. This can happen easily since we often tend to heavily use certain sections of the cutting edge while other sections are often unused until you try to take a deep cut, with the end of the bit being the area that ordinarily dulls first (there very section you are trying to plunge). Also, be very aware of resin/pitch buildup on your cutting edges any time you are routing or cutting pines with any power tool as the resin buildup will effectively dull your cutting edges until removed with a suitable solvent (avoid things like oven cleaner if using carbide bits as many often cleaners attack the filler metals that attach the carbide). Pines are often easy to cut in principle as they are often fairly soft but the resin accumulation on your cutting edges often means more cleanup work and with some pines will effectively dull a blade fairly quickly. I would not expect the wood removed in your one mortise to result in enough resin buildup but if you have used the bits many times over the years without cleaning them you can accumulate a good deal of resin contamination over time.
 

Jeff

New User
Jeff
Is this the type of 3/4" straight bit (it has some cutting flutes at the very bottom tip of the bit) that you were using?

http://www.freudtools.com/index.php/products/product/04-140

https://www.homedepot.com/p/Diablo-3-4-in-x-1-1-2-in-Carbide-Straight-Router-Bit-DR12156/100660717

Here's a 3/4" spiral uncut bit which is better suited to deeper plunge cuts like your huge bench top mortise pictured.

https://www.amazon.com/Onsrud-Up-Cut-Spiral-Mortising-Router/dp/B0020B358G

How large is the area that you excavated (l x w x depth)? A single cut (1/4" d x 3/4" w) is pretty hefty even with a 2 1/4hp router (same model as mine).

Your hand tool alternative is an expedient alternative too!
 

KenOfCary

Ken
Staff member
Corporate Member
A spiral up-cut bit would have been the one for this job. But as you said hand tools also work well.
 

David Justice

David
Corporate Member
Thanks everyone! I definitely think it was my router bit. It is brand new, but it's just a plain old straight bit like Jeff's second link.

As luck would have it, I have a leg vise to install with an X brace, so I have 2 mortises to make on the chop and the bench leg. I'll give the router another try with a 3/8 upcut spiral bit that I have.
 

Graywolf

Board of Directors, President
Richard
Staff member
Corporate Member
David, the 3/8" up cut spiral will work but in small bites I would stay with 1/8" bites at a time or you will over heat the bit and it could break. If nothing else it will dull and just sit there and go you want me to cut what. Good luck and I look forward to seeing pictures of the finished product.
 

David Justice

David
Corporate Member
Yes, if I ever get it finished. This wagon vise is an unbelievable PITA to install! I know it's more my fault than the vises though.
 

Jeff

New User
Jeff

David Justice

David
Corporate Member
I got the Hovarter Wagon and Leg vise with the XLink (https://www.hovartercustomvise.com/) but like I said before it's not the vises, they are actually really nice and Len is a very nice and patient guy.

After thinking about building a workbench for at least a year, I still managed to do a horrible job of planning. I built the base and top...then decided I wanted these vises. It was just a lot of work and refining to get the Wagon vise in correctly after the fact. If I had planned and had the vise when I built the top, it would have been much easier!

I have it in and it's working great! I am going to tackle the Leg vise this week, and I think it will be and easier install.
 

Gofor

Mark
Corporate Member
I got the Hovarter Wagon and Leg vise with the XLink (https://www.hovartercustomvise.com/) but like I said before it's not the vises, they are actually really nice and Len is a very nice and patient guy.

After thinking about building a workbench for at least a year, I still managed to do a horrible job of planning. I built the base and top...then decided I wanted these vises. It was just a lot of work and refining to get the Wagon vise in correctly after the fact. If I had planned and had the vise when I built the top, it would have been much easier!

I have it in and it's working great! I am going to tackle the Leg vise this week, and I think it will be and easier install.

When building my work bench, I remember a definition (not sure of the source) that basically stated that a woodworking bench is merely a structure to hold all the vises and attachments to secure your work at a comfortable height. The same treatise recommended procuring all vise hardware before designing the bench. Although that may sound backwards, i have found it to be a good philosophy.

Go
 
Status
Not open for further replies.

Premier Sponsor

Our Sponsors

LATEST FOR SALE LISTINGS

Top