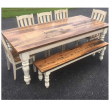
Here is the completion of this build. The client, my daughter-in-law, is delighted so all is well!

Attaching the outer wrap. There are screws under the pegs so each leg is held in place by 4 floating tenons and 4 screws. They are arranged so the tenons and screws are 90 degrees apart from each other which offsets torsion loads in either direction.

The completed frames. The table is 9 1/2 feet long. Designed to hold a 300 lb dead load in the center of the table. Benches will hold a greater load - 800 lbs each with essentially zero deflection. I hope neither ever sees this weight.

Top glue up done in three stages to try to keep everything aligned.

Just a shot of planing. Everything was within a few thousandths ( a very few so as not to be measureable).

Method for breadboard attachment. Floating tenons in tight slots on the main table and loose slots on the breadboard with oblong holes to allow for expansion.

Wooden pins hold everything in place. Glue on the center tenons, and free floating on the remainder. Pins are drawbored.

One of the benches before finish

Planning for attaching the tops to the bases. Pocket screws are used to hold the center support to the top and the side supports have floating tenons in mortises to allow for expansion. This shot shows me using hide glue for a rub joint for the base to hold the tenon later.

My normal finishing area was WAY too small for this, so here is my "spray booth".

Picture of a top holding tenon in place.

The final product!


")