Metal Keyhole Hangers

Status
Not open for further replies.

patlaw

Mike
Corporate Member
Thinking it was a good idea, I purchased a dozen or so of these metal keyhole hangers a few years ago. Now that I'm preparing to use them, I have a question. Should they be inset into the wood? If so, does there have to be a second offset behind the place to let the screw head fit? If I mount one on the surface of a board, I can't find a screw that will fit into the hanger.
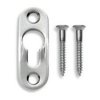
keyhole_hanger.JPG
 

Michael Mathews

Board of Directors, Vice-President
Michael
Staff member
Corporate Member
I used these on some hanging wall shelves I made for my daughters. (I can post a pic if it helps) I did mortise (inset) the hangar so the wood was just proud of the hangar. That would require a recess for the head of the screw that slips into the slot also. The nice thing about using these, if you adjust the screw (hangar) just right, the piece that has the hangar will "suck" tight up to the wall, in my case.
Michael
 
OP
OP
patlaw

patlaw

Mike
Corporate Member
A picture would be helpful. Did you mortise with a router or by hand? It is a double mortise?
 

Michael Mathews

Board of Directors, Vice-President
Michael
Staff member
Corporate Member
Just saw your post...I'm getting a picture ready to upload. I just drilled several holes with a couple different sizes of Forestner bits. The larger size (same or just bitter than the rounded ends of the bracket) to drill the upper and lower holes for the inset. I used a chisel between the holes to clear between them. Then I used a smaller Forestner bit to remove the material for the recess.

http://www.ncwoodworker.net/pp/uploads/7931/hangar_bracket.jpg
 
OP
OP
patlaw

patlaw

Mike
Corporate Member
Thanks for the picture, Mike! I may try to use a router since my drill press is on the blink.
 

Michael Mathews

Board of Directors, Vice-President
Michael
Staff member
Corporate Member
Mike, be very careful with the router. If you're routing the recess freehand, watch out for the router to jump. It's so easy to wreck all that work in a heartbeat...and believe me, if it jumps when you're in the cut, your heart will be beating like it's trying to get out of your chest! Don't take to much material in one pass. Also, you can use your Forstner bits in your hand drill.
BTW, what's up with your drill press? I may be able to help get it back into service.
Michael
 

Jeff

New User
Jeff
A plunge router in small increments will work with care and patience. Start the router first and then plunge to depth #1...stop router and raise from cut. Reset for plunge depth #2.

This would be an ideal application for an MDF template and router bearing guides.
 

Joe Scharle

New User
Joe
I wouldn't recommend this freehand unless you have some experience routing freehanded. The experience can be gained by routing some outlined letters in scrap.
SYP is a good test material as the annual rings are much harder than the sapwood, one can discover how the bit tends to jump at the transition.
Once that experience is gained, freehand becomes a lot less scary.
If you're routing on edge, clamp stock on either side of the workpiece to support the base.
 
OP
OP
patlaw

patlaw

Mike
Corporate Member
There's no way I would try freehand. It's not much, but I do have a router table. One of the pieces I wanted to use one was too big for the router table, so I added a nailer strip inside and screwed it to a wall stud.

Mike, my press is a very old Craftsman King-Seely with the Vari-Speed option. The knob that tensions the belts will not remain in position. If I hold the knob, the drill press works fine. Something is missing. (I never used it when it was working correctly.)

Mine is a floor model, but it looks just like this one.

6939832014_78967b9f37_b.jpg
 

DaveD

New User
Dave
Why over complicate it.
I'd just use a couple of Forster drill bits and the drill press. One size to recess the plate and a smaller one to make the recess to cut the clearance for the 'thing' it will hang on.

Or even brad point drill bits and your favorite drill motor. I can even use Forster bits in a hand held drill motor with a little care.

The router, and it's associated complications for this operation would be my last, and far distant, choice. Even then it would have to be a small, lightweight router that I could easily control.

The recess doesn't have to be perfect. You won't see it when it's done.
 

ehpoole

Moderator
Ethan
I usually use either a router (Bosch Colt) set to a low speed and a small straight or spiral bits -- or chisels -- to create a recess to receive the screw. A drill bit, especially if cleaned up with a chisel to ensure a screw or bolt head moves freely within the space, will work every bit.

If you are just learning to use a router for this you can use the router's edge guide to help you maintain proper control if you need to (but you may need to reset its position if two or more passes are required). This will allow you to route the recess as if you were routing a short groove or dado. Lowering the speed of the router (as in RPMs) can also help with maintaining control by allowing you to move more slowly.

I don't usually bother to create a recess for the actual keyhole flange unless there is a reason why I want it flush -- but occasionally I will do so -- in which case just trace it out and carefully route the outline.

The recess that matters most is the recess for the bolt head and that is the critical one. Just be sure to test the final fit with the specific screw or bolt you intend to use while hanging the item.

In principle the keyhole mounts will work without a recess but only if hanging a very lightweight object with *small* countersink screws. However, these small screws are not compatible with our most common mounting option (i.e. hollow wall anchors) nor for especially heavy items since small shallow screws should never be used for a heavy object. So it is for compatibility with larger, often panhead, screws that we commonly use that we route a recess.
 
OP
OP
patlaw

patlaw

Mike
Corporate Member
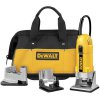
My trim router doesn't have a fence. Is there a way to add one? It's also not multi-speed.

D26670K_K1.jpg
 

ScottM

Scott
Staff member
Corporate Member
My trim router doesn't have a fence. Is there a way to add one? It's also not multi-speed.

Clamp a straight piece of wood on to your piece so that when you rest the router against it the bit is inline where you want to hole. That becomes the fense. You can also clamp a piece of wood in front and behind your cuts. They will be your stops. Make sense?
 
OP
OP
patlaw

patlaw

Mike
Corporate Member
Yes, but it takes a long time for me to get it right. Then there's the problem of finding a straight piece of wood!
 

Jeff

New User
Jeff
Your description sounds like the D26670K. Unfortunately the DeWalt site doesn't provide much information beyond the basic product description.

http://www.dewalt.com/tools/woodworking-laminate-trimmers-d26670k.aspx

I also tried to download the manual, but got nowhere with that. These pics show an assortment of applications but don't address fence options, etc.

http://www.dewalt.com/tools/woodworking-laminate-trimmers-d26670.aspx


My trim router doesn't have a fence. Is there a way to add one? It's also not multi-speed.

View attachment 10228
 

DaveD

New User
Dave
My trim router doesn't have a fence. Is there a way to add one? It's also not multi-speed.

View attachment 10228
i have a Bosch router similar to your DeWalt. Bought it 'back in the day' because it was specific to doing laminate work. I think the companies that now try to pawn it off as a lightweight 'trim' router do a big disservice to the woodworking community. Particularly those unfamiliar with routers.

Without some 'redneck engineering' there is no practical way (read easy and quick) to attach a adjustable fence to that setup.
 
Status
Not open for further replies.

Premier Sponsors

Contact for your financial processing needs!

Our Sponsors

LATEST FOR SALE LISTINGS

Top