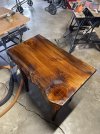
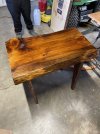
Knot splits in live edge pine

LomToon

New User
LomToon
Hey all,
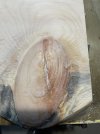
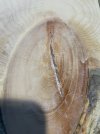
So like in my intro I stated being a new woodworker. Being able to fix almost anything, I’m at a loss of how to resolve the subject issue.
When working with much smaller knife handle scales, I’ve successfully used CA glue (sans accelerator) with zero issues.
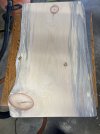
However, I’ve been initially defeated with this first table project. The knot splits are relatively large, with the largest being ~4”x1/8”, coursing entirely through the 2” board. Initially thought it was working to stabilize/fill the split as with previous small scale experience. Then the glue stopped hardening. Didn’t have any accelerator so decided to try acetone…that was a fail.
Then I switched over to titebond clear…also a fail. I’ve now dug out most of the glue but remnants of both still are present and are holding tight as an unsightly white mess.
I know pine is not an ideal wood but since first project I thought on the cheap side. I’d rather not cut the defects out but have thought about routing them “clean” with an engraving bit…but then how best to fill.
I turn to the group for advice
Tom
 

Scott H

New User
Scott
Hey all,
So like in my intro I stated being a new woodworker. Being able to fix almost anything, I’m at a loss of how to resolve the subject issue.
When working with much smaller knife handle scales, I’ve successfully used CA glue (sans accelerator) with zero issues.
However, I’ve been initially defeated with this first table project. The knot splits are relatively large, with the largest being ~4”x1/8”, coursing entirely through the 2” board. Initially thought it was working to stabilize/fill the split as with previous small scale experience. Then the glue stopped hardening. Didn’t have any accelerator so decided to try acetone…that was a fail.
Then I switched over to titebond clear…also a fail. I’ve now dug out most of the glue but remnants of both still are present and are holding tight as an unsightly white mess.
I know pine is not an ideal wood but since first project I thought on the cheap side. I’d rather not cut the defects out but have thought about routing them “clean” with an engraving bit…but then how best to fill.
I turn to the group for advice
Tom

Just FYI acetone dissolves super glue, so it will do the opposite of what you would want to do with an accelerator. I guess you probably already know that if you have used CA a lot, just mentioning in case.

If Titebond Clear is anything like Titebond 1/2/3 it will not like filling gaps that large, the normal TB wood glues like as small a gap as possible.

I would recommend some form of epoxy for filling, but I will let the folks that have done this specific sort of thing more get into the recommendations as to what specific kind for tabletops. You will probably have to mechanically remove the existing glue residues down to bare wood for the best result.
 
Last edited:

Graywolf

Board of Directors, President
Richard
Staff member
Corporate Member
Yep, I would suggest epoxy, you can use it clear or you can tint it with pigment. My favorite way is I use artist oil pant mixed with the epoxy to color it. It works well.
IMG_2878.jpeg

the bark inclusion in these drawer fronts was filled with epoxy colored with vandyke drown oil paint. Once dry I used a card scraper to remove the excess material and finished with shellac.
 

Dee2

Board of Directors, Vice President
Gene
Staff member
Corporate Member
if you want to use CA on cracks, pack the crack with saw dust first. if the crack is deep, work in layer. If the wood is not stable, it's gonna crack (more).

As Richard said, card scraper to clean up excess.
 

Craptastic

Matt
Corporate Member
I'd go with epoxy also. And next time you run out of accelerator you can use a fine dusting of baking powder and it will do the same job.
 

LomToon

New User
LomToon
I'd go with epoxy also. And next time you run out of accelerator you can use a fine dusting of baking powder and it will do the same job.
Well…thank you all so far for being so polite in calling me a moron…lol.
I figured out the acetone thing well after the fact.
I think my biggest problem right note is how to remove the white layers within the splits. Pretty sure the largest split is stable now as a fair amount of glue did actually fully harden…but white as a sheet now
 

Scott H

New User
Scott
I think my biggest problem right note is how to remove the white layers within the splits. Pretty sure the largest split is stable now as a fair amount of glue did actually fully harden…but white as a sheet now
Might be good to have a picture?

Sometimes when just the surface of a clear polymer is rough, fuzzy, scuffed or foamy it will appear white but it's still clear inside. You could maybe put a drop of water on the white parts and see if it turns clear while the water is present, if so you may be lucky and you could put clear epoxy on it and get a clear look without much work. If the whiteness goes deep into the set glue it is probably impossible to fix without physically removing that glue. You could maybe cover it up with a dark color instead. If it's a white appearance on the wood itself you will probably have to scrape or plane or sand it off.
 
Last edited:

Craptastic

Matt
Corporate Member
Might be good to have a picture?

Sometimes when just the surface of a clear polymer is rough, fuzzy, scuffed or foamy it will appear white but it's still clear inside. You could maybe put a drop of water on the white parts and see if it turns clear, if so you may be lucky and you could put clear epoxy on it and get a clear look without much work. If the whiteness goes deep into the set glue it is probably impossible to fix without physically removing that glue. You could maybe cover it up with a dark color instead. If it's a white appearance on the wood itself you will probably have to scrape or plane or sand it off.

And if you need to remove the previous attempts you should be able to use a hand carver and carve them out.

And, you are not a moron. You tried and kept trying to do something that you thought would work. If that makes a moron, well welcome to a website full of morons because we have all been there before. Feel good in the knowledge that you fit right in.

That's why a website like this works so well. When we get done with our own stubborn obstinance we have other folks to ask.
 

LomToon

New User
LomToon
Liking this group already
Forgot to put a scale against it but the knot is almost 6” on the long end
 

Attachments

  • IMG_0331.jpeg
    IMG_0331.jpeg
    1.9 MB · Views: 119
  • IMG_0330.jpeg
    IMG_0330.jpeg
    2 MB · Views: 122

Henry W

Henry
Corporate Member
I'd be using a rotary tool like a Dremel or a Foredom and a burr tool or similar to 'carve out' your 'lessons'. If you don't have one, I'm in SW Raleigh, come by and use mine. Might be a mess of materials but a burr tool will dig it out. Once down to fresh wood you can refill with any prescription you like ( just not what you tried the 1st time). If interested, ask here for a PM from me; as a new user you may not yet have priveledges to initiate a private/direct message.

BTW I am never happy with my sawdust and glue filling of defects, but too lazy to pick up epoxy.
 

LomToon

New User
LomToon
Great idea Henry. I was first thinking an engraving bit for a router but I like the dremel idea better, bit more control
I’m in Iowa, but appreciate the helping offer fine sir
 

Henry W

Henry
Corporate Member
I’m in Iowa, but appreciate the helping offer fine sir
Hmmm, might not be worth the trip from Iowa for the use of a Foredom tool - but you'd get to see the genuine mess of a shop I am proud to call mine. Maybe still not worth the trip. Oh well.
 

LomToon

New User
LomToon
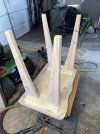
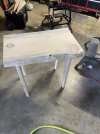
Project basically complete…
Not really a fan of the PolyShades as it applies kind of clunky, and it’s a bit darker than I planned for but first table.
I appreciate all the insight I received here and definitely have some things to take into learning and next projects.
 

Attachments

  • IMG_0360.jpeg
    IMG_0360.jpeg
    1.9 MB · Views: 120
  • IMG_0364.jpeg
    IMG_0364.jpeg
    1.7 MB · Views: 113
  • IMG_0366.jpeg
    IMG_0366.jpeg
    2.3 MB · Views: 115
  • IMG_0371.jpeg
    IMG_0371.jpeg
    2.4 MB · Views: 130
  • IMG_0370.jpeg
    IMG_0370.jpeg
    2.1 MB · Views: 120

Henry W

Henry
Corporate Member
Project basically complete…
Not really a fan of the PolyShades as it applies kind of clunky, and it’s a bit darker than I planned for but first table.
I appreciate all the insight I received here and definitely have some things to take into learning and next projects.
Well you can't leave us hanging on your methods. Results look great, but how did you clean up your earlier 'lessons'?
 

Scott H

New User
Scott
However you ended up fixing those splits and the white residue, it looks great, you couldn't tell you had to rework it.
 

LomToon

New User
LomToon
Somewhere along the way i obtained a 1/16”dremel burr. Never used it before but it fit really well into the crack. Took some care not to load it up and break it, but worked really well. Filled with epoxy. Took quite a while to sand down everything flat again but I got there.
Appreciate the reviews of the end result, but I know they’re there…
On to the next project, woodworking is my new hobby that I hope to turn into a side hack when I get comfortable enough
 

Henry W

Henry
Corporate Member
Somewhere along the way i obtained a 1/16”dremel burr. Never used it before .....
Ah so it's not just me that aquires things so as to later discover they have them - might be useful someday!

Glad you got to the finish line (without needing a roadtrip to Raleigh!).
 

Premier Sponsor

Our Sponsors

LATEST FOR SALE LISTINGS

Top