Using a rabbet plane

Status
Not open for further replies.

JimReed2160

New User
jim
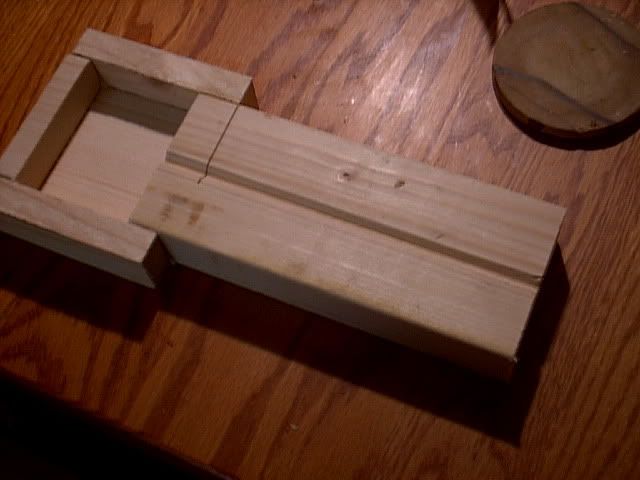
I picked up one of the LN 60 1/2R rabbet planes on sale and have been using it alot. The last project was a dowel jig that I made for a ww buddy at work. He needed some contrasting dowels. I knew his pain because I like to do the same. Like cherry table with walnut dowels pinned thru the mortices. BUT -- If you have ever cut up dowel sticks on your bandsaw, you have watched them dance around like little grasshoppers. It is pretty spooky. A coping saw is not much better because they usually break. Anyway, I came up with this little jig which began life as a 2x4. The little dowel pins just fall into the box on the end after they are cut. Pretty neat, huh? Well the challenge is the Vee groove. It is hard to do with a router, but is a snap with the LN rabbet plane. I started with a saw kerf from the backsaw. Then I used the plane and alternated sides. The Vee groove took about one minute and came out perfectly. Hand tools rock!
IMAG0404.jpg
 

Jim Murphy

New User
Fern HollowMan
While we're talking about rabbets here, let me share some knowledge I just gained. I know that 99% of you know this, so this is for the benefit of the other 1%.

I'm putting in a floor sweep as part of the DC effort. I got a 4X10X6" dia register boot from the BORG. The top of the pipe part is only 2" below the attachment wings, and the 6" DC pipe is 11-1/2" below the floor. I decided to make a simple box out of melamine to extend up to be flush with the floor.

Since it was melamine, I didn't want to use screws or trust glue to hold onto the plastic surface, so I hit upon the idea of using half-lap joints, so that the glue would contact the particle board guts of the stuff. I drew a simple picture (this is part of the problem... simple) and figured out the dimensions needed for an inside dimension of 4X10. Simple, 3/8" rabbets from each end, double 3/8" to get 3/4", cut stuff to 4-3/4" by 10-3/4". Cool.

Set up rabbeting bit in router, made a lot of dust that will soon be swept into the ClearVue but this time made a big mess. Test fit, looks good. Glued, clamped. Looks good.

For some reason, I measured the inside dimensions. Eeek! 3-5/8" X 9-5/8". :eusa_doh:

After I needed it, I gained the experience (thanks, Bas) to realize that half-lapped boxes need to have 3 times the lap depth added to account for the fact that one adjoining side has been reduced by half the lap. It's not a giant killer, since there's enough surface area to support the 6" pipe, but had this been a critical thingie I would be doing it again instead of typing this. And if I had drawn out the whole thing instead of just one side, MAYBE I would have realized my error. I kinda doubt it, though.
 

sapwood

New User
Roger
Jim,
Great use of a hand tool! I would guess it took less time to make the jig than set up the router and bits :icon_thum

Roger
 

JimReed2160

New User
jim
Not only less time, but made for a better Vee groove. The physics of router bit means that a vee cutter has almost no speed at its point. What you really need is a wheel cutter that cuts on the circumference. Except for this cut, you would need a 3" stem on said cutter to use it in your router. That takes you to shaper land.

If you want a Vee groove with a sharp and defined point, then a rabbet plane is the only practical game in town. (Unless you have one of my custom designed Vee groove cutters for your Stanley #45.)

The Vee was used alot in the past. Many desk pigeonhole dividers are held in such joints. It stands up well to wood movement. Has kinda gone out of favor in modern times.
 

willarda

New User
Bill Anderson
Another good use of a vee-groove plane is to define the track for a rounding plane when you are cutting molding by hand. You can plane a straight line to get an initial small groove that the round bottom plane can track into. Once you have run that rounder over the work a time or two then it will follow its own track. I have modified a plough plane blade to cut a vee-groove as well, since this will allow me to precisely locate parallel tracks.
 

willarda

New User
Bill Anderson
Another idea to keep those small parts from flying off is to drill a hole through a block of wood at the diameter of your dowel. Cut the block in half and glue the two halves to a small plywood base, separated just enough for the kerf of the bandsaw blade and a bit more so you can see where your mark is. Insert the dowel all the way through both holes, line your mark up with the kerf and cut the dowel. The advantage of this is that both ends of the dowel get support during the cut, the offcut is held in place, and your cut will be perfectly square to the end. If you are cutting many dowels of the same length, make the offcut side of the jig the length of your finished dowel size, and as you cut off lengths, set the stock even to the end of the hole on the offcut side and you will get exact repeat cuts.
 
Status
Not open for further replies.

Premier Sponsor

Our Sponsors

LATEST FOR SALE LISTINGS

Top